
Did you know that food presentation can increase perceived taste by up to 35%, according to culinary psychology research? When golden phyllo layers meet creamy cheesecake filling, the result is nothing short of a visual symphony that demands attention. This Baklava Cheesecake transforms two beloved desserts into one show-stopping centerpiece that’s as breathtaking to behold as it is delicious to taste. The interplay of textures—crispy, buttery phyllo contrasting with velvety smooth cream cheese—creates a dessert that photographs beautifully and elevates any gathering from ordinary to extraordinary. You’ll master the art of layering phyllo for maximum visual impact, learn professional plating techniques, and discover how to achieve that perfect golden-brown finish that makes this Baklava Cheesecake absolutely irresistible.
Why Baklava Cheesecake Matters
The visual presentation of this dessert transforms the entire eating experience, creating anticipation through its stunning layers and golden hues. When you combine the architectural beauty of traditional baklava with the elegant simplicity of cheesecake, you’re crafting more than just a dessert—you’re creating an edible work of art. For those seeking inspiration beyond this recipe, explore our Apple Crisp Cheesecake for another textural masterpiece, or discover Chocolate Pumpkin Cheesecake Bars for seasonal variations. Professional pastry chefs understand that proper phyllo layering techniques are essential for achieving those coveted crispy layers, while creative cream cheese applications can inspire countless variations of this stunning dessert.
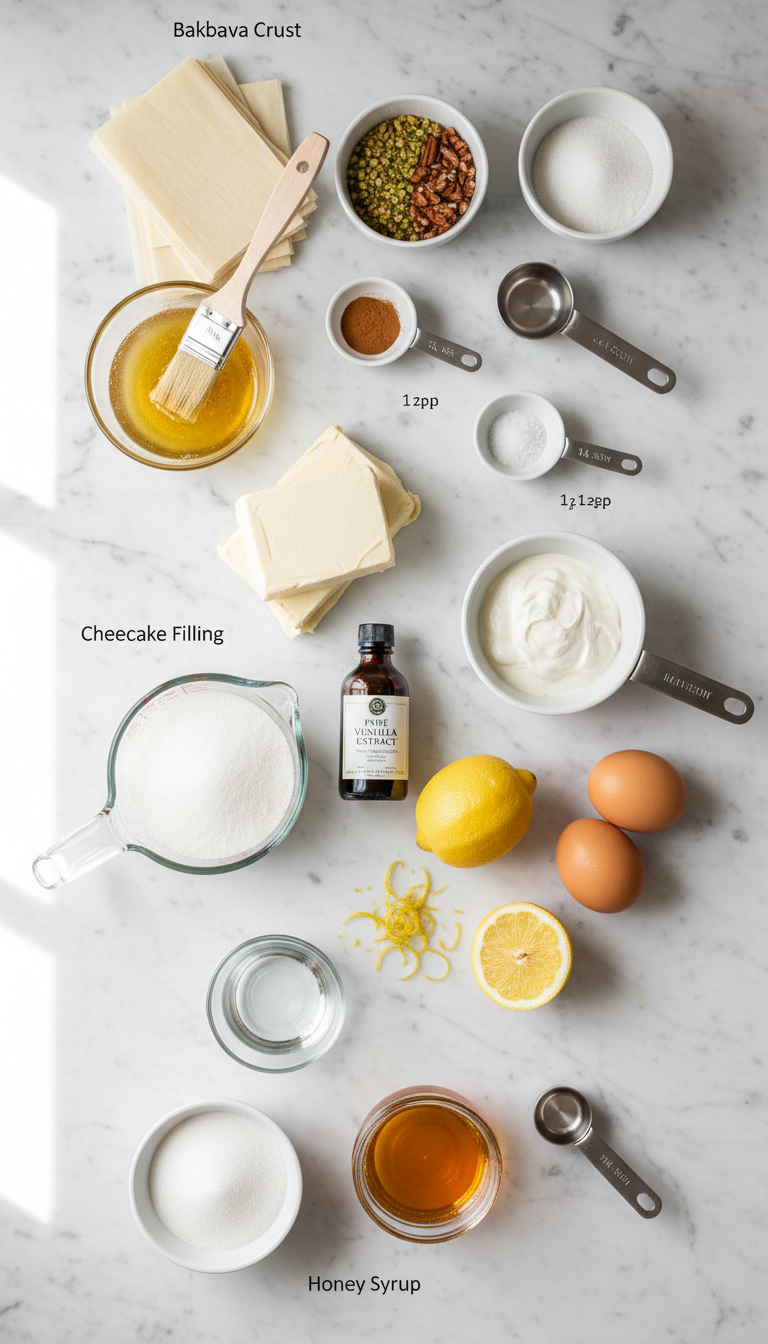
Ingredients
|
Ingredient Spotlight
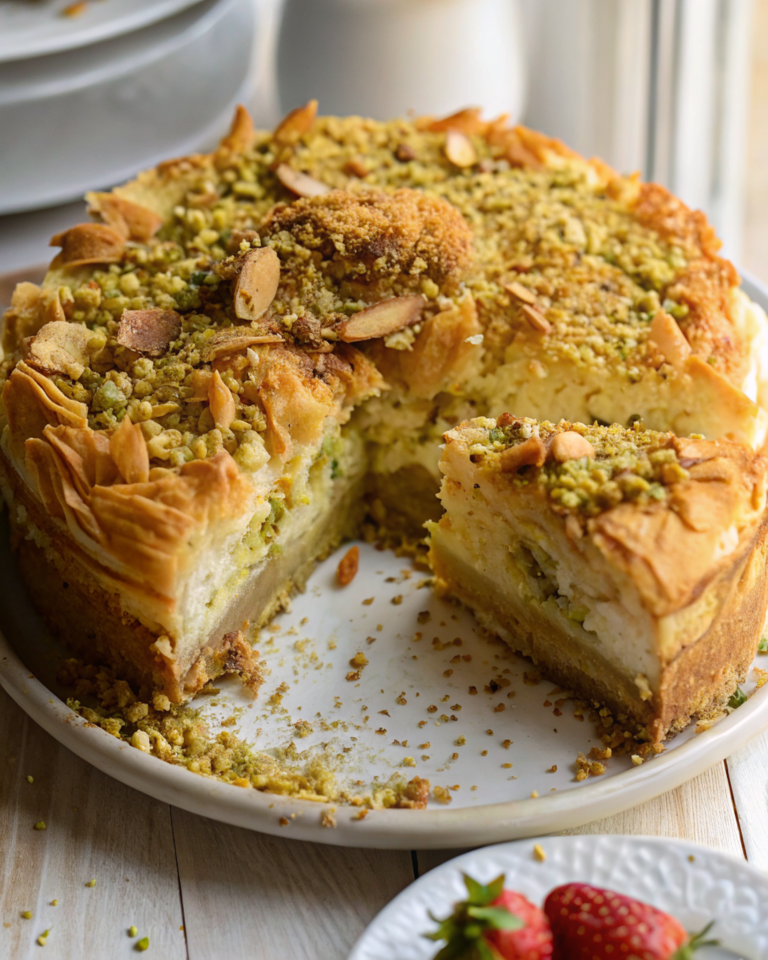
The phyllo sheets serve as your artistic canvas, creating those stunning paper-thin layers that catch light beautifully when baked. The combination of pistachios and pecans provides not just flavor but essential color contrast—the vibrant green of pistachios against the rich amber of pecans creates visual depth that makes each slice Instagram-worthy. Ghee is preferred over regular butter for its higher smoke point and richer golden color that photographs magnificently. The cream cheese filling acts as your neutral backdrop, allowing the colorful nut layers to pop visually while providing that signature cheesecake smoothness that contrasts beautifully with the crispy phyllo.
Timing
|
Instructions
|
Behind the Recipe
This Baklava Cheesecake was inspired by the geometric beauty of traditional Middle Eastern architecture—those stunning layered patterns you see in ancient palaces and mosques. The golden color palette mirrors the warm honey tones of Mediterranean sunsets, while the textural contrast between smooth and crispy echoes the interplay of marble and intricate tilework. Each layer tells a story, creating depth and visual interest that transforms a simple dessert into an edible masterpiece worthy of the most elegant table setting.
Tips & Tricks for Perfect Baklava Cheesecake
|
Recipe Variations & Substitutions
Mediterranean Twist: Replace pecans with almonds and add orange zest to the filling for a citrusy brightness that complements the golden color palette.
Chocolate Lover’s Version: Swirl melted dark chocolate into the cheesecake filling and sprinkle cocoa powder between phyllo layers for dramatic color contrast.
High Contrast Plating Option: Serve on stark white plates with a drizzle of pomegranate molasses for stunning color pop and professional presentation.
Textural Twist: Add a layer of crushed amaretti cookies between phyllo sheets for extra crunch and visual interest when sliced.
Pairing Ideas
Serve this stunning Baklava Cheesecake on elegant white or deep blue plates to make the golden phyllo layers pop visually. Pair with Turkish coffee or strong espresso in small, ornate cups that echo the Mediterranean theme. For color harmony, garnish plates with fresh mint leaves and a few whole pistachios. Consider serving alongside fresh figs or dates arranged artfully on a marble board, creating a beautiful dessert landscape that photographs magnificently. The rich textures pair wonderfully with sparkling grape juice served in crystal glasses for an elegant, non-alcoholic finish to any meal.
Nutritional Information
Per serving (12 servings total): Approximately 420 calories, 28g fat, 35g carbohydrates, 8g protein, 4g fiber. Rich in healthy fats from nuts and calcium from cream cheese. Contains eggs and dairy.
Leftover & Reuse Ideas
Transform leftover Baklava Cheesecake into elegant parfait layers by crumbling and layering with Greek yogurt and honey in clear glasses. The phyllo pieces can be saved and toasted as garnish for ice cream or fruit salads. Crumbled cheesecake makes an excellent base for cake pops when mixed with a little cream cheese and rolled into balls, then dipped in white chocolate for a sophisticated treat.
Serving Suggestions
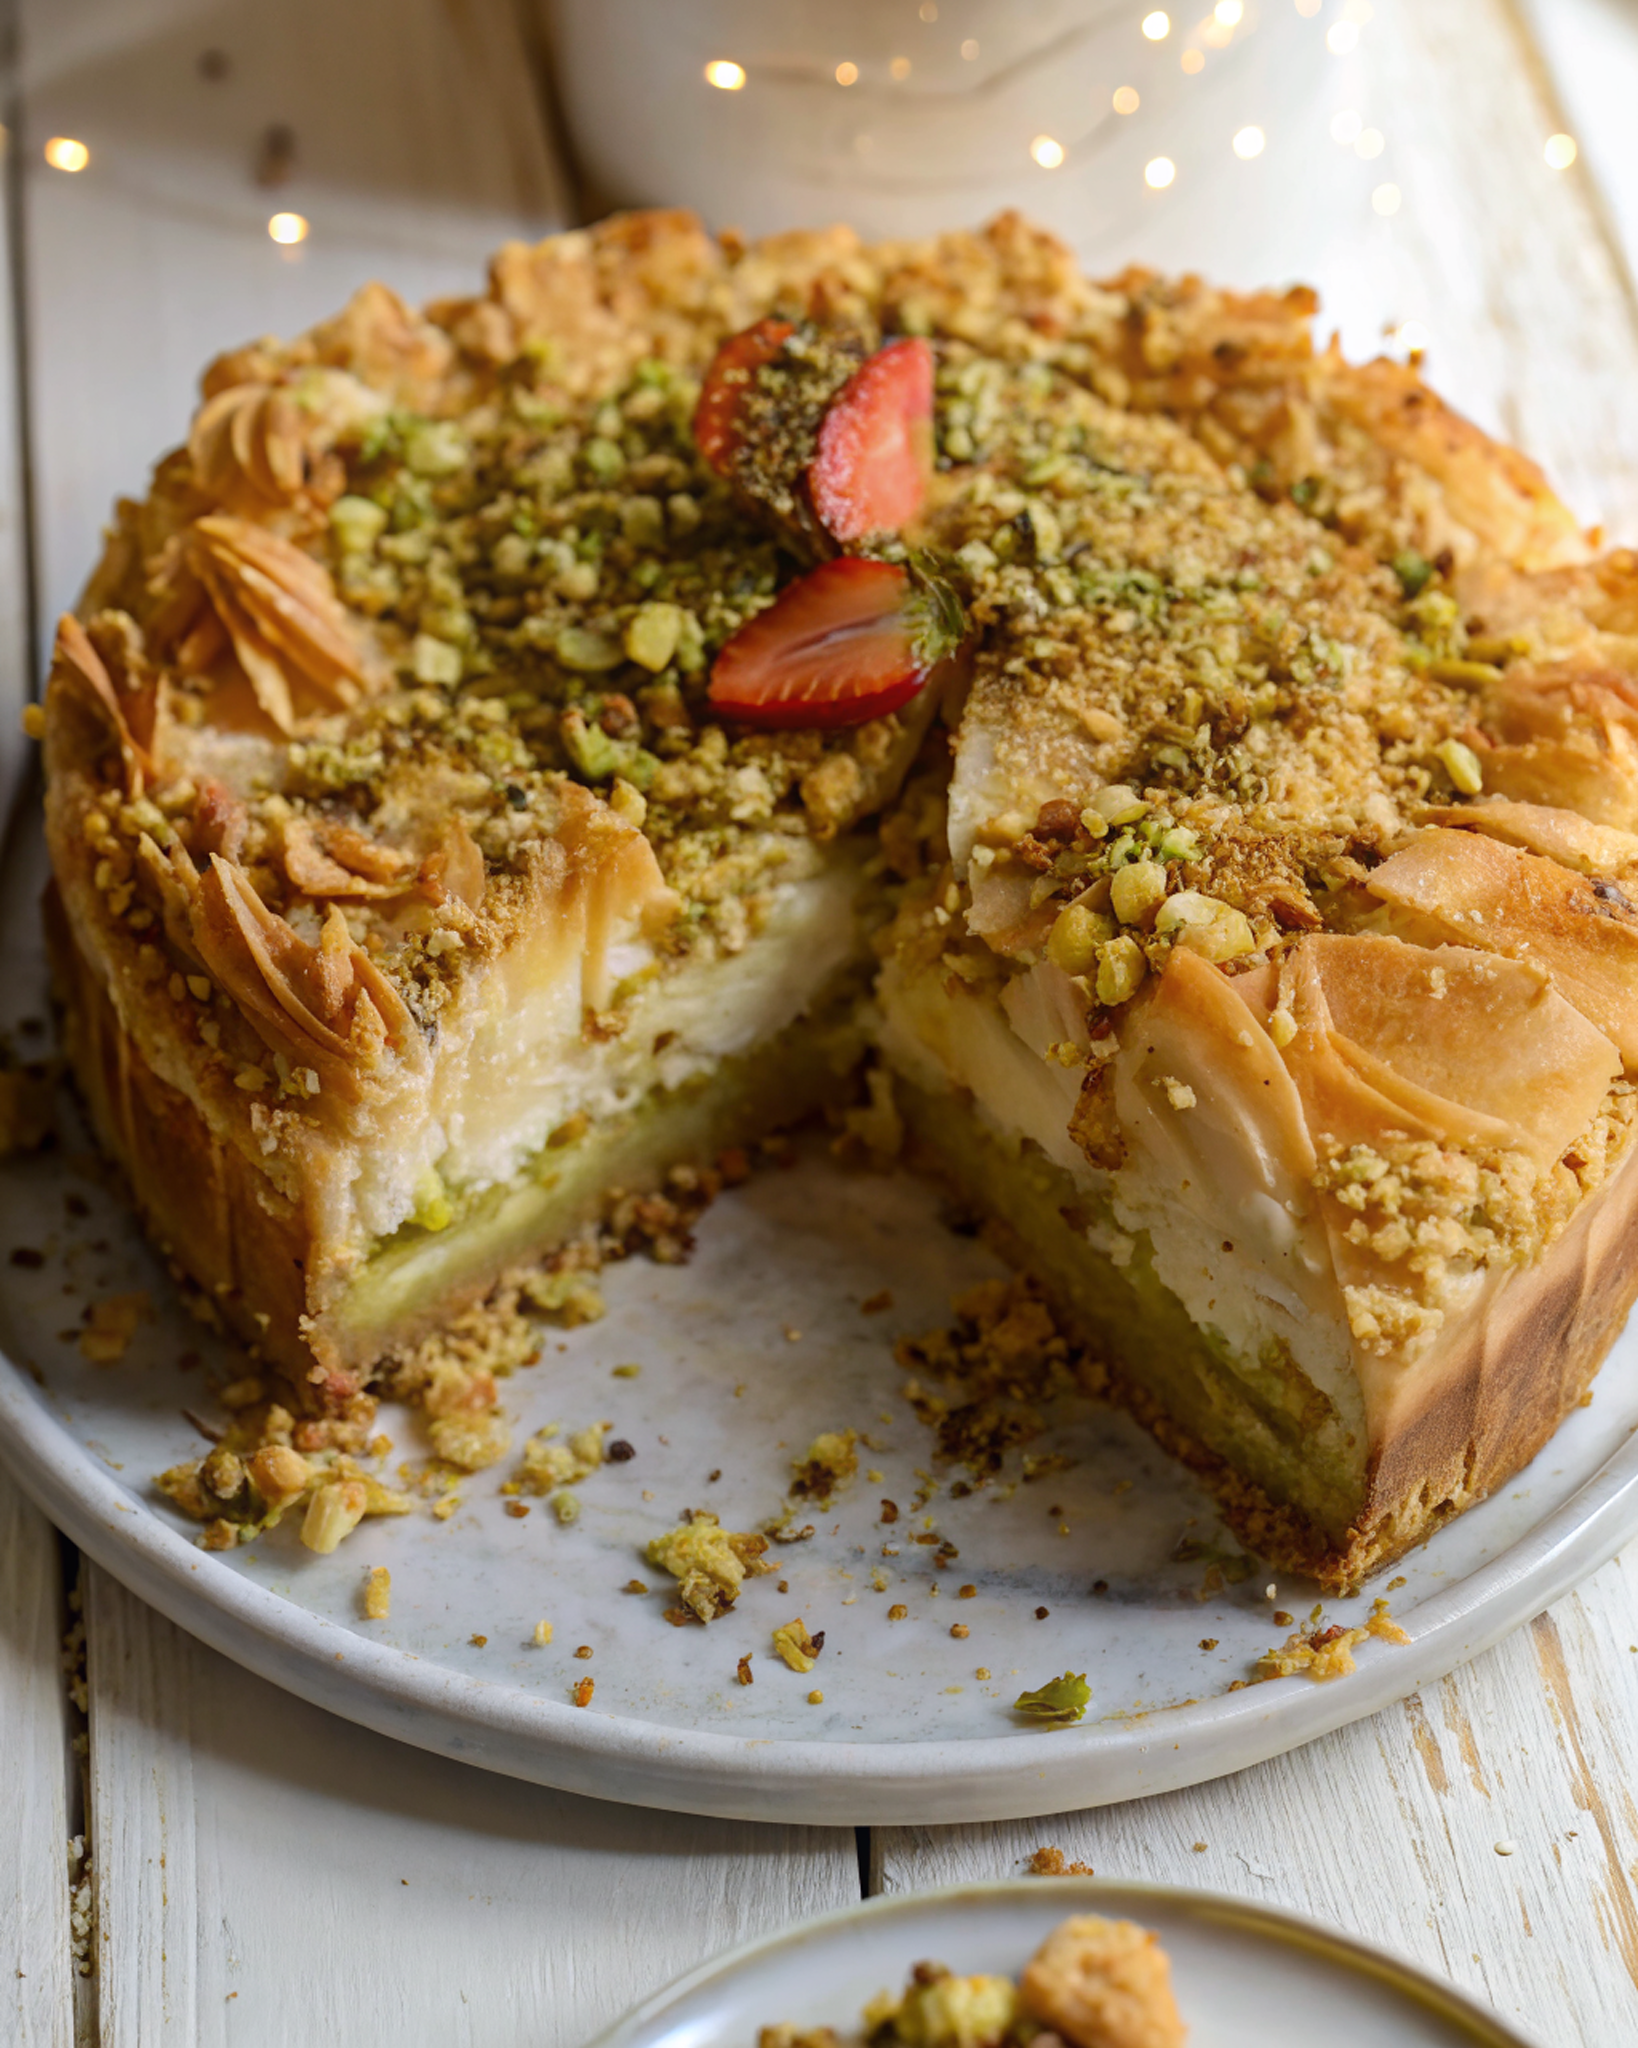
Present this Baklava Cheesecake as the centerpiece of your dessert table, elevated on a marble or wooden cake stand for maximum visual impact. Use a sharp, thin knife dipped in warm water between cuts to achieve those perfect, clean slices that showcase the beautiful layers. Garnish each plate with a light dusting of powdered sugar, a drizzle of honey, and three pistachios arranged in a triangle for professional presentation. For special occasions, add a small sprig of fresh mint and serve with small spoons and dessert forks on crisp white linens. The contrast between the rustic phyllo edges and elegant plating creates an irresistible visual story that guests will remember long after the last bite.
Storage & Reheating Tips
Store covered in the refrigerator for up to 5 days—the phyllo will soften slightly but maintains its delicious flavor. For best presentation, slice only what you need and keep the remainder whole. If you prefer crispier phyllo, place individual slices under the broiler for 30-60 seconds before serving, watching carefully to prevent burning. The cheesecake can be frozen for up to 3 months; thaw overnight in the refrigerator and let come to room temperature for 30 minutes before serving for optimal texture and visual appeal.
Common Mistakes to Avoid
Phyllo Pitfalls: Never let phyllo dry out completely—it becomes brittle and impossible to work with. Keep unused sheets covered with a damp towel.
Color Concerns: Overbaking creates dark, unappealing phyllo that photographs poorly. Watch for that perfect golden-brown color and remove promptly.
Texture Troubles: Adding eggs when the cream cheese mixture is too cold creates lumps that ruin the smooth visual appeal. Always use room temperature ingredients.
Syrup Mistakes: Pouring cold syrup on hot cheesecake can crack the surface. Both should be warm for proper absorption and that gorgeous glossy finish.
Cutting Catastrophe: Using a dull knife crushes the delicate layers. Always use a sharp, thin blade and clean it between cuts for pristine presentation.
- Can I make Baklava Cheesecake ahead of time for parties?
- Absolutely! This dessert actually improves with overnight chilling, making it perfect for entertaining. The flavors meld beautifully and the texture becomes ideal for clean slicing.
- Is Baklava Cheesecake difficult for beginner bakers?
- While it requires patience for the phyllo layering, the technique is quite forgiving. The rustic, ruffled appearance means imperfections add to its charm rather than detract from it.
- How do I prevent my Baklava Cheesecake from cracking?
- Use room temperature ingredients, don’t overmix the filling, and avoid overbaking. The phyllo covering also helps protect the cheesecake surface from temperature fluctuations.
- Can I substitute the nuts in Baklava Cheesecake?
- Yes! Try almonds, walnuts, or hazelnuts. Each creates different color contrasts and flavors while maintaining the essential textural element that makes this dessert so visually striking.
- What’s the secret to achieving golden phyllo in Baklava Cheesecake?
- Generous ghee application and proper oven temperature are key. The 325°F temperature allows the phyllo to crisp and brown gradually without burning, creating that coveted golden color.
FAQs
Conclusion
This Baklava Cheesecake represents the perfect marriage of visual artistry and incredible flavor, transforming any gathering into a memorable occasion. The interplay of textures, colors, and flavors creates a dessert that’s as much a feast for the eyes as it is for the palate. From the golden phyllo ruffles to the creamy center and jewel-toned nuts, every element contributes to a stunning presentation that photographs beautifully and tastes even better.
Made these Baklava Cheesecake? Drop your twist in the comments, rate the recipe, and tag us on facebook, instagram with #erinrecipes — we might feature your creation!

Stunning Baklava Cheesecake: A Visual Masterpiece Recipe
Ingredients
Instructions
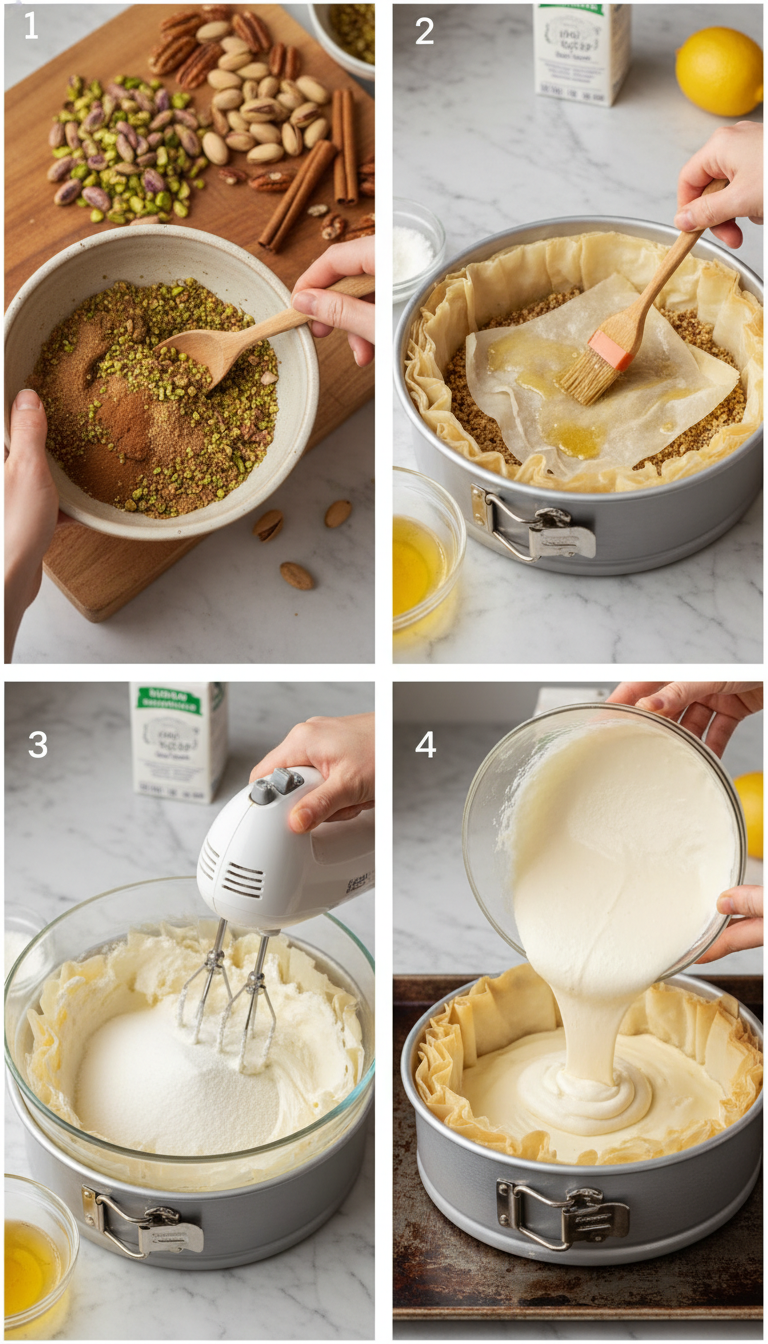
- Prep Ingredients: Prep your ingredients: the cream cheese, eggs and sour cream should be at room temperature before you begin making the filling. The nuts should be finely chopped (not to a powder, but into little bits). Mix together the sugar, cinnamon and ground nuts and set them in a bowl.
- Make Cheesecake Filling: In a bowl, beat together the sugar, vanilla, salt and cream cheese until smooth and no lumps remain. Add the sour cream and lemon juice and zest if using, and beat until smooth. Add the eggs and beat to just combine. Pour the filling into a bowl through a sieve to remove any remaining lumps.
- Assemble Baklava Crust: If your ghee is thick, warm it up in the microwave so it’s liquid and easy to brush onto the phyllo. Use a 9 or 10″ round springform pan, laying a sheet of parchment on the bottom and buckling it closed. Then begin layering the first ten sheets of phyllo: place the first sheet so it mostly covers the bottom of the pan but also comes up and folds over the side of the pan. Brush with ghee all over then place the second sheet so it also covers the bottom but only partially covers the top part – it’ll be slightly askew, covering the first sheet only halfway. Do this with ten sheets for the bottom layer, arranging each a little more clockwise so that you are covering the whole pan. After you have the tenth layer, brush with ghee and evenly sprinkle on half the nut mixture. Lay a sheet of phyllo on top and arrange 4 more on top of the nuts (each brushed with ghee and layered a bit askew to cover the whole pan). Spread remaining nut mixture then repeat the process with another 5 sheets of phyllo.
- Combine Filling and Crust & Bake: Pour the cheesecake mixture into the center of the unbaked phyllo crust. Scrunch up the sides of the phyllo that were laying over the edge into a ruffled shape (it’s okay if it tears, it need not be pretty) leaving a little gap in the center so you can see when the cheesecake is done baking. Bake the cheesecake on a sheet pan (the ghee tends to seep out and you don’t want a mess in the oven) at 325 F until you can shake the pan and it only jiggles a bit in the center, for about 60-70 minutes.
- Make Honey Syrup: Toward the end of baking, make the syrup: in a small pot set the water, sugar and honey (and a pinch of salt if you are like me and can’t help yourself) to cook on medium low heat. Stir so the sugar dissolves then cook it for about 5-7 minutes, until it is slightly thickened (but still pourable). Off the heat, add a few drops of lemon juice, if desired.
- Finish and Chill: When the cheesecake comes out of the oven, pour the syrup over the cheesecake – focusing mostly on the sides rather than the exposed center of the cheesecake. Optional: add a sprinkle of chopped nuts to the top of the pie. Let cool and then chill in the fridge overnight. Store in the fridge, serve cold.