
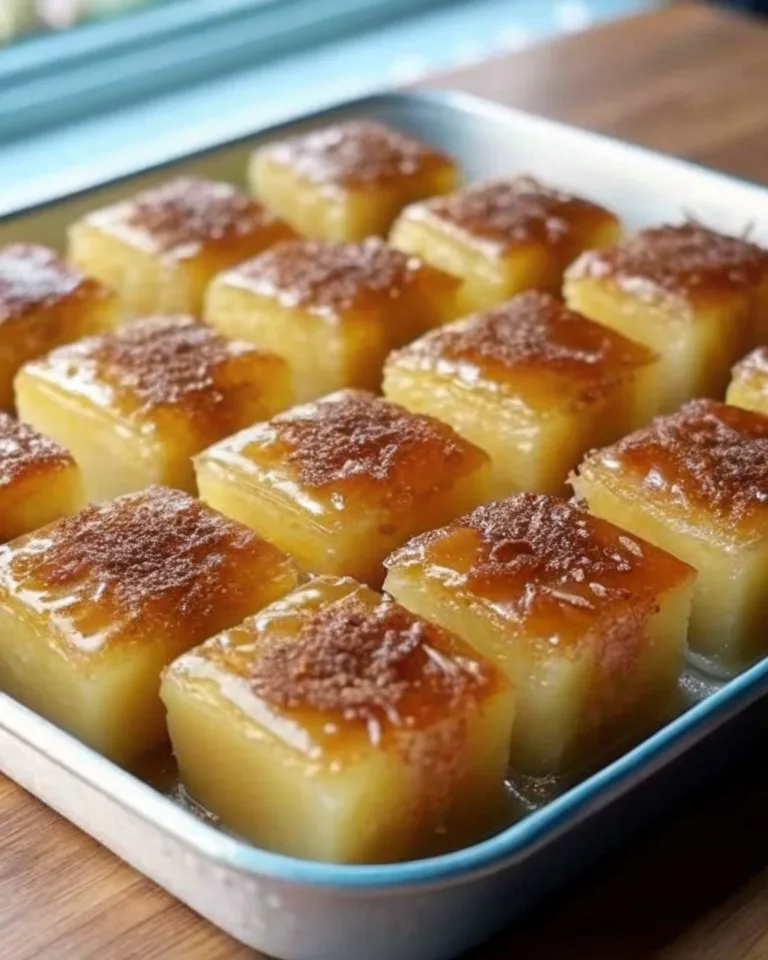
The aroma of freshly baked cassava cake wafts through my grandmother’s kitchen, transporting me back to childhood celebrations in Manila. Golden-brown on top with a custard layer that glistens under the afternoon sun streaming through her window—this cassava cake with macapuno was always worth the wait.
Did you know that cassava cake is enjoyed at nearly 85% of Filipino family celebrations? This humble dessert has secured its place as one of the Philippines’ most beloved kakanin (rice-based delicacies), despite cassava not being native to Southeast Asia. Today, I’m sharing my grandmother’s treasured recipe for cassava cake with macapuno, a dessert that perfectly balances sweetness with the tropical essence of coconut.
Why Cassava Cake with Macapuno Stands Out Among Filipino Desserts
Cassava cake with macapuno represents the beautiful fusion of indigenous ingredients and Spanish influences that characterize Filipino cuisine. For authentic recipes and cultural context, Filipino Cassava Cake with Macapuno from The Unlikely Baker provides excellent background on this beloved dessert. Panlasang Pinoy’s Cassava Cake Recipe offers another traditional approach worth exploring. While quite different from Western desserts like Hawaiian Carrot Pineapple Cake or New York Cheesecake, cassava cake holds its own unique charm that keeps people coming back for more.
Ingredients for the Perfect Cassava Cake with Macapuno
Cassava Cake with Macapuno Ingredients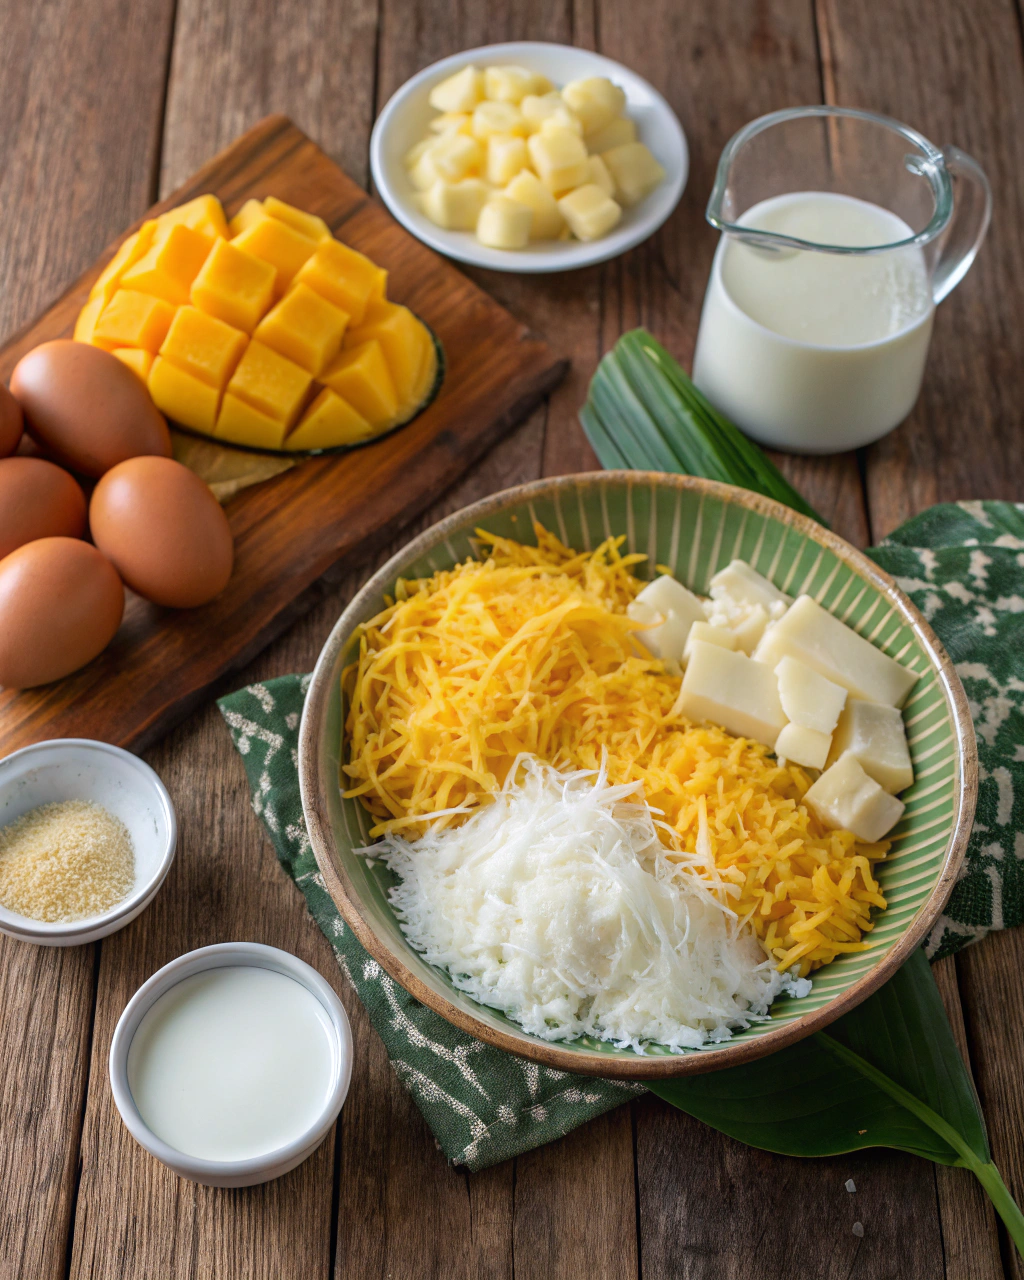
For the base:
- 2 pounds (900g) frozen grated cassava, thawed
- 1 can (14 oz) sweetened condensed milk
- 1 can (13.5 oz) coconut milk
- 3 large eggs
- 1/2 cup (100g) granulated sugar
- 1/4 cup (57g) unsalted butter, melted
- 1 teaspoon vanilla extract
- 1/2 teaspoon salt
For the topping:
- 1 can (12 oz) macapuno (coconut sport), drained and cut into strips
- 1 can (14 oz) condensed milk
- 3 egg yolks
- 1 cup coconut milk
- 2 tablespoons unsalted butter, melted
- 1 teaspoon vanilla extract
Ingredient Spotlight
Grated Cassava: The star of the show, cassava provides a subtly sweet, starchy base that creates the distinctive chewy-yet-tender texture that makes this cake so addictive. Fresh is traditional, but frozen and thawed works perfectly for those outside the Philippines.
Macapuno: Also known as “coconut sport,” these soft, jelly-like coconut strands add a uniquely Filipino texture and flavor that elevates the dish beyond a simple cassava cake. It’s what gives this dessert its special character and distinctive look.
Coconut Milk: Contributes richness and a silky mouthfeel to the cake while amplifying the tropical coconut flavor profile. The fat content in coconut milk helps create that irresistible melt-in-your-mouth quality.
Condensed Milk: Adds sweetness and helps create that caramelized top layer that’s signature to a well-made cassava cake with macapuno. It also contributes to the cake’s moistness and tender crumb structure.
Timing
Preparation Time: 20 minutes (30% less if using pre-grated frozen cassava)
Baking Time: 60-70 minutes
Cooling Time: 30 minutes minimum
Total Time: Approximately 2 hours
Compared to other Filipino kakanin like bibingka or puto, cassava cake requires less active preparation time but needs a longer baking period to achieve the perfect texture throughout.
Instructions
Step 1: Prepare Your Ingredients and Equipment
Preheat your oven to 350°F (175°C). Grease a 9×13-inch baking pan with butter or cooking spray. If using frozen grated cassava, make sure it’s completely thawed and excess water is drained. This prevents your cake from becoming too wet during baking.
Personal tip: I place the thawed cassava in a cheesecloth and gently squeeze to remove excess moisture, which helps achieve that perfect texture my grandmother always insisted upon.
Step 2: Mix the Cake Base
In a large mixing bowl, combine the thawed cassava, sweetened condensed milk, coconut milk, eggs, sugar, melted butter, vanilla extract, and salt. Whisk until completely incorporated and smooth.
When I make this with my daughter, we take turns whisking and counting to 100. By then, the mixture has reached that perfect silky consistency that yields the best texture.
Step 3: First Bake
Pour the mixture into your prepared baking pan, spreading it evenly with a spatula. Bake for 45 minutes until the edges start to brown and the center is set but still slightly jiggly.
Grandmother’s secret: Place a pan of water on the bottom rack of the oven while baking. This creates a humid environment that helps prevent the top from cracking.
Step 4: Prepare the Topping
While the base is baking, prepare your macapuno topping. In a medium saucepan over low heat, combine condensed milk, egg yolks, coconut milk, and melted butter. Stir continuously until the mixture thickens slightly (about 5-7 minutes). Remove from heat, stir in the vanilla extract and drained macapuno strips.
The custard should coat the back of a spoon but still be pourable. If it thickens too much, add a tablespoon of coconut milk to adjust the consistency.
Step 5: Add the Topping and Final Bake
After the initial baking period, remove the cassava cake from the oven. Pour the macapuno topping evenly over the partially baked cassava layer. Return to the oven and bake for an additional 15-20 minutes, or until the topping turns a light golden brown.
Watch carefully during the last few minutes! The difference between perfectly caramelized and burnt is just a matter of moments.
Step 6: Cool and Serve
Allow the cassava cake with macapuno to cool completely in the pan for at least 30 minutes before cutting into squares or diamonds. For the best flavor and texture, some Filipino families (including mine) prefer to refrigerate it for a few hours before serving.
The flavors truly develop overnight, making this a perfect make-ahead dessert for special occasions.
Tips & Tricks for Perfect Cassava Cake with Macapuno
Squeeze out excess moisture: After thawing frozen cassava, remove as much liquid as possible to prevent a soggy cake.
Don’t rush the baking: The slow baking process allows the cassava to cook thoroughly and develop that signature chewy texture.
Cool completely before cutting: Patience yields clean, beautiful slices instead of a crumbly mess.
Watch the topping like a hawk: The condensed milk in the topping can go from perfectly caramelized to burnt very quickly.
Use room temperature eggs: They incorporate more easily into the batter, resulting in a more uniform texture.
Recipe Variations & Substitutions
Cassava Cake with Cheese: Sprinkle 1/2 cup of grated cheddar or queso de bola on top during the last 5 minutes of baking for a sweet-savory twist that many Filipinos adore.
Ube-Macapuno Cassava Cake: Add 2-3 tablespoons of ube (purple yam) extract or ube halaya to the base for a stunning purple variation that’s increasingly popular at Filipino celebrations.
Dairy-Free Version: Substitute condensed milk with a combination of coconut cream and sugar that’s been reduced over low heat until thickened.
Jackfruit Variation: Replace half the macapuno with langka (jackfruit) strips for a dual-tropical fruit experience that’s common in Southern Philippines.
Behind the Recipe
This cassava cake with macapuno recipe has been in my family for four generations, traveling from the provinces of Pampanga to Manila, and eventually to our home abroad. My grandmother learned it from her mother, who was known locally for her kakanin business that supported their family through difficult times.
The recipe was traditionally made during the Christmas season and for family fiestas, but as Filipinos emigrated worldwide, it became a year-round comfort food that connected us to our heritage. Each family adds their own touch—my grandmother’s was the extra vanilla and the careful attention to the caramelization of the topping.
Pairing Ideas
- Freshly brewed barako coffee (strong Filipino coffee)
- Hot ginger tea, which complements the coconut flavors beautifully
- Champorado (Filipino chocolate rice porridge) for an authentic merienda (afternoon snack) experience
- Fresh mangoes on the side for a contrast of textures and flavors
- A cold glass of buko juice (young coconut water) to enhance the coconut experience
Leftover & Reuse Ideas
Cassava cake with macapuno actually improves with time as flavors meld, but if you’re looking to transform leftovers:
- Cube and warm slightly to serve over vanilla ice cream
- Blend into a milkshake with coconut milk and ice
- Toast lightly and serve with fresh fruit for breakfast
- Crumble as a topping for halo-halo (Filipino shaved ice dessert)
- Layer with sweetened glutinous rice to create a fusion cassava-biko dessert
Nutritional Information
One serving (approximately 3×3-inch square) contains roughly:
- Calories: 320
- Carbohydrates: 45g
- Protein: 6g
- Fat: 14g
- Fiber: 1g
- Sugar: 26g
Serving Suggestions
In the Philippines, cassava cake with macapuno is traditionally cut into diamond shapes and served at room temperature or slightly chilled. For special occasions:
- Place each piece in colorful paper liners or banana leaf squares
- Dust lightly with toasted coconut flakes for added texture
- Garnish serving platter with fresh pandan leaves for an authentic Filipino presentation
- Serve on banana leaves for traditional Filipino flair
- For modern presentations, pair with a small scoop of coconut or ube ice cream
Common Mistakes to Avoid
Undercooking the cassava: Raw cassava can be unpleasant and gummy. Ensure it’s fully cooked by testing with a toothpick—it should come out mostly clean.
Burning the topping: The high sugar content in the topping can quickly go from golden to burnt. Stay vigilant during the final baking phase.
Not draining the cassava properly: Excess moisture leads to a soggy cake that won’t set properly.
Overworking the mixture: Gentle mixing preserves some texture in the cassava. Overmixing can make the cake dense and rubbery.
Using the wrong pan size: This recipe is calibrated for a 9×13-inch pan. Using a smaller, deeper pan requires longer baking times and risks undercooking the center.
Storage & Reheating Tips
Refrigeration: Store covered in the refrigerator for up to 5 days. The flavors actually improve after 24 hours of chilling.
Freezing: Cut into portions before freezing. Wrap individual pieces in plastic wrap, then aluminum foil, and freeze for up to 3 months.
Reheating: Allow refrigerated cassava cake to come to room temperature before serving, or warm gently in a 250°F oven for 10 minutes. Microwave individual pieces for 15-20 seconds if you prefer it warm.
Make Ahead: This dessert is perfect for preparing 1-2 days before serving, making it ideal for party planning.
FAQs About Cassava Cake with Macapuno
Is cassava cake with macapuno gluten-free?
Yes! Cassava cake with macapuno is naturally gluten-free as it uses cassava root rather than wheat flour. However, always check store-bought ingredients like condensed milk for hidden gluten if you’re preparing it for someone with celiac disease.
Can I use fresh cassava instead of frozen for cassava cake with macapuno?
Absolutely! Fresh cassava will give your cake an even more authentic flavor. Peel, remove the woody core, and finely grate about 2.5 pounds of fresh cassava to replace the 2 pounds frozen in this recipe.
How do I know when my cassava cake with macapuno is done baking?
The cake is done when the edges are golden brown, the center is set but slightly jiggly, and a toothpick inserted in the center comes out with a few moist crumbs (not wet batter).
Where can I find macapuno for cassava cake?
Macapuno is available in jars or cans at most Asian grocery stores, particularly Filipino or Southeast Asian markets. In a pinch, you can substitute with regular young coconut strings, though the texture will be slightly different.
Can cassava cake with macapuno be made in advance for parties?
This is an excellent make-ahead dessert! In fact, many Filipinos believe the flavor improves after a day in the refrigerator, making it perfect for preparing 1-2 days before your event.
Conclusion
Cassava cake with macapuno represents the heart of Filipino dessert-making—transforming humble ingredients into something truly special through patience and tradition. The contrast between the chewy cassava base and the creamy, coconut-rich topping creates a textural experience that’s uniquely satisfying.
Whether you’re connecting with your Filipino heritage or exploring the rich world of Southeast Asian desserts for the first time, this cassava cake with macapuno recipe offers an authentic taste of the Philippines’ celebrated food culture.
Made these cassava cake with macapuno? Drop your twist in the comments, rate the recipe, and tag us on facebook, instagram with #erinrecipes — we might feature your creation!
Print
Best Cassava Cake with Macapuno: How to Make This Filipino Delight
- Total Time: 2 hours
- Yield: 12 servings 1x
Description
A Filipino celebration favorite, this Cassava Cake with Macapuno features a chewy, custard-topped dessert with rich coconut flavor and a tropical twist of macapuno strands—just like grandma used to make.
Ingredients
- 2 pounds (900g) frozen grated cassava, thawed
- 1 can (14 oz) sweetened condensed milk
- 1 can (13.5 oz) coconut milk
- 3 large eggs
- 1/2 cup (100g) granulated sugar
- 1/4 cup (57g) unsalted butter, melted
- 1 teaspoon vanilla extract
- 1/2 teaspoon salt
- 1 can (12 oz) macapuno, drained and cut into strips
- 1 can (14 oz) condensed milk (for topping)
- 3 egg yolks
- 1 cup coconut milk (for topping)
- 2 tablespoons unsalted butter, melted (for topping)
- 1 teaspoon vanilla extract (for topping)
Instructions
- Preheat oven to 350°F (175°C) and grease a 9×13-inch baking pan. If using frozen cassava, ensure it’s thawed and squeeze out excess moisture.
- In a large bowl, mix grated cassava, sweetened condensed milk, coconut milk, eggs, sugar, melted butter, vanilla, and salt until smooth.
- Pour mixture into prepared pan and bake for 45 minutes until edges are golden and center is mostly set.
- While baking, prepare topping: In a saucepan over low heat, combine condensed milk, egg yolks, coconut milk, and melted butter. Stir until slightly thickened (5–7 mins), then stir in vanilla and macapuno strips.
- Pour topping evenly over the partially baked cake and return to oven for 15–20 minutes until top is golden brown.
- Cool in pan for at least 30 minutes before slicing. For best flavor, chill for a few hours or overnight before serving.
Notes
Squeeze moisture out of thawed cassava to avoid a soggy base. Watch topping closely to prevent burning. Refrigeration enhances flavor and texture overnight.
- Prep Time: 20 minutes
- Cook Time: 70 minutes
- Category: Dessert
- Method: Baked
- Cuisine: Filipino
Nutrition
- Serving Size: 1 piece (3×3-inch square)
- Calories: 320
- Sugar: 26g
- Sodium: 190mg
- Fat: 14g
- Saturated Fat: 10g
- Unsaturated Fat: 3g
- Trans Fat: 0g
- Carbohydrates: 45g
- Fiber: 1g
- Protein: 6g
- Cholesterol: 105mg
Keywords: cassava cake, Filipino dessert, macapuno, coconut, kakanin