
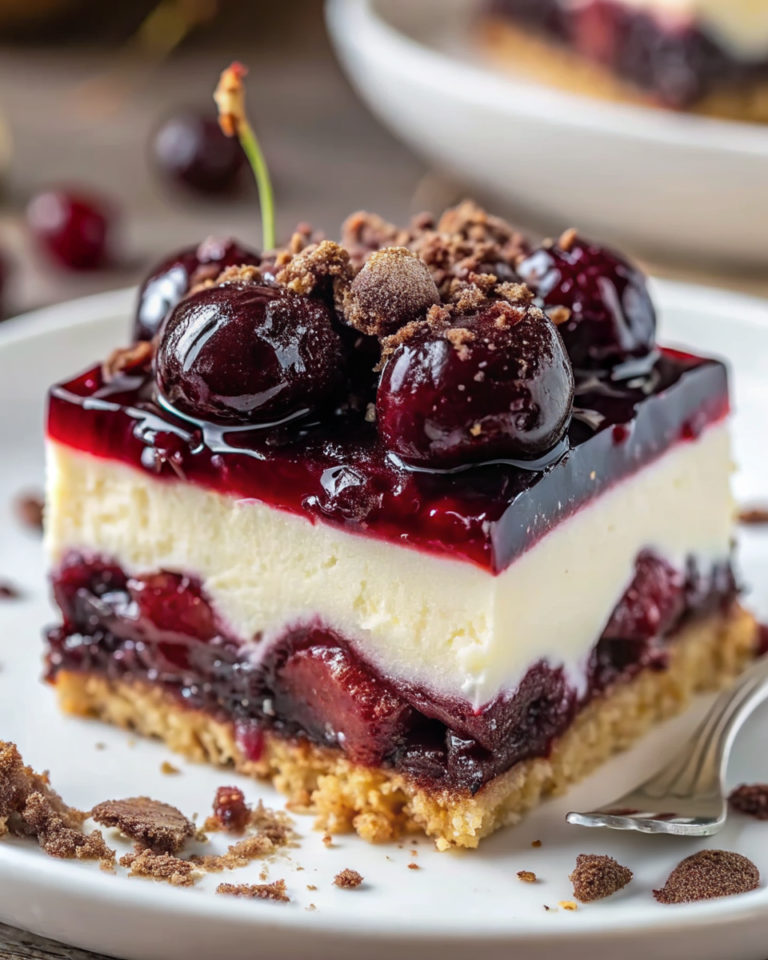
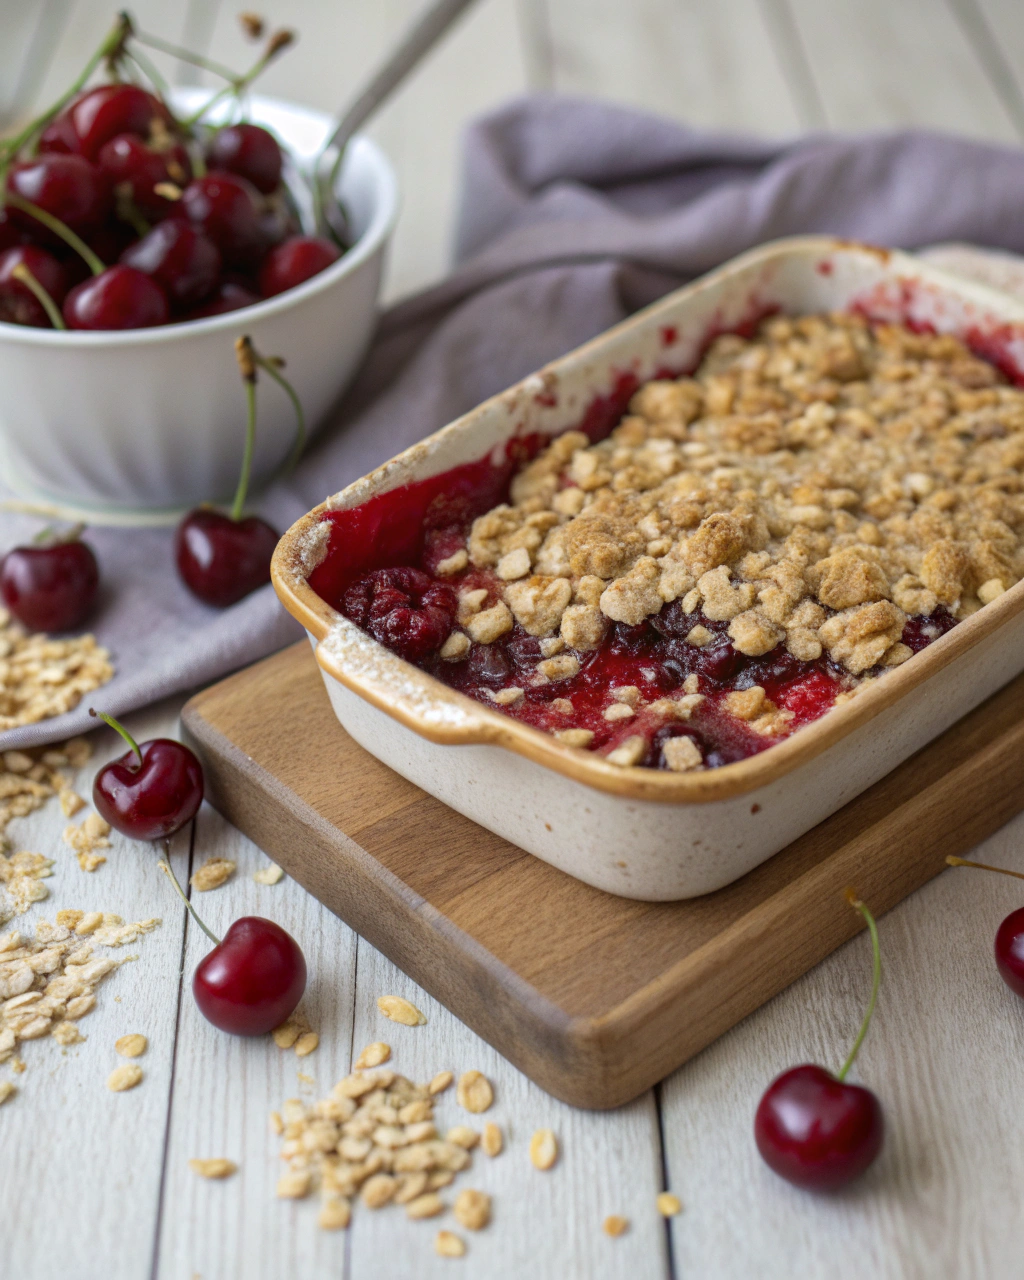
Nothing brings me quite the same joy as the aroma of a freshly baked cherry crumble filling the kitchen on a busy weeknight. This simple yet utterly satisfying dessert has become my go-to solution when I need something sweet that doesn’t require hours of prep or fancy techniques. With just a handful of pantry staples and one can of cherry pie filling, this cherry crumble transforms into a golden, bubbling masterpiece that makes any ordinary evening feel special. Whether you’re hosting unexpected guests or simply treating your family to something delightful, this recipe delivers bakery-quality results with minimal effort. You’ll discover how easy it is to create a dessert that looks impressive but comes together in under an hour, making it perfect for those moments when you want to end the day on a sweet note.
Why Cherry Crumble Matters for Your Home Kitchen
In the world of weeknight desserts, cherry crumble stands as a true champion of comfort and convenience. This dessert embodies everything we love about home baking: it’s forgiving, uses simple ingredients, and delivers that warm, cozy feeling that brings families together around the table. Unlike complicated desserts that require precise timing or advanced techniques, cherry crumble welcomes home cooks of all skill levels with open arms. The beauty lies in its rustic charm – those golden, slightly uneven crumbs and bubbling fruit create a homestyle appeal that fancy desserts simply can’t match. Most importantly, it’s a dessert that actually fits into real life, requiring minimal prep time while delivering maximum satisfaction.
Behind the Recipe
This particular cherry crumble recipe came to me during one of those hectic weeknights when I had promised my kids dessert but realized I had almost nothing in the pantry. As I stared at a lonely can of cherry pie filling and some basic baking staples, inspiration struck. I remembered my grandmother’s approach to crumbles – she always said the secret was in the butter-to-flour ratio and never overthinking the process. That evening, as we sat around the table enjoying warm spoonfuls of this impromptu creation, I knew I had stumbled upon something special. It became our family’s signature “emergency dessert” – the one we turn to when we need something comforting, quick, and guaranteed to make everyone smile.
External Resources
For those looking to expand their dessert repertoire, I highly recommend exploring our apple crisp cheesecake for another fruit-forward treat that’s equally crowd-pleasing. If you’re interested in perfecting your crumble technique, this comprehensive guide on crumble topping offers excellent tips for achieving that perfect texture. Additionally, our nectarine crisp provides a lovely summer variation using fresh stone fruit. For more cherry dessert inspiration, ZoëBakes has compiled a wonderful collection of 15 cherry desserts that are sweet and tart, perfect for expanding your cherry-loving horizons.
Ingredients
|
Ingredient Spotlight
The magic of this cherry crumble lies in understanding how each ingredient contributes to the final result. The butter serves as both flavor enhancer and binding agent – when melted and mixed with the dry ingredients, it creates those coveted crumbly clusters that become golden and crispy in the oven. The combination of flour and oats provides the perfect textural contrast: flour gives structure while oats add a delightful chewiness and rustic appearance. Brown sugar isn’t just about sweetness; its molasses content creates depth and helps achieve that beautiful caramelized color. That tiny amount of salt might seem insignificant, but it’s crucial for making all the other flavors pop. Finally, the cherry pie filling eliminates the guesswork of fresh fruit preparation while ensuring consistent results every time – those pre-sweetened, perfectly tender cherries create the ideal base for our crumble topping.
Timing
|
This cherry crumble is remarkably efficient, taking about 20% less time than traditional fruit crisps that require peeling and preparing fresh fruit. The beauty of using canned pie filling means you can have this dessert ready in under an hour, making it perfect for those spontaneous dessert cravings or last-minute dinner party additions.
Instructions
|
Tips & Tricks for Perfect Cherry Crumble
|
Recipe Variations & Substitutions
This versatile cherry crumble adapts beautifully to different dietary needs and flavor preferences. For a gluten-free version, substitute the all-purpose flour with your favorite gluten-free flour blend – almond flour works particularly well and adds a lovely nutty flavor. Busy parents will love the “dump and go” variation: simply combine all crumb ingredients in a bowl, press half into the pan, add filling, and top with remaining crumbs. For kid-friendly appeal, try adding a handful of mini chocolate chips to the topping or swapping the cherry filling for mixed berry. Health-conscious bakers can reduce the sugar by 2 tablespoons and add a teaspoon of cinnamon for extra warmth and flavor without additional sweetness.
Leftover & Reuse Ideas
Leftover cherry crumble (if you’re lucky enough to have any!) transforms beautifully into breakfast treats or afternoon snacks. Crumble it over Greek yogurt for a protein-packed breakfast that tastes like dessert, or warm individual portions in the microwave for 30 seconds for a quick comfort food fix. The crumble topping can be made ahead and frozen for up to three months – just sprinkle it directly from frozen onto fresh fruit for an instant dessert. You can also repurpose leftovers into a trifle by layering pieces with whipped cream and fresh berries, creating an entirely new dessert that looks elegant enough for special occasions.
Pairing Ideas
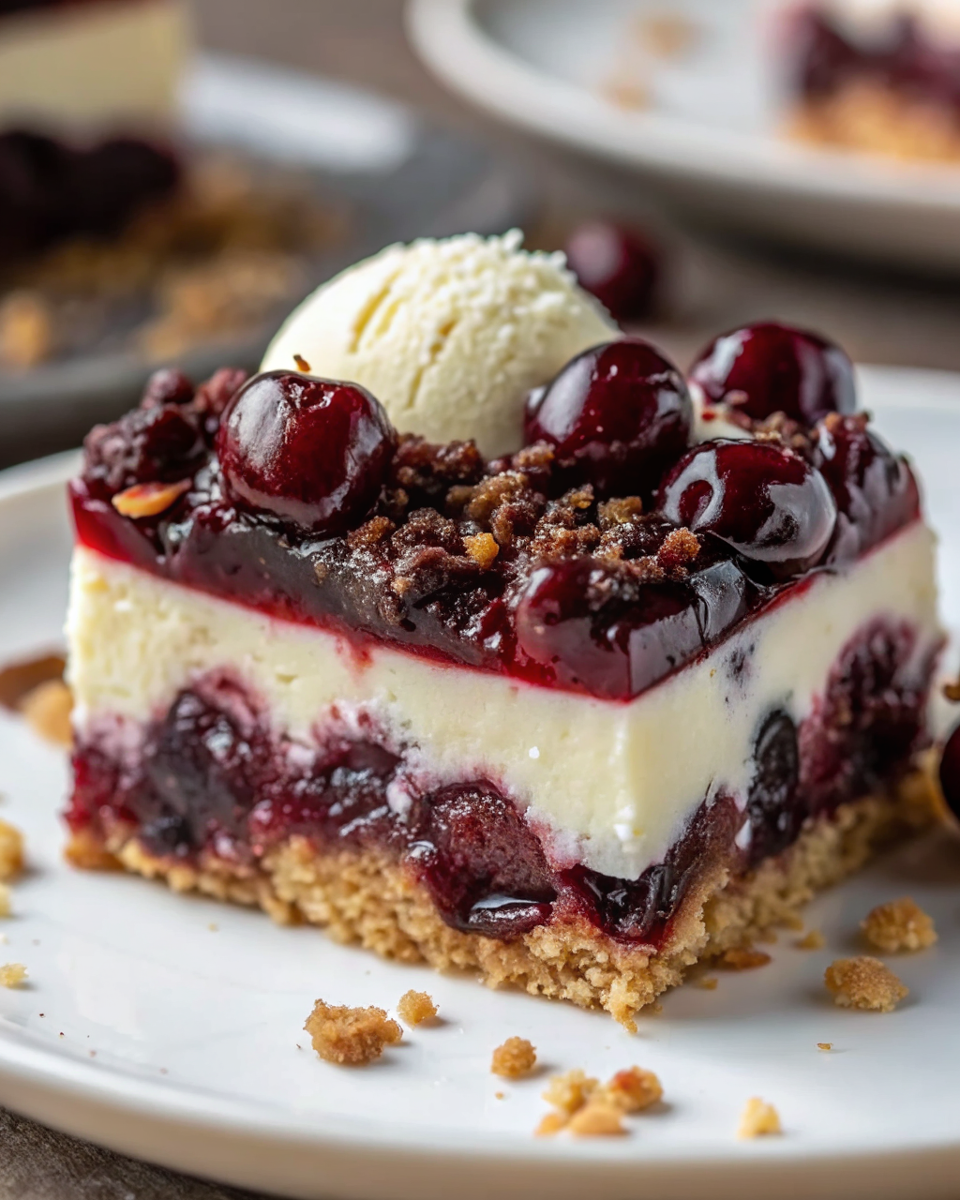
This cherry crumble pairs beautifully with simple, refreshing accompaniments that complement rather than compete with its rustic charm. A scoop of vanilla ice cream is classic for good reason – the cold creaminess balances the warm, textured fruit perfectly. For a lighter option, try a dollop of freshly whipped cream or a spoonful of Greek yogurt. Coffee lovers will appreciate how well this dessert pairs with a strong cup of coffee or rich hot chocolate. For special occasions, consider serving it alongside a glass of sparkling apple cider or a warm mug of spiced tea. The key is choosing accompaniments that enhance the cozy, homestyle nature of this beloved dessert.
Serving Suggestions
Presentation doesn’t need to be complicated to be beautiful with cherry crumble. Serve it directly from the baking dish for that authentic family-style appeal, or portion it into individual bowls for a more refined presentation. A light dusting of powdered sugar just before serving adds an elegant touch, while a sprig of fresh mint provides a lovely color contrast. For casual gatherings, set up a little dessert station with various toppings – whipped cream, ice cream, and chopped nuts – letting guests customize their portions. During holidays, consider baking it in individual ramekins for a more formal presentation that still maintains that homestyle warmth everyone loves.
Nutritional Information
Each serving of this cherry crumble (based on 12 servings) contains approximately 185 calories, 5g fat, 35g carbohydrates, 2g fiber, and 3g protein. The dessert provides vitamin C from the cherries and some beneficial fiber from the oats. The moderate portion size makes it a reasonable treat that can fit into most eating plans when enjoyed mindfully.
Common Mistakes to Avoid
Even with this forgiving cherry crumble recipe, a few common pitfalls can affect your results. The biggest mistake is overmixing the crumb topping – you want it to look rustic and varied, not uniform like cookie dough. Another frequent error is packing the bottom crust too tightly, which can result in a dense, heavy base instead of the tender foundation we’re after. Don’t worry if your first attempt isn’t picture-perfect; crumbles are meant to look homestyle and rustic. If the top browns too quickly, simply tent it with foil for the remaining baking time. Remember, even “imperfect” crumbles taste absolutely delicious, and practice makes perfect!
Storage & Reheating Tips
Store your cherry crumble covered in the refrigerator for up to 4 days, though it’s definitely best within the first two days. To reheat, warm individual portions in the microwave for 30-45 seconds, or reheat the entire dish in a 350°F oven for 10-15 minutes until warmed through. For make-ahead convenience, you can assemble the entire crumble up to 24 hours before baking – just cover and refrigerate, then add 5-10 minutes to the baking time. The crumb topping can also be prepared and frozen separately for up to 3 months, making it easy to have dessert ready whenever fresh or canned fruit calls your name.
- Can I make cherry crumble with fresh cherries instead of canned filling?
- Absolutely! Use about 4 cups of pitted fresh cherries mixed with ½ cup sugar and 2 tablespoons cornstarch. The baking time may need to be extended by 5-10 minutes to ensure the fresh fruit is properly cooked.
- Is cherry crumble suitable for freezing?
- Yes, this cherry crumble freezes beautifully for up to 3 months. Wrap tightly in plastic wrap and aluminum foil, then thaw overnight in the refrigerator before reheating.
- Can I make cherry crumble ahead of time for entertaining?
- Definitely! Assemble the entire dish up to 24 hours ahead, cover, and refrigerate. Add 5-10 minutes to the baking time when cooking from cold.
- What’s the best way to tell when cherry crumble is done baking?
- Look for active bubbling around the edges and a golden-brown top. The filling should be bubbling vigorously, and the crumb topping should be crisp and well-colored.
- Are there any good substitutions for the oats in cherry crumble?
- You can substitute the oats with chopped nuts, additional flour, or even crushed graham crackers for different textures and flavors while maintaining the same delicious results.
Frequently Asked Questions
Conclusion
This cherry crumble proves that the most satisfying desserts often come from the simplest ingredients and techniques. With its golden, crispy topping and bubbling cherry filling, it delivers all the comfort and warmth we crave in a weeknight-friendly package. The beauty lies not just in its delicious taste, but in how effortlessly it brings families together around the table, creating those sweet moments that make ordinary evenings feel special. Whether you’re a seasoned baker or just starting your culinary journey, this recipe offers the perfect combination of simplicity and satisfaction that will have you reaching for it again and again.
Made these Cherry Crumble? Drop your twist in the comments, rate the recipe, and tag us on facebook, instagram with #erinrecipes — we might feature your creation!

Easy Cherry Crumble Recipe – Perfect Weeknight Dessert
Ingredients
Instructions
- Gather Ingredients: Gather all ingredients.
- Preheat Oven: Preheat the oven to 375 degrees F (190 degrees C).
- Melt Butter: Melt butter in a large saucepan over medium heat.
- Mix Crumble: Remove from heat, then stir in flour, oats, brown sugar, and salt until mixture resembles dry crumbs.
- Press Base Layer: Press about 2/3 of the crumbs evenly into the bottom of a 9-inch square pan.
- Add Filling: Top with cherry pie filling and sprinkle with remaining crumb mixture.
- Bake: Bake for 40-45 minutes until cherries bubble and top is golden brown.
- Serve: Serve warm or at room temperature.