

Baking bread at home is an experience that engages all your senses, from the first whiff of dough rising to the satisfying crackle of a freshly baked crust. When you infuse this process with the rich, deep flavors of chocolate, you create something truly special: Chocolate Sourdough Bread. This unique combination blends the tangy, complex taste of traditional sourdough with the comforting sweetness of chocolate, resulting in a loaf that is both decadent and wholesome.
Chocolate Sourdough Bread is not just a treat for the palate; it’s a journey into the art of bread-making, where patience and skill meet creativity. Whether you’re a seasoned baker or a curious novice, this guide will take you through every step of crafting your own Chocolate Sourdough Bread, ensuring that each bite is as satisfying as the process itself.
What is Chocolate Sourdough Bread?
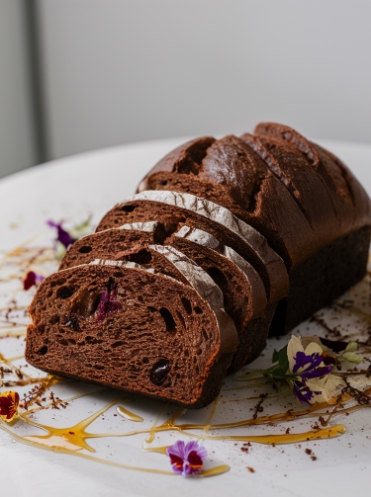
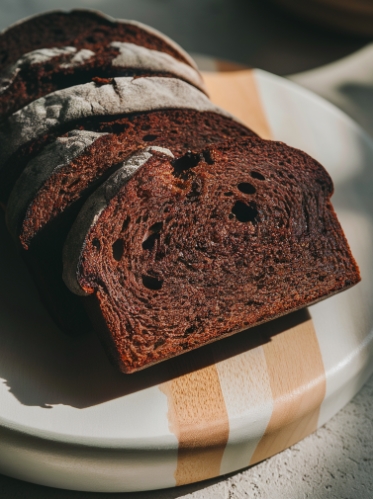
At its core, Chocolate Sourdough Bread is a variation of the classic sourdough loaf, enhanced with cocoa and chunks of chocolate. Unlike other sweet breads, it maintains the distinctive tang of sourdough, creating a balance of flavors that is both surprising and delightful. The bread’s crumb is typically soft and moist, with a rustic, hearty crust that adds texture and depth.
But what makes Chocolate Sourdough Bread truly stand out is its versatility. It can be enjoyed as a breakfast treat, paired with butter or jam, or served as an indulgent dessert, perhaps with a scoop of vanilla ice cream. The chocolate flavor is pronounced but not overwhelming, allowing the natural sourness of the bread to shine through.
History and Origins of Sourdough
Sourdough is one of the oldest forms of leavened bread, with origins dating back thousands of years. Ancient Egyptians are credited with the first known use of sourdough, accidentally discovering that wild yeast and bacteria in the environment could ferment dough, making it rise and giving it a tangy flavor. This method of bread-making spread across civilizations and has remained a staple in many cultures due to its unique taste and texture.
The resurgence of sourdough in modern kitchens is largely due to its perceived health benefits and the desire for more artisanal, hands-on food experiences. Unlike commercial yeasted breads, sourdough requires time, patience, and a good starter—a mix of flour and water that captures wild yeast and bacteria from the environment, creating the necessary fermentation for leavening the bread.
The Fusion of Chocolate and Sourdough
Combining chocolate with sourdough might seem unconventional, but it’s a pairing that works beautifully. The tangy, fermented flavor of sourdough contrasts with the sweet, rich taste of chocolate, creating a complex, layered flavor profile. Cocoa adds a depth of bitterness, while chocolate chunks melt into pockets of sweetness throughout the bread.
This fusion is not just about taste; it’s also about texture. The natural chewiness of sourdough is complemented by the creamy, melty chocolate, making each bite a unique experience. Additionally, the addition of cocoa gives the bread a dark, almost black crumb, making it visually striking and appealing.
Why Make Chocolate Sourdough Bread?
Aside from its delicious taste, Chocolate Sourdough Bread offers several benefits that make it worth the effort. Firstly, sourdough is known for being easier to digest than other types of bread. The fermentation process breaks down gluten and other complex carbohydrates, making the bread gentler on the stomach. When combined with chocolate, which contains antioxidants and other beneficial compounds, you get a treat that’s as nourishing as it is tasty.
Moreover, baking Chocolate Sourdough Bread at home allows you to control the quality of ingredients, ensuring that no unnecessary additives or preservatives are included. This makes it a healthier option compared to store-bought sweet breads. And let’s not forget the satisfaction that comes from baking something from scratch—a loaf of Chocolate Sourdough Bread is a labor of love, one that rewards you with both a culinary masterpiece and a deep sense of accomplishment.
Ingredients
To make the perfect Chocolate Sourdough Bread, the quality of your ingredients is paramount. Each component plays a critical role in the final product, so it’s important to choose wisely. Here’s what you’ll need:
- Flour: Bread flour is ideal for this recipe because of its high protein content, which contributes to a better gluten structure and a more elastic dough. However, you can also use a blend of bread flour and all-purpose flour for a slightly softer loaf.
- Cocoa Powder: Opt for high-quality, unsweetened cocoa powder to give your bread a rich chocolate flavor without adding extra sweetness. Dutch-processed cocoa powder is a good choice if you want a deeper, more intense flavor.
- Chocolate: Whether you prefer dark, semi-sweet, or milk chocolate, make sure to use a high-quality bar rather than chocolate chips, as bars tend to melt more evenly and create better pockets of chocolate in the bread.
- Sourdough Starter: This is the heart of your bread. A healthy, active starter will ensure a good rise and a proper fermentation process.
- Water: Use filtered water to avoid any chemicals or impurities that might affect the fermentation process.
- Salt: A small amount of salt is essential to balance the flavors and strengthen the gluten network.
- Optional Add-ins: Nuts, dried fruits, or spices can be added to customize your bread.
Choosing the Right Flour for Chocolate Sourdough Bread
Flour is the foundation of any bread, and in Chocolate Sourdough Bread, it plays a crucial role in the dough’s structure and texture. Bread flour, with its higher protein content, is generally preferred because it provides the necessary strength and elasticity for a good rise. The protein in bread flour forms gluten when mixed with water, which traps air bubbles and gives the bread its chewy texture.
However, if you prefer a softer crumb, you can mix bread flour with all-purpose flour. This will result in a loaf that is slightly less chewy but still has the necessary structure to support the addition of chocolate and cocoa.
The Role of Cocoa Powder
Cocoa powder is what gives Chocolate Sourdough Bread its rich, chocolatey flavor and deep color. When choosing cocoa powder, you have two main options: natural cocoa powder or Dutch-processed cocoa powder. Natural cocoa powder is more acidic and will give your bread a brighter, more intense flavor. Dutch-processed cocoa powder, on the other hand, is treated with an alkali to neutralize its acidity, resulting in a smoother, more mellow flavor.
For this recipe, either type can be used depending on your flavor preference. However, Dutch-processed cocoa powder is often preferred for its deeper color and less bitter taste, which complements the tanginess of the sourdough.
Selecting the Perfect Chocolate
The chocolate you choose will significantly impact the taste and texture of your bread. High-quality chocolate bars, rather than chocolate chips, are recommended because they melt more evenly and create larger, more luxurious pockets of chocolate throughout the loaf.
Dark chocolate is a popular choice because its bitterness contrasts nicely with the sourdough, but you can also use semi-sweet or milk chocolate if you prefer a sweeter loaf. For the best results, chop the chocolate into chunks rather than using chips, as this will create a more varied texture and ensure that every bite has a bit of chocolate.
The Importance of a Good Sourdough Starter
Your sourdough starter is the key to a successful loaf of Chocolate Sourdough Bread. A well-fed, active starter will give your bread the necessary lift and contribute to its complex flavor. If you don’t already have a starter, you can easily make one at home with just flour and water. It takes about five to seven days for a starter to become strong enough for baking, so plan ahead.
Maintaining your starter is simple: keep it in a warm place and feed it regularly with equal parts flour and water. The day before you plan to bake, give it a double feeding to ensure it’s at its peak activity level.
Tools You’ll Need
Baking Chocolate Sourdough Bread requires a few essential tools to ensure success. Here’s what you’ll need:
- Mixing Bowls: A large bowl for mixing the dough and smaller bowls for ingredients.
- Bench Scraper: Useful for handling and shaping the dough.
- Dutch Oven or Baking Stone: To create the perfect baking environment with steam, which helps develop a crispy crust.
- Proofing Basket (Banneton): Helps maintain the shape of the dough during the final rise.
- Kitchen Scale: For accurate measurement of ingredients.
- Lame or Sharp Knife: For scoring the dough before baking.
- Cooling Rack: To cool the bread evenly after baking.
Preparing Your Sourdough Starter
Before you begin mixing your dough, it’s essential to ensure your sourdough starter is in top condition. The night before baking, feed your starter with equal parts flour and water, and leave it at room temperature. By morning, it should be bubbly and active, ready to leaven your bread.
If your starter is stored in the refrigerator, you may need to feed it a couple of times in the days leading up to baking to bring it back to full strength. A strong, active starter is crucial for a good rise and the development of that signature sourdough flavor.
Mixing the Dough
Mixing the dough is where the magic begins. Start by combining the flour, cocoa powder, and salt in a large bowl. In a separate bowl, mix your sourdough starter with water until fully dissolved. Gradually add the wet ingredients to the dry ingredients, stirring until a shaggy dough forms.
This initial mixing stage, known as autolyse, allows the flour to fully hydrate and the gluten to begin developing. After letting the dough rest for about 30 minutes, it’s time to knead. Kneading is crucial for developing the gluten network, which will trap the gas produced by the fermentation and give your bread its structure.
Autolyse and Kneading
During the autolyse period, the flour absorbs the water, and the gluten begins to develop. This process makes the dough easier to handle and more elastic. After the autolyse, knead the dough by hand or using a stand mixer with a dough hook attachment. Kneading should continue until the dough is smooth, elastic, and passes the windowpane test—where a small piece of dough can be stretched thin without breaking.
The kneading process should take about 10-15 minutes by hand or slightly less with a mixer. Proper kneading ensures that the dough has enough strength to support the addition of chocolate and other ingredients.
Adding Chocolate to the Dough in Sourdough Bread
Once your dough is well-kneaded, it’s time to add the chocolate chunks. Gently fold the chocolate into the dough, distributing it evenly without overworking the dough. Overmixing can cause the chocolate to melt into the dough, which will affect the texture and distribution of the chocolate in the final loaf.
If you’re adding nuts or dried fruits, now is the time to incorporate them as well. Be sure to fold them in gently to avoid deflating the dough.
First Rise (Bulk Fermentation)
The first rise, or bulk fermentation, is where the dough undergoes most of its fermentation, developing flavor and structure. Place the dough in a clean, lightly oiled bowl, cover it with a damp cloth, and let it rise at room temperature for 4-6 hours, or until it has doubled in size.
During this time, the wild yeast and bacteria in the sourdough starter will feed on the sugars in the dough, producing carbon dioxide gas that causes the dough to expand. This is also when the characteristic sourdough flavor develops.
Shaping the Dough
After the first rise, gently turn the dough out onto a lightly floured surface. Flatten it slightly to release any large air bubbles, then shape it into a round or oval loaf. To shape, fold the dough over itself, creating tension on the surface to help it hold its shape during the final rise.
Once shaped, place the dough seam-side up in a floured proofing basket (banneton) or a bowl lined with a floured kitchen towel. Cover the dough and let it rest for 30-60 minutes, allowing it to relax before the final proof.
Second Rise (Proofing)
The second rise, or proofing, is the final step before baking. This is when the dough develops its final volume and texture. You can either proof the dough at room temperature for 1-2 hours or refrigerate it overnight for a slower rise, which will enhance the flavor.
If you choose to proof overnight, the cold temperature will slow down the fermentation process, allowing the flavors to develop more deeply. When you’re ready to bake, let the dough come to room temperature before proceeding.
Scoring the Dough
Scoring is the process of making shallow cuts on the surface of the dough just before baking. This allows the bread to expand properly in the oven, creating an attractive pattern on the crust. Use a sharp knife or a baker’s lame to score the dough with a few simple slashes or a more intricate design, depending on your preference.
Scoring is not just for aesthetics; it also helps control the direction in which the bread expands during baking, preventing it from bursting in unexpected places.
Baking the Bread
Preheat your oven to 475°F (245°C) and place your Dutch oven or baking stone inside to heat up. Carefully transfer the proofed dough onto a piece of parchment paper, then lift the parchment paper into the preheated Dutch oven. Cover with the lid and bake for 20 minutes.
After 20 minutes, remove the lid to allow the crust to brown and crisp up. Bake for an additional 20-25 minutes, or until the crust is deep brown and the bread sounds hollow when tapped on the bottom. For a softer crust, you can reduce the baking time slightly.
Cooling and Storing
Once your bread is baked to perfection, resist the urge to slice into it right away. Allow the bread to cool completely on a wire rack to set the crumb and improve the flavor. Cutting into hot bread can result in a gummy texture, so patience is key.
To store your Chocolate Sourdough Bread, wrap it in a clean kitchen towel and keep it at room temperature for up to three days. For longer storage, you can slice the bread and freeze it in an airtight bag. Simply toast or warm the slices in the oven before serving.
Variations on the Chocolate Sourdough Bread Recipe
While Chocolate Sourdough Bread is delicious on its own, there are endless ways to customize the recipe to suit your taste. Here are a few ideas:
- Nuts: Add chopped walnuts, pecans, or almonds for a crunchy texture.
- Dried Fruit: Mix in dried cherries, cranberries, or raisins for a sweet-tart contrast.
- Spices: Enhance the flavor with a pinch of cinnamon, cardamom, or chili powder for a subtle kick.
- Citrus Zest: Brighten the flavor with a touch of orange or lemon zest.
- Chocolate Variations: Experiment with white chocolate, caramelized chocolate, or even cocoa nibs for a different twist.
Common Mistakes to Avoid
Baking bread can be a delicate process, and even small mistakes can affect the final outcome. Here are some common pitfalls to avoid when making Chocolate Sourdough Bread:
- Using an Inactive Starter: Make sure your sourdough starter is active and bubbly before you begin. An inactive starter will result in a dense, flat loaf.
- Overmixing the Dough: When incorporating chocolate and other add-ins, be gentle to avoid deflating the dough.
- Underproofing: Give your dough enough time to rise during both the bulk fermentation and the proofing stages. Underproofed dough will be dense and gummy.
- Incorrect Oven Temperature: Ensure your oven is fully preheated before baking. An incorrect temperature can lead to uneven baking and a pale crust.
- Cutting the Bread Too Soon: Allow the bread to cool completely before slicing to avoid a gummy texture.
Serving Suggestions
Chocolate Sourdough Bread is incredibly versatile and can be enjoyed in many ways. Here are a few serving suggestions to make the most of your homemade loaf:
- Breakfast: Serve toasted slices with butter, honey, or your favorite jam.
- Dessert: Pair with a scoop of vanilla or coffee ice cream for an indulgent treat.
- Snack: Enjoy with a spread of ricotta and a drizzle of honey.
- Gourmet Sandwich: Use it as a base for a sweet and savory sandwich with brie and fig jam.
- French Toast: Turn leftover slices into decadent French toast with a sprinkle of powdered sugar and fresh berries.
Health Benefits of Chocolate Sourdough Bread
Chocolate Sourdough Bread offers more than just delicious flavor; it also comes with a variety of health benefits. Sourdough is known for its easier digestibility compared to other breads, thanks to the fermentation process that breaks down gluten and other complex carbohydrates. This makes it a good option for those with mild gluten sensitivities.
The addition of cocoa and dark chocolate provides antioxidants, which can help protect your cells from damage and improve heart health. Plus, chocolate is known to have mood-boosting properties, making this bread not only a treat for your taste buds but also a boost for your well-being.
FAQs
How long does it take to make Chocolate Sourdough Bread?
The entire process, including the preparation of the sourdough starter, mixing, rising, and baking, takes about 24-48 hours. However, most of this time is hands-off, allowing the dough to ferment and develop flavor.
Can I use milk chocolate instead of dark chocolate?
Yes, you can use milk chocolate if you prefer a sweeter loaf. However, dark chocolate is recommended for a more balanced flavor that complements the sourdough.
Is Chocolate Sourdough Bread suitable for beginners?
While sourdough baking can be challenging, this recipe is detailed and designed to guide even novice bakers through the process. With patience and attention to detail, beginners can achieve great results.
What is the best way to store Chocolate Sourdough Bread?
Store the bread at room temperature in a kitchen towel or bread box for up to three days. For longer storage, freeze slices in an airtight bag and toast them before serving.
Can I add other ingredients like nuts or dried fruit?
Absolutely! Nuts, dried fruit, and spices can all be added to customize your Chocolate Sourdough Bread. Just be sure to fold them in gently to avoid deflating the dough.
Why is my bread dense and not rising properly?
Dense bread can be a result of using an inactive starter, underproofing, or not kneading the dough enough. Make sure your starter is bubbly and active, and give the dough enough time to rise fully.
Conclusion
Chocolate Sourdough Bread is a delightful fusion of flavors, combining the tangy complexity of sourdough with the rich sweetness of chocolate. Baking this bread at home is a rewarding experience that results in a loaf that is as beautiful as it is delicious. Whether you enjoy it for breakfast, as a snack, or as a dessert, Chocolate Sourdough Bread is sure to become a favorite in your baking repertoire. So, gather your ingredients, feed your sourdough starter, and embark on the delicious journey of making Chocolate Sourdough Bread.
Inbound Links:
Outbound Links: