
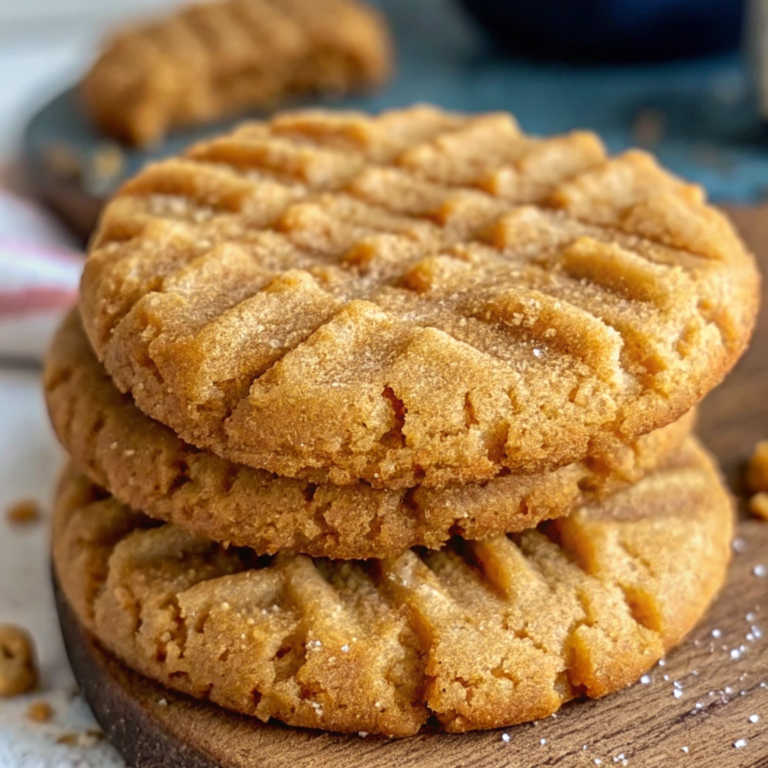
Did you know that 94% of people judge food by its visual appeal before taking their first bite? When it comes to Old-Fashioned Peanut Butter Cookies, the presentation is just as important as the taste. That signature cross-hatch pattern isn’t just decorative—it’s a visual promise of the rich, buttery texture waiting inside. These golden beauties represent the perfect marriage of rustic charm and refined technique, where every ridge and golden edge tells a story of careful craftsmanship. As someone who believes that food is art on a plate, I’m here to guide you through creating cookies that don’t just taste incredible but look absolutely stunning on your table.
Why Perfect Old-Fashioned Peanut Butter Cookies Matter
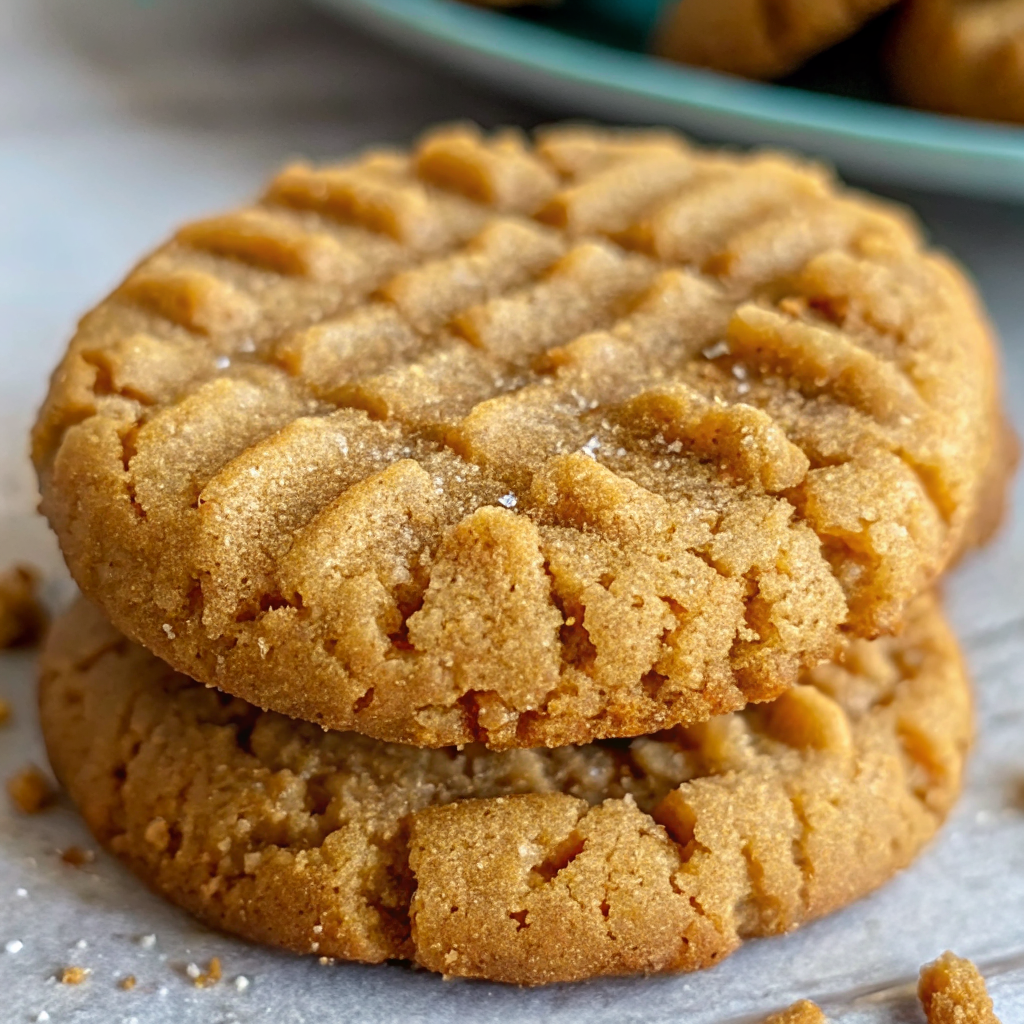
The visual impact of perfectly executed Old-Fashioned Peanut Butter Cookies extends far beyond mere aesthetics—it transforms the entire eating experience. When cookies display that coveted golden-brown hue with crisp edges and tender centers, they communicate quality and care to anyone who sees them. The iconic fork pattern creates textural interest and helps the cookies bake evenly, while the slightly cracked surface promises that perfect chewy bite. For more dessert inspiration that celebrates visual appeal, explore our Peanut Butter Cup Cookies and discover techniques from The Best Chocolate Chip Cookie Recipe Ever. Understanding the rich history of peanut butter also helps appreciate why these cookies have remained a beloved classic. Check out our No-Bake Chocolate Chip Cookie Dough Bars for another stunning cookie presentation.
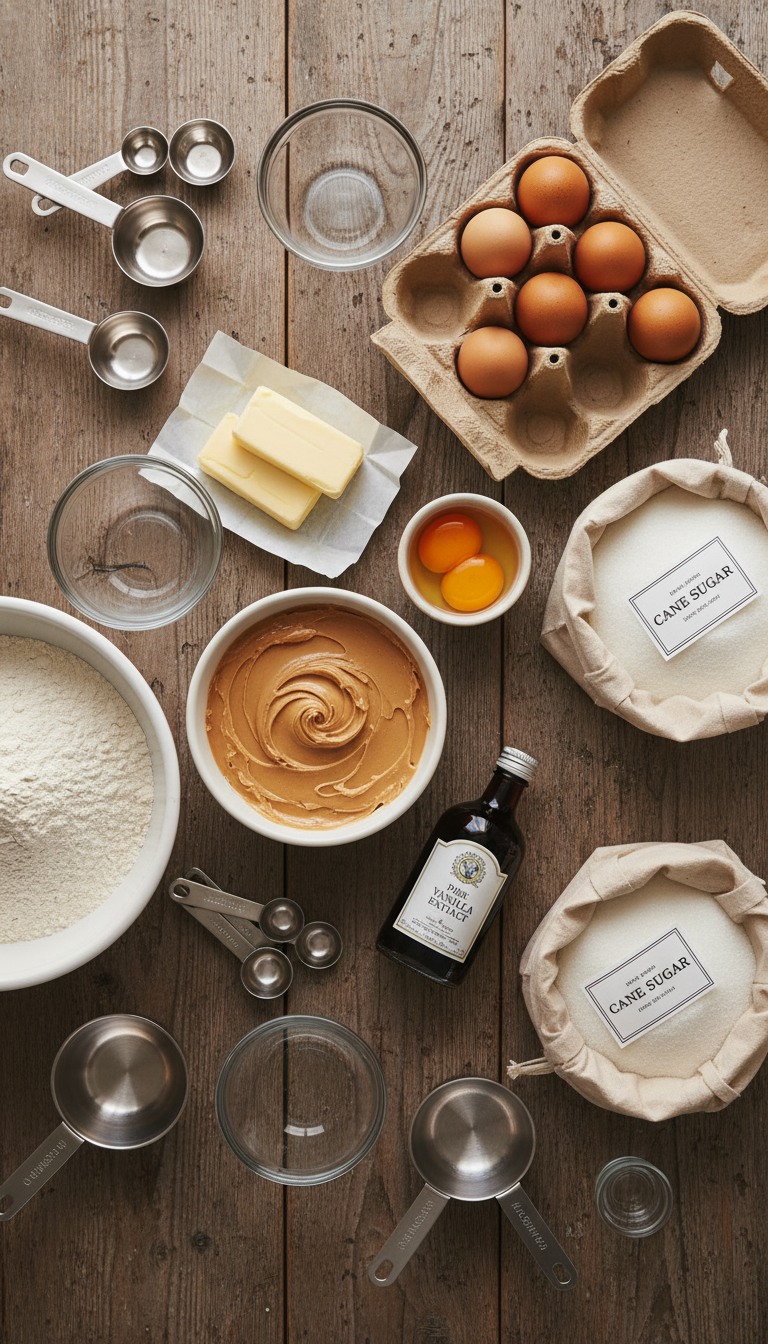
Ingredients
|
Substitution Ideas: Natural peanut butter works beautifully but may create a slightly more rustic appearance. For dairy-free versions, use plant-based butter, though the golden color may be slightly less vibrant. Coconut sugar can replace brown sugar for a deeper, more complex hue.
Ingredient Spotlight
The creamy peanut butter serves as our canvas, providing that signature golden base that makes these cookies instantly recognizable. The combination of brown and granulated sugars creates visual contrast—the brown sugar contributes to the rich, amber interior color, while granulated sugar helps achieve those coveted crispy, slightly sparkly edges. Room temperature butter is crucial for achieving the perfect texture that photographs beautifully, creating cookies that hold their shape while maintaining that appetizing, slightly rustic appearance that makes Old-Fashioned Peanut Butter Cookies so visually appealing.
Timing
|
Instructions
|
Behind the Recipe
The inspiration for these Old-Fashioned Peanut Butter Cookies comes from the timeless appeal of simple, honest ingredients transformed through careful technique. I wanted to capture that nostalgic golden warmth that makes these cookies so photogenic—the way light catches the textured surface, how the edges crisp to perfection while maintaining tender centers. The cross-hatch pattern isn’t just traditional; it’s a design element that creates shadows and depth, making each cookie a small work of art. The color palette of warm golds and rich ambers speaks to comfort and craftsmanship, while the slightly rustic appearance maintains that homemade charm that’s so appealing in food photography.
Tips & Tricks for Perfect Old-Fashioned Peanut Butter Cookies
|
Recipe Variations & Substitutions
High Contrast Plating Option: Roll cookie edges in coarse sugar before baking for sparkling, textured borders that catch light beautifully. Chocolate Drizzle Twist: Once cooled, drizzle with melted dark chocolate for elegant color contrast. Textural Enhancement: Press chopped peanuts into cookie tops before baking for added visual and textural interest. Gluten-Free Adaptation: Substitute almond flour for a nuttier flavor and slightly different texture that photographs beautifully with its more rustic appearance.
Pairing Ideas
Serve these golden beauties on white ceramic plates to emphasize their warm color, or arrange on dark wood boards for rustic charm. Pair with cold milk in clear glasses to create appealing color contrast, or serve alongside vanilla ice cream for temperature and texture variety. Fresh berries add vibrant color pops, while a dusting of powdered sugar creates elegant finishing touches. Consider serving on vintage-style cooling racks for that authentic, just-baked appearance that’s so appealing in food styling.
Nutritional Information
Per cookie (approximate): 185 calories, 10g fat, 21g carbohydrates, 4g protein, 2g fiber. Contains naturally occurring vitamins from peanut butter and eggs. These cookies provide sustained energy from the combination of proteins and complex carbohydrates.
Leftover & Reuse Ideas
Crumble leftover cookies over ice cream for textural contrast, or pulse in food processor to create cookie crumb crusts for cheesecakes. Broken pieces work beautifully in trifles, layered with pudding and whipped cream. Store properly baked cookies in airtight containers to maintain their appealing texture for up to one week.
Serving Suggestions
Present Old-Fashioned Peanut Butter Cookies on tiered serving stands to create height and visual interest. Arrange in overlapping circles on large platters, alternating directions to showcase the cross-hatch patterns. For photography, place cookies on parchment paper with scattered peanuts and a vintage measuring spoon as props. Use natural lighting to emphasize the golden color and textured surfaces. Consider serving in mason jars for gifts, layering cookies with parchment paper dividers. For special occasions, arrange on vintage cake pedestals with small bowls of milk for dipping, creating an inviting, nostalgic presentation that celebrates the homemade appeal of these classic treats.
Storage & Reheating Tips
Store completely cooled cookies in airtight containers at room temperature for up to one week. Layer between parchment paper to prevent sticking and maintain their beautiful appearance. For longer storage, freeze in freezer-safe containers for up to three months. To refresh day-old cookies, warm briefly in 300°F oven for 2-3 minutes to restore crispness. Avoid refrigerating as this can make cookies lose their appealing texture.
Common Mistakes to Avoid
Avoid overbaking, which creates dull, dark cookies instead of that appealing golden color. Don’t skip the cooling time on baking sheets—cookies continue cooking and set properly during this phase. Resist pressing fork patterns too deeply, which flattens cookies and reduces visual appeal. Don’t overcrowd baking sheets, as this prevents even browning and proper spreading. Avoid using cold ingredients, which can create dense cookies that don’t photograph well due to poor texture development.
- Are Old-Fashioned Peanut Butter Cookies gluten-free?
- Traditional recipes contain all-purpose flour, but you can substitute gluten-free flour blends for similar results with slightly different texture.
- How do I make Old-Fashioned Peanut Butter Cookies extra chewy?
- Slightly underbake by 1-2 minutes and ensure cookies are completely cool before storing to maintain that perfect chewy center.
- Can I make Old-Fashioned Peanut Butter Cookies without eggs?
- Yes, substitute each egg with 1 tablespoon ground flaxseed mixed with 3 tablespoons water, though texture will be slightly different.
- Why do my Old-Fashioned Peanut Butter Cookies spread too much?
- This usually indicates butter was too warm or dough wasn’t chilled. Chill dough 30 minutes before baking for better shape retention.
- How can I make Old-Fashioned Peanut Butter Cookies more visually appealing?
- Focus on uniform sizing, proper fork patterns, and achieving that perfect golden-brown color through careful timing and temperature control.
FAQs
Conclusion
These Old-Fashioned Peanut Butter Cookies represent the perfect balance of visual appeal and incredible taste. With their signature golden color, textured cross-hatch pattern, and irresistible aroma, they’re sure to become a favorite in your baking repertoire. The key lies in attention to detail—from ingredient temperature to baking timing—every step contributes to creating cookies that look as amazing as they taste.
Made these Old-Fashioned Peanut Butter Cookies? Drop your twist in the comments, rate the recipe, and tag us on facebook, instagram with #erinrecipes — we might feature your creation!

Old-Fashioned Peanut Butter Cookies: Perfect Golden Treats
Ingredients
Instructions
- Preheat the Oven: Preheat your oven to 350°F. Line your baking sheets with parchment paper or silicone liners and set aside.
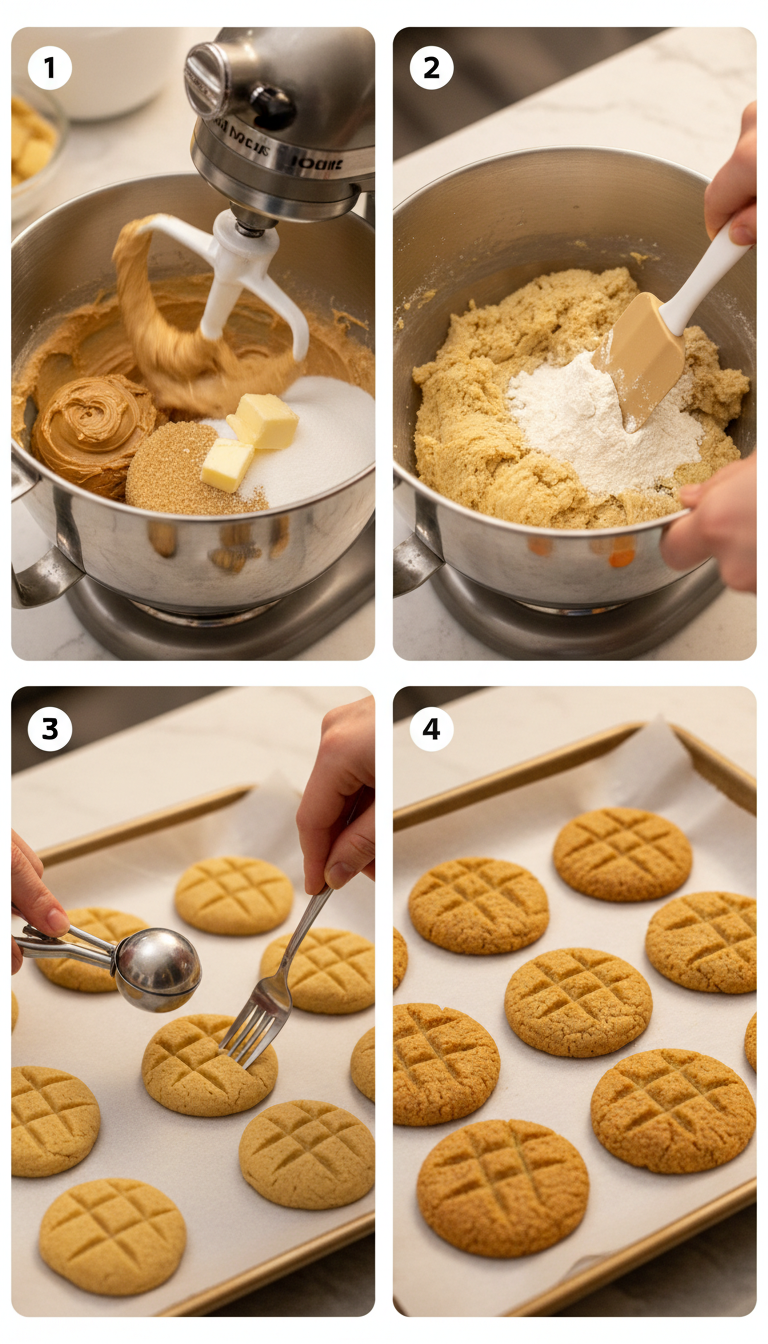
- Mix Peanut Butter and Butter: In a large bowl, use either a stand mixer or hand mixer to beat together the creamy peanut butter and salted butter. Continue mixing until the mixture is smooth.
- Add Sugars: Add both the light brown sugar and granulated sugar. Beat this mixture until it becomes fluffy.
- Incorporate Eggs and Vanilla: Mix in the large eggs, one at a time, followed by the vanilla extract. Ensure everything is well combined.
- Combine Dry Ingredients: In a medium-sized bowl, whisk together the all-purpose flour and baking soda. Gradually add this mixture to your wet ingredients. Stir until just combined while scraping down the sides of the bowl as necessary.
- Shape the Cookies: Scoop out dough into balls using about 2 tablespoons per cookie. Place them approximately 3 inches apart on your prepared baking sheets. Using a fork, gently press down on each ball to create a cross-hatch pattern on top.
- Bake: Bake your cookies in the preheated oven for about 12-13 minutes or until they are golden brown and no longer glossy on top. Allow them to cool on the baking sheet for about 5 minutes before transferring them to a wire rack to cool completely.