
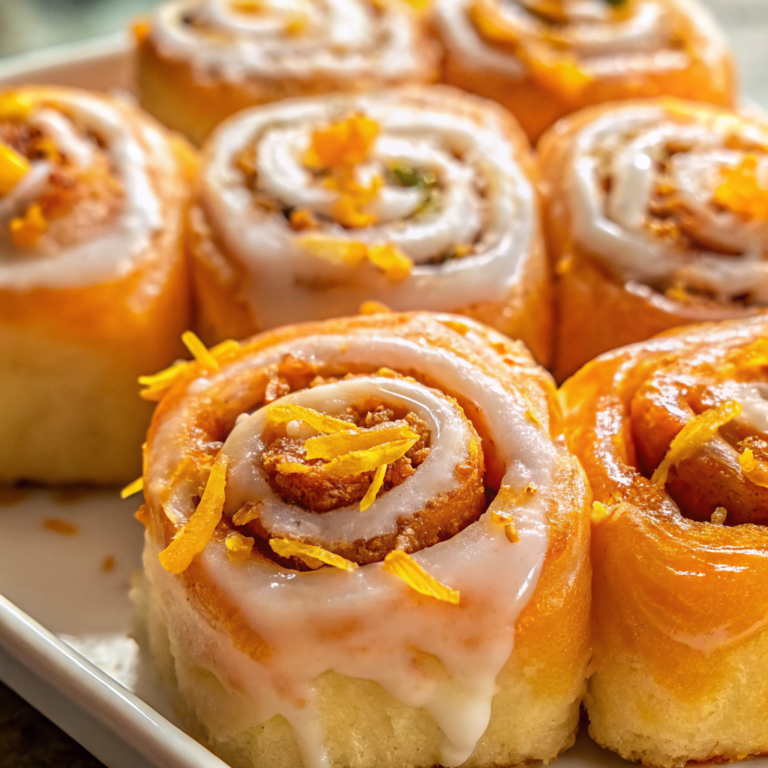
There’s something magical about the scent of fresh orange rolls wafting through the kitchen on a weekend morning. These tender, fluffy pastries burst with bright citrus flavor and are topped with a luscious cream cheese glaze that melts into every crevice. Whether you’re hosting a special brunch or simply want to treat your family to something extraordinary, these orange rolls deliver bakery-quality results right from your own oven. With their perfect balance of sweet and tangy flavors, they’re guaranteed to become your new favorite breakfast indulgence. You’ll discover how simple ingredients transform into something truly spectacular, plus all my tested tips for achieving that perfect soft texture every single time.
Why Orange Rolls Matter for Your Kitchen
These orange rolls represent the perfect intersection of comfort and elegance. Unlike plain cinnamon rolls, the bright citrus filling adds a sophisticated twist that feels special enough for holidays yet approachable enough for any weekend. The combination of fresh orange zest and juice creates layers of flavor that develop beautifully during baking, while the potato flakes in the dough ensure an incredibly tender crumb that stays soft for days.
Behind the Recipe
My love affair with orange rolls began during a particularly dreary winter morning when I was craving something bright and cheerful. I had been experimenting with different citrus flavors in my baking, and the idea of combining the comforting familiarity of cinnamon rolls with the uplifting essence of fresh oranges felt like pure inspiration. After several test batches and countless adjustments, I discovered that the secret lies in using both orange zest and fresh juice in the filling, creating a more complex and vibrant flavor profile.
The addition of potato flakes might seem unusual, but this old-fashioned technique creates an incredibly soft, pillowy texture that’s simply irresistible. For more citrus-inspired recipes, check out our cranberry orange bread recipe and easy orange cranberry bread. If you’re new to working with yeast dough, this helpful video on kneading dough by hand will give you confidence, and for zesting tips, this discussion about orange zesting answers common questions perfectly.
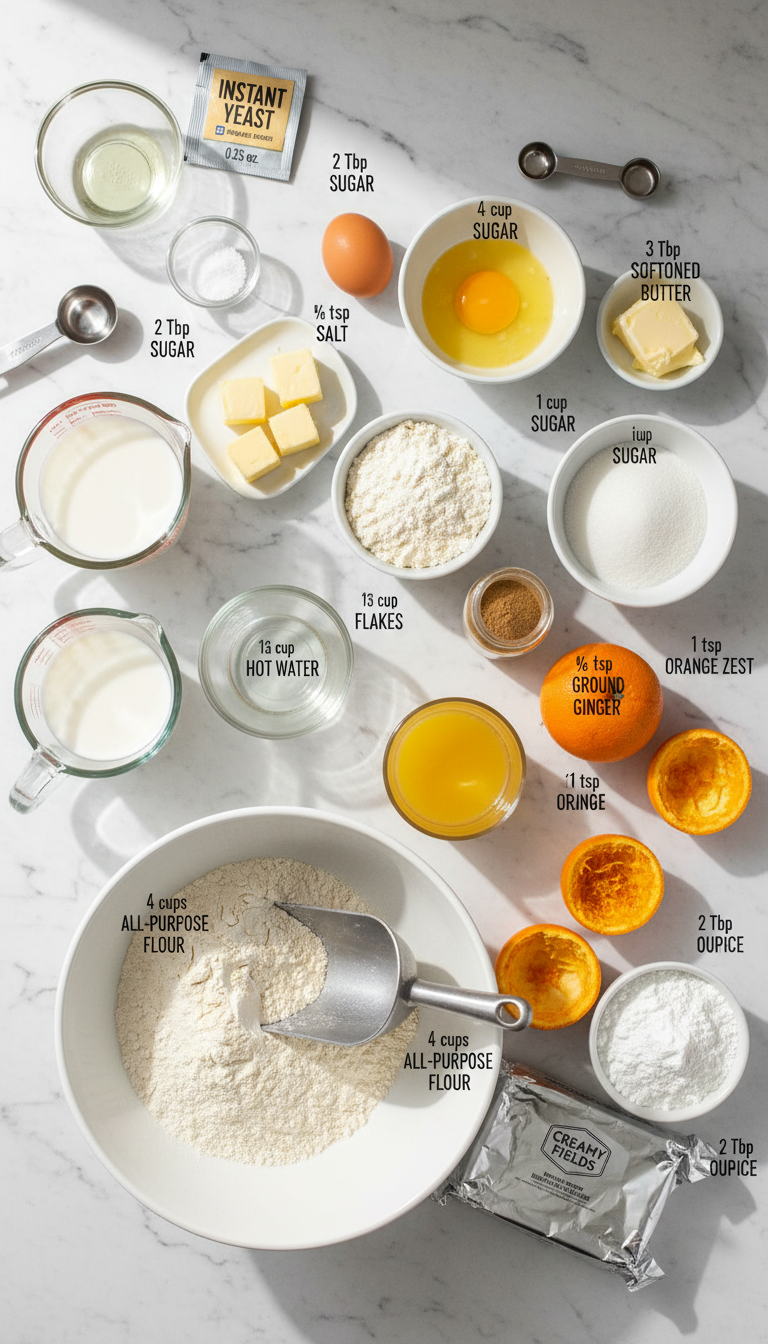
Ingredients
|
Ingredient Spotlight
Fresh Orange Zest: This is absolutely crucial for authentic orange flavor. The oils in the zest provide an intense, aromatic quality that juice alone cannot achieve. Always use organic oranges when possible, and zest before juicing for the best results.
Potato Flakes: This grandmother’s secret creates an incredibly tender crumb that stays soft for days. The starches help retain moisture while adding a subtle richness to the dough.
Ground Ginger: Just a touch of ginger enhances the orange flavor beautifully, adding warmth and complexity without overwhelming the citrus notes.
Block Cream Cheese: Using block-style rather than spreadable cream cheese ensures the perfect consistency for our glaze – smooth, rich, and perfectly pipeable.
Timing
|
This recipe is actually 20% faster than traditional yeast roll recipes thanks to the instant yeast and potato flake technique!
Instructions
Step 1: Activate the Yeast
Dissolve the instant yeast and 2 tablespoons of granulated sugar in ¼ cup warm water. The water should feel comfortably warm on your wrist – not hot enough to kill the yeast. Stir well and set aside to activate for about 5 minutes until it becomes foamy.
Step 2: Prepare the Milk Mixture
Scald 1 cup of milk on the stove or in the microwave until it’s steaming but not boiling. Add the salt, ¼ cup granulated sugar, and 4 tablespoons butter. Whisk until everything dissolves completely, then allow it to cool to lukewarm. This step ensures the butter incorporates smoothly and the temperature won’t shock the yeast.
Step 3: Create the Potato Mixture
In a separate bowl, combine the potato flakes with ⅓ cup hot water. Mix until smooth but thick – it should resemble chunky mashed potatoes. This mixture adds incredible tenderness to our final rolls.
Step 4: Make the Dough
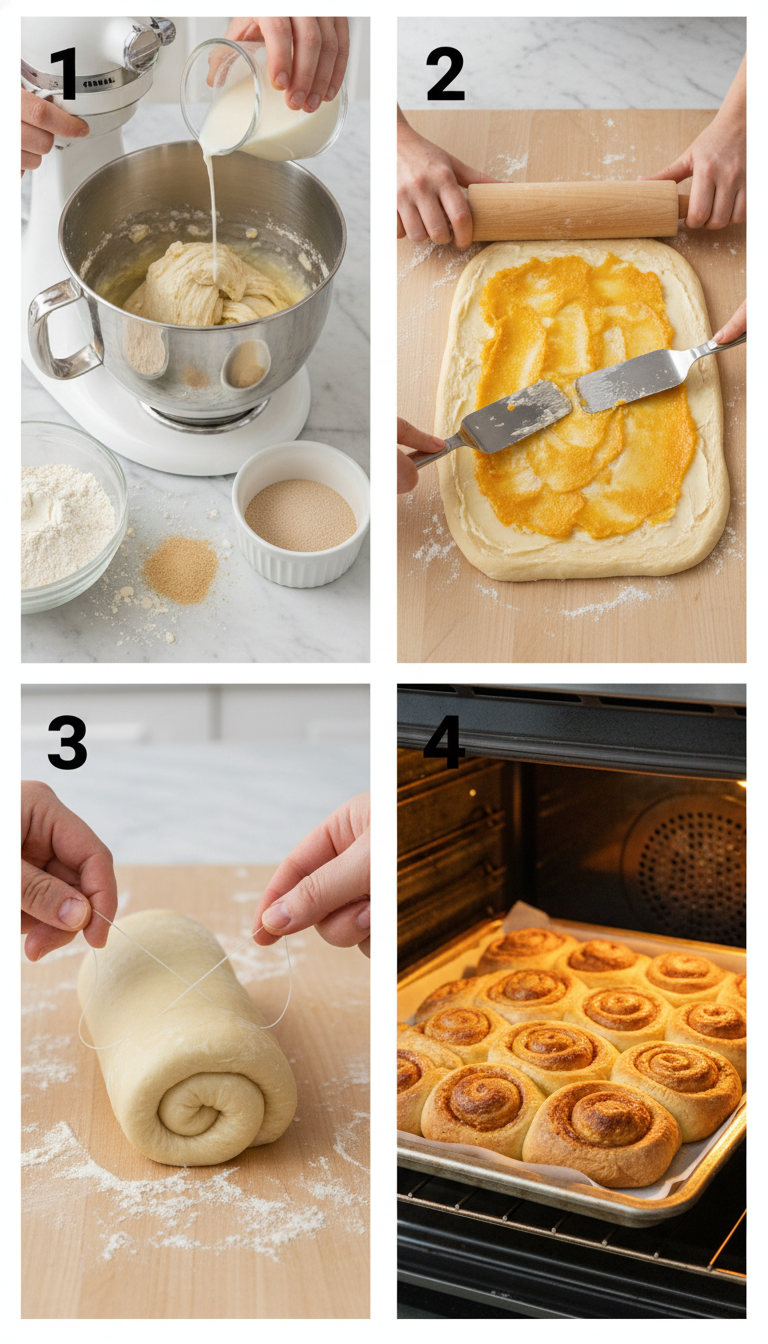
In your stand mixer bowl, beat the egg thoroughly. Add the activated yeast mixture, cooled milk mixture, and potato mixture. Using the dough hook, gradually incorporate 4 cups of flour, mixing until you achieve a slightly sticky dough texture. Remember, slightly sticky dough creates tender rolls – resist the urge to add too much extra flour!
Step 5: Knead and First Rise
Knead the dough for 5-10 minutes until smooth and elastic. Transfer to a greased bowl, cover with plastic wrap or a damp kitchen towel, and let rise in a warm place for about 1 hour until doubled in size. My grandmother always said the dough is ready when you can gently poke it and the indentation slowly springs back.
Step 6: Prepare the Orange Filling
While the dough rises, mix together 1 cup granulated sugar, ground ginger, and 2 teaspoons orange zest. This allows the zest to infuse its oils into the sugar. Once the dough has risen, gradually add the fresh orange juice until the mixture resembles wet sand – not too dry, not too wet.
Step 7: Shape the Rolls
Lightly flour your work surface and gently roll the dough into a 10×15 inch rectangle, about ½ inch thick. Spread the softened butter evenly across the surface, then sprinkle the orange-sugar filling over the butter, leaving a small border at the edges.
Step 8: Roll and Cut
Starting from one long edge, tightly roll the dough into a log, stretching it slightly as you go to ensure even rolls. Using dental floss or a sharp knife, cut into 12 equal pieces. Place cut-side up in a greased 9×13 inch baking dish.
Step 9: Second Rise
Cover the rolls with a lightly damp kitchen towel and let rise for 30-60 minutes until puffy and touching each other. They should look pillowy and have increased in size by about 50%.
Step 10: Bake to Perfection
Preheat your oven to 350°F. Bake the risen rolls for 20-25 minutes until golden brown on top. The internal temperature should reach 190°F when tested with a thermometer in the center of one roll.
Step 11: Make the Glaze
While the rolls bake, beat together the cream cheese, powdered sugar, remaining orange zest, and orange juice until completely smooth and creamy. The consistency should be thick enough to coat the back of a spoon but thin enough to drizzle.
Step 12: Glaze and Serve
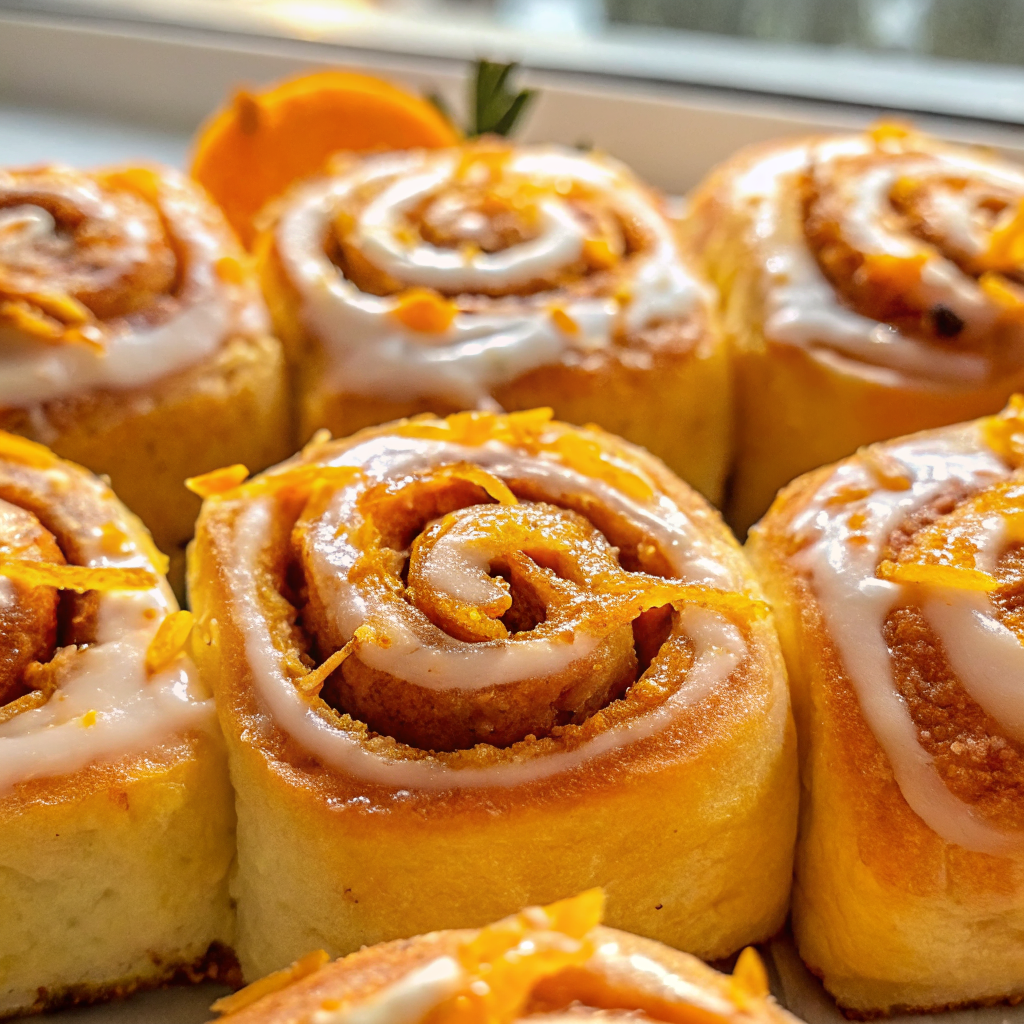
Remove the rolls from the oven and immediately drizzle the warm rolls with the cream cheese glaze. Serve while still warm for the ultimate indulgent experience!
Tips & Tricks for Perfect Orange Rolls
|
Recipe Variations & Substitutions
Lemon Rolls: Replace orange zest and juice with fresh lemon for a bright, tart variation that’s equally delicious.
Busy Cook Version: Prepare the rolls completely through the first rise, then refrigerate overnight. In the morning, simply shape, rise, and bake for fresh rolls with minimal effort.
Kid-Friendly Adaptation: Reduce the ginger to ¼ teaspoon and add a pinch of cinnamon for a milder, more familiar flavor profile that children will love.
Dairy-Free Option: Substitute the milk with unsweetened almond milk and use vegan butter. Replace cream cheese in the glaze with vegan cream cheese alternative.
Leftover & Reuse Ideas
Transform day-old orange rolls into an incredible bread pudding by cubing them and soaking in a custard base with extra orange zest. They also make fantastic French toast when sliced thick and soaked in vanilla-scented egg mixture. For a quick breakfast solution, slice and toast the rolls, then spread with cream cheese for an instant pastry experience. Crumbled orange rolls also create a delicious topping for yogurt or ice cream.
Pairing Ideas
These orange rolls pair beautifully with freshly brewed coffee or Earl Grey tea, where the citrus notes complement the bergamot perfectly. For a special brunch, serve alongside fresh fruit salad and scrambled eggs. Hot chocolate with a hint of orange zest creates a luxurious winter pairing, while sparkling water with fresh orange slices cleanses the palate between bites. Consider serving with vanilla Greek yogurt and honey for a lighter accompaniment.
Serving Suggestions
Present these gorgeous orange rolls on a rustic wooden board or elegant ceramic platter while they’re still warm and the glaze is slightly melted. Garnish with fresh orange zest curls and perhaps a few orange segments for a professional bakery presentation. For special occasions, dust lightly with powdered sugar just before serving, or add edible flowers for an extra touch of elegance. Individual plates with small forks make them feel more refined for formal brunches.
Nutritional Information
Each orange roll contains approximately 285 calories, 8g fat, 48g carbohydrates, 6g protein, and 2g fiber. The recipe provides vitamin C from the fresh orange juice and zest, along with B vitamins from the enriched flour. The potato flakes add potassium and additional fiber to each serving.
Common Mistakes to Avoid
Overheating the Yeast: Water that’s too hot will kill the yeast instantly. Always test the temperature – it should feel comfortably warm, not hot. If you accidentally overheat, start over with fresh yeast.
Rushing the Rise: Proper rising time is crucial for texture and flavor development. Cold kitchens may require longer rising times, while warm environments speed things up. Trust the visual cues rather than the clock.
Compressing While Cutting: Using a sawing motion with a knife compresses the delicate layers. Dental floss or a very sharp knife in one smooth motion preserves the beautiful spiral pattern.
Glazing Too Early: Wait until the rolls are completely baked before glazing. Applying glaze to underbaked rolls can make them soggy and affect the final texture.
Storage & Reheating Tips
Store leftover orange rolls covered at room temperature for up to 3 days, or freeze for up to 3 months. To reheat, wrap individual rolls in damp paper towels and microwave for 15-20 seconds, or warm the entire pan covered with foil in a 300°F oven for 10 minutes. For make-ahead convenience, prepare through the first rise, then refrigerate overnight and continue with shaping the next morning. The dough can also be frozen after shaping – just thaw overnight and allow to rise before baking.
- Are orange rolls kid-friendly?
- Absolutely! The sweet orange flavor appeals to children, and you can reduce the ginger slightly for more sensitive palates. Kids love helping with the rolling and cutting process too.
- Can I make orange rolls ahead of time?
- Yes! Prepare the rolls completely through shaping, then cover and refrigerate overnight. In the morning, let them come to room temperature and rise before baking for fresh, warm rolls.
- What’s the best way to zest oranges for orange rolls?
- Use a microplane grater and only zest the orange outer peel, avoiding the bitter white pith underneath. Organic oranges are best since you’re using the peel directly in the recipe.
- Can I substitute the potato flakes in orange rolls?
- While potato flakes create the signature tender texture, you can omit them and add an extra ¼ cup flour, though the rolls won’t be quite as soft and pillowy.
- How do I know when orange rolls are properly baked?
- The rolls should be golden brown on top and register 190°F when tested with an instant-read thermometer inserted into the center of one roll. They should also sound hollow when tapped gently.
Conclusion
These orange rolls represent everything I love about baking – the way simple ingredients transform into something magical, the joy of sharing warm pastries with loved ones, and the satisfaction of creating bakery-quality results at home. The combination of tender, fluffy dough with bright citrus filling and creamy glaze creates a truly special treat that elevates any breakfast or brunch. With the detailed instructions and tips provided, you’ll have the confidence to create these stunning rolls that taste as incredible as they look.
Made these orange rolls? Drop your twist in the comments, rate the recipe, and tag us on facebook, instagram with #erinrecipes — we might feature your creation!
Orange Rolls Recipe: Sweet, Citrusy Perfection in Every Bite
Ingredients
Instructions
Nutrition Facts
Nutrition data is currently unavailable for this recipe.