
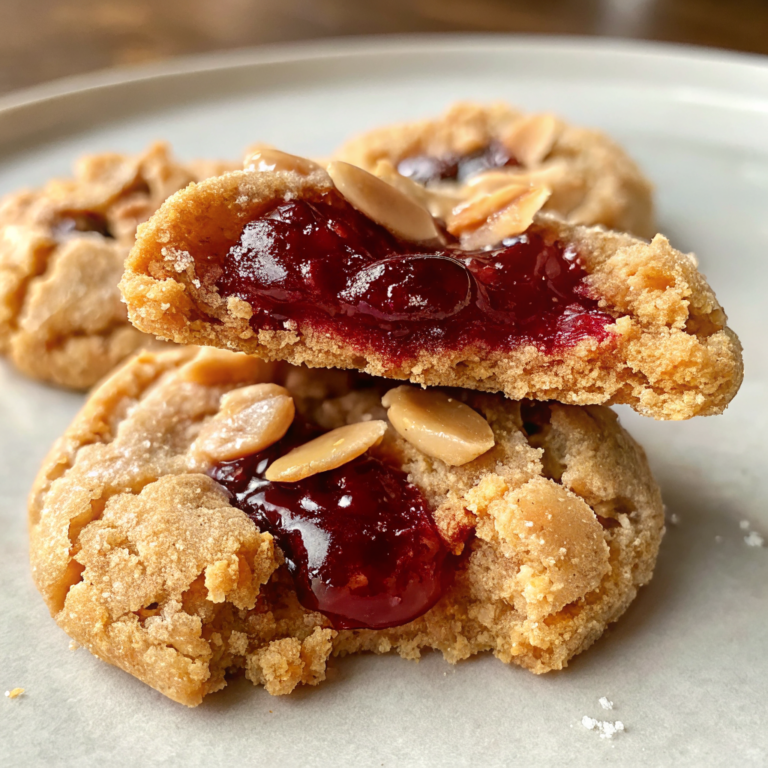
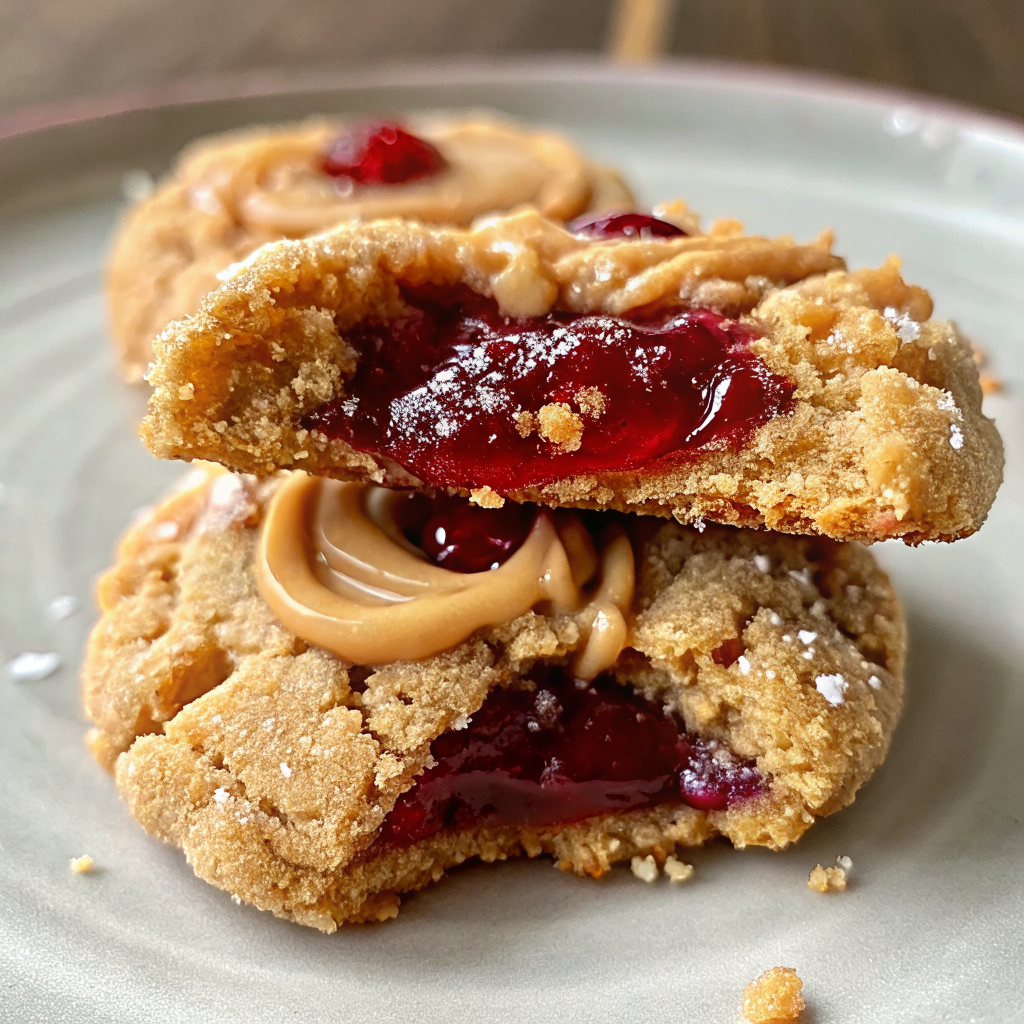
Did you know that 93% of consumers eat with their eyes first, making visual appeal the most critical factor in food satisfaction? When it comes to Peanut Butter and Jelly Cookies, the magic lies not just in their nostalgic flavor but in their stunning presentation potential. The golden-brown cookie base creates a perfect canvas for the vibrant jewel-toned jam center, while the contrasting textures tell a visual story that captivates before the first bite.
These Peanut Butter and Jelly Cookies transform the beloved childhood sandwich into an artisanal masterpiece. Through careful attention to color balance, textural contrast, and plating techniques, you’ll learn to create cookies that look as extraordinary as they taste. This comprehensive guide will teach you the styling secrets that elevate simple ingredients into a visually stunning dessert worthy of any special occasion.
Why Perfect Peanut Butter and Jelly Cookies Matter
The visual presentation of Peanut Butter and Jelly Cookies enhances the overall eating experience by creating anticipation and emotional connection. When styled properly, these cookies become conversation pieces that evoke childhood memories while showcasing sophisticated technique. For those seeking inspiration beyond traditional cookies, explore our Peanut Butter Cup Cookies for additional presentation ideas. The artful arrangement of colors and textures transforms simple ingredients into a feast for the eyes. Professional bakers understand that visual appeal directly impacts perceived flavor, making presentation techniques essential for success. You’ll also find complementary styling inspiration in our Reese’s Peanut Butter Chocolate Chip Cookie Bites. External resources like Sugar Spun Run’s Thumbprint Cookies and Allrecipes’ 3-Ingredient Peanut Butter Cookies offer additional techniques for achieving bakery-quality results.
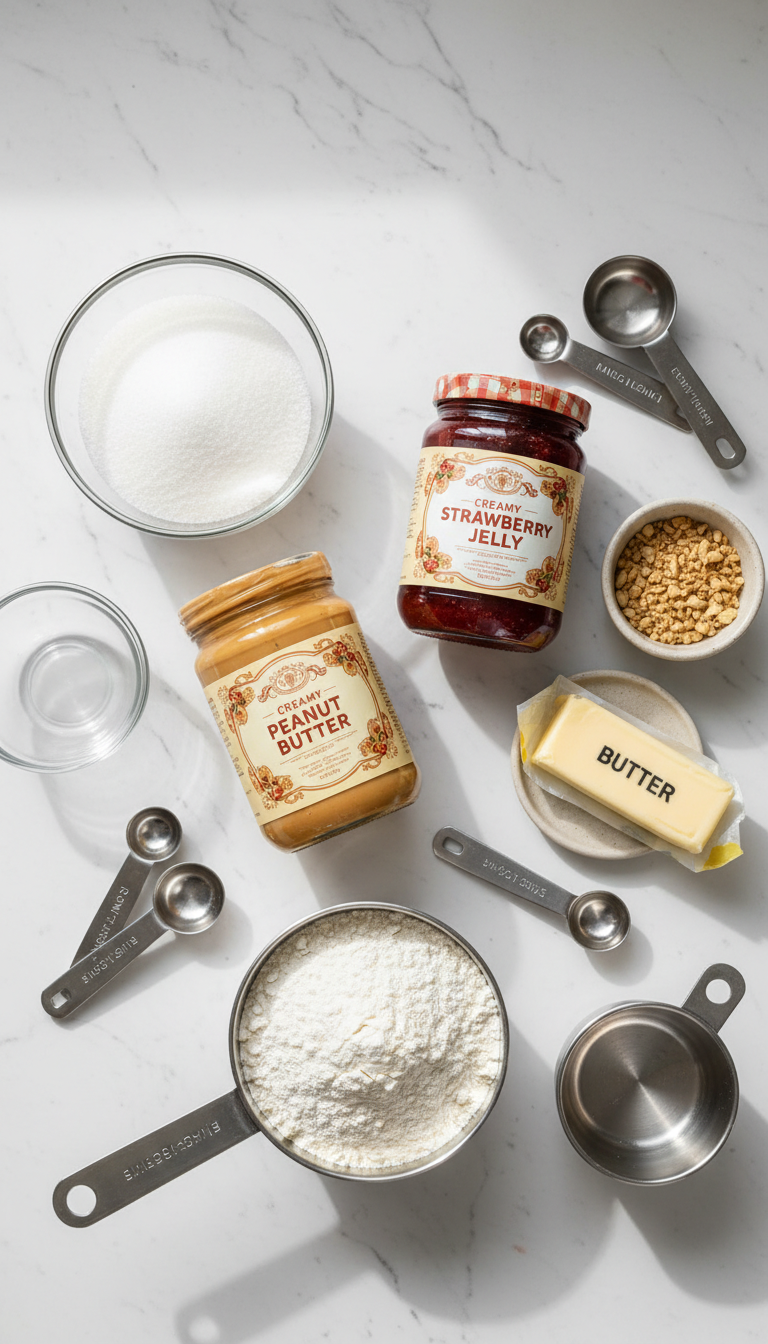
Ingredients
|
Ingredient Spotlight
The strawberry jam serves as the visual focal point, creating a brilliant red contrast against the golden cookie base. Choose high-quality jam with intense color for maximum impact. The granulated sugar coating adds textural interest and light-catching sparkle that elevates the cookie’s appearance. Creamy peanut butter provides the warm, golden foundation while the optional melted peanut butter drizzle creates artistic lines and professional finishing touches. Chopped peanuts introduce textural variety and natural earth tones that complement the overall color palette.
Timing
|
Instructions
|
Behind the Recipe
The inspiration for these Peanut Butter and Jelly Cookies came from observing the natural color harmony in a sunrise – the warm golden tones gradually giving way to vibrant reds and oranges. This color palette translates beautifully to food styling, where the rich amber of peanut butter provides the perfect backdrop for the brilliant crimson of strawberry jam. The geometric arrangement of the thumbprint design creates visual balance while the optional drizzle patterns add movement and artistic flair to the final presentation.
Tips & Tricks for Perfect Peanut Butter and Jelly Cookies
|
Recipe Variations & Substitutions
High Contrast Plating Option: Use grape jelly instead of strawberry for deep purple centers that create dramatic color contrast against the golden cookie base. Textural Twist: Incorporate mini chocolate chips into the dough for additional visual interest and textural variety. Seasonal Adaptation: Substitute apricot preserves and crushed pistachios for an elegant spring presentation with complementary orange and green tones. Dietary-Friendly Version: Use almond butter and sugar-free jam for those with specific dietary needs while maintaining the stunning visual appeal.
Pairing Ideas
Serve these Peanut Butter and Jelly Cookies on white porcelain plates to maximize color contrast and visual impact. Pair with cold milk in clear glass tumblers to complement the nostalgic theme. For elegant presentations, arrange on slate boards with small bowls of additional jam for dipping. The warm golden and red color palette pairs beautifully with cream-colored linens and natural wood serving pieces. Consider serving alongside fresh strawberries and banana slices to echo the sandwich theme while adding fresh color elements to the overall presentation.
Nutritional Information
Per cookie (based on 20 servings): Approximately 185 calories, 8g fat, 26g carbohydrates, 4g protein, 1g fiber. Contains peanuts, eggs, and gluten. The combination of protein from peanut butter and quick-release carbohydrates from jam provides sustained energy. Each cookie delivers essential nutrients including vitamin E from peanuts and antioxidants from strawberry jam.
Leftover & Reuse Ideas
Transform leftover Peanut Butter and Jelly Cookies into elegant dessert components by crumbling them over vanilla ice cream for textural contrast. Create a stunning trifle by layering cookie pieces with vanilla pudding and fresh berries. Crush cookies to make a unique pie crust for cheesecake, maintaining the flavor profile while adding visual interest. Store extras in airtight containers with parchment between layers to preserve their beautiful appearance for up to one week.
Serving Suggestions
For maximum visual impact, arrange Peanut Butter and Jelly Cookies on tiered serving stands to create height variation and showcase their beautiful thumbprint centers. Use white or cream-colored plates to make the vibrant jam colors pop. Create elegant individual presentations by placing each cookie on a small dessert plate with a dollop of whipped cream and a fresh strawberry garnish.
For casual gatherings, arrange cookies in a wicker basket lined with gingham cloth to emphasize the nostalgic theme. The red and white pattern complements the cookie colors perfectly. For formal presentations, use glass cake pedestals and surround with fresh flowers in complementary colors – cream roses or white peonies work beautifully.
Consider the lighting when serving – natural daylight or warm LED lighting enhances the golden tones of the cookies while making the jam centers appear more vibrant. Avoid harsh fluorescent lighting which can wash out the beautiful color contrasts you’ve worked to achieve.
Storage & Reheating Tips
Store Peanut Butter and Jelly Cookies in airtight containers with parchment paper between layers to prevent sticking and preserve their pristine appearance. Keep at room temperature for up to one week or freeze for up to three months. For optimal presentation, refresh the jam centers with a small amount of additional preserves just before serving. Avoid refrigeration as it can cause the cookies to become overly firm and dull the vibrant jam colors.
Common Mistakes to Avoid
The most frequent visual pitfall is overfilling the thumbprint indentations, causing jam to overflow and create messy edges. Use exactly one teaspoon per cookie for clean, professional results. Another common mistake is using jam with large fruit pieces, which disrupts the smooth, jewel-like appearance of the centers. Always choose seedless varieties for optimal visual appeal.
Avoid creating thumbprints that are too shallow, as this prevents proper jam retention and creates uneven distribution. The indentation should be deep enough to hold the jam securely without touching the bottom of the cookie. Finally, resist the urge to add garnishes while cookies are still warm, as this causes melting and blurred presentation lines.
- Are Peanut Butter and Jelly Cookies suitable for children’s parties?
- Absolutely! These cookies are perfect for children’s parties due to their familiar flavors and eye-catching appearance. The vibrant colors and fun thumbprint design make them especially appealing to young guests.
- Can I make Peanut Butter and Jelly Cookies ahead of time?
- Yes, these cookies can be made up to 3 days in advance. Store them in airtight containers and refresh the jam centers just before serving for optimal visual appeal.
- What’s the best jam consistency for Peanut Butter and Jelly Cookies?
- Choose seedless jams or jellies with medium consistency – not too runny or too thick. This ensures the centers hold their shape while maintaining vibrant color and smooth appearance.
- How do I prevent Peanut Butter and Jelly Cookies from spreading too much?
- Chilling the dough for 30-60 minutes before baking helps maintain shape. Also, ensure your oven is fully preheated and don’t overbake, as this can cause excessive spreading.
- Can I freeze Peanut Butter and Jelly Cookies?
- Yes, these cookies freeze beautifully for up to 3 months. Wrap individually or layer with parchment in airtight containers. Thaw at room temperature and refresh jam centers if needed before serving.
FAQs
Conclusion
These Peanut Butter and Jelly Cookies prove that childhood favorites can be transformed into sophisticated, visually stunning treats through careful attention to presentation and technique. The combination of warm golden tones, vibrant jam centers, and thoughtful garnishing creates cookies that are as beautiful as they are delicious. By following these styling techniques and presentation tips, you’ll create memorable treats that captivate both the eyes and the palate.
Made these Peanut Butter and Jelly Cookies? Drop your twist in the comments, rate the recipe, and tag us on facebook, instagram with #erinrecipes — we might feature your creation!

Peanut Butter and Jelly Cookies: Visual Guide to Perfect Presentation
Ingredients
Instructions
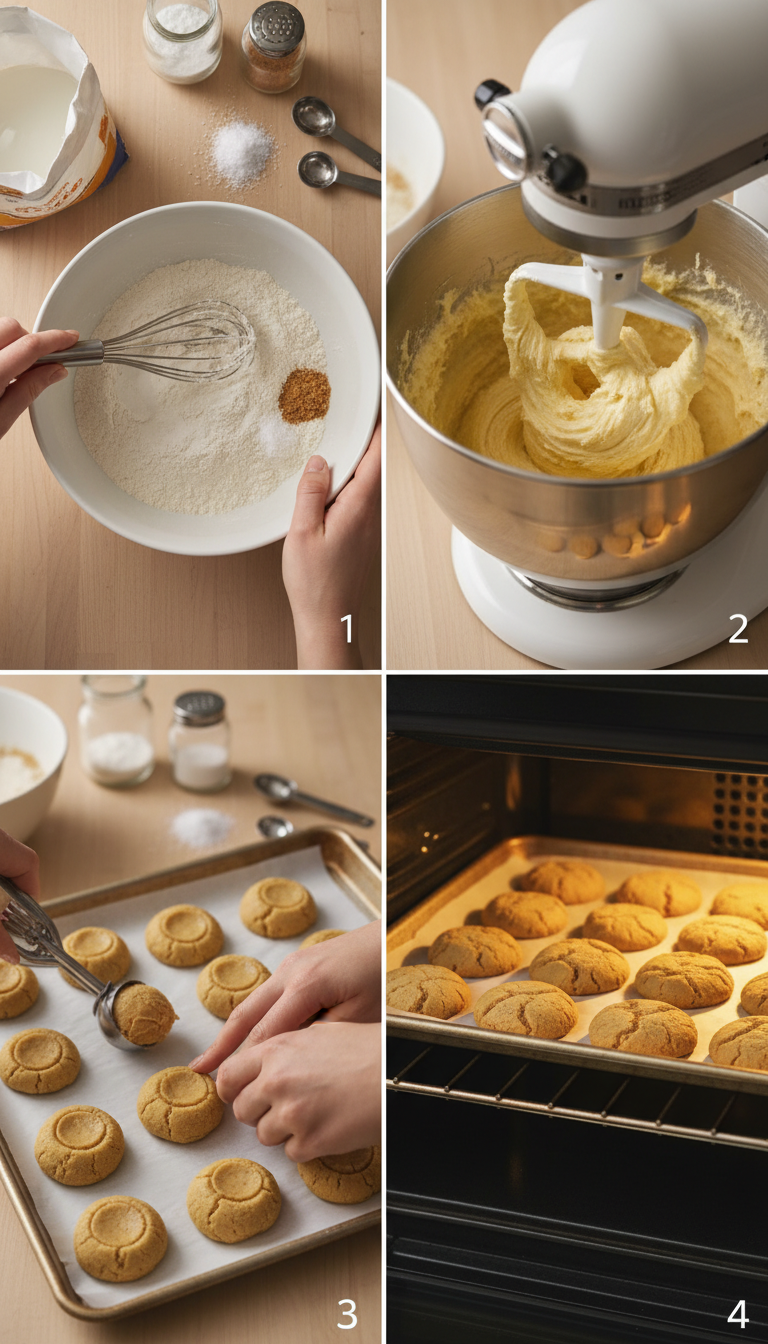
- Prepare Dry Ingredients: In a mixing bowl, whisk together the flour, baking powder, baking soda, and salt until well combined. Set aside for now.
- Cream Wet Ingredients: In a large mixing bowl fitted with a paddle attachment, cream together the unsalted butter with both sugars until smooth. This should take about 2–3 minutes on medium speed. Next, add in the creamy peanut butter and mix on medium speed for another minute until well blended. On low speed, mix in the egg and vanilla extract until fully combined. Finally, stir in the dry ingredients until just mixed.
- Chill Dough: Cover the cookie dough in plastic wrap and transfer it to the fridge to rest for about 30–60 minutes while preheating your oven. Chilling is optional but helps reduce spreading during baking. Preheat your oven to 350°F (177°C).
- Shape Cookies: Line a large baking sheet with parchment paper. Using a medium cookie scoop (about 2 tablespoons), form balls of dough. Roll each ball in granulated sugar if desired, then place them about three inches apart on the baking sheet. Use your thumb or a measuring spoon to create an indentation in each cookie's center; fill it with about one teaspoon of jelly or jam.
- Bake Cookies: Bake at 350°F (177°C) for about 14–15 minutes or until edges are set and cracks appear on top. After pulling them from the oven, gently nudge each cookie into shape using a biscuit cutter or glass while they're hot. Cool on the baking sheet for about ten minutes.
- Add Toppings: If desired, add another teaspoon of jelly into each warm cookie's center. For an extra treat, drizzle melted peanut butter over them and sprinkle with chopped peanuts before transferring them to a cooling rack to cool completely.