

Did you know that visual appeal accounts for 83% of food satisfaction, according to culinary psychology research? When creating Chocolate Mint Cookies, the interplay between rich cocoa depths and vibrant mint green creates a stunning contrast that elevates these treats from simple cookies to edible art pieces. The deep chocolate base provides the perfect canvas for the bright mint frosting, while the glossy ganache drizzle adds professional-level sophistication that transforms your kitchen creations into bakery-worthy masterpieces.
As someone who lives and breathes food styling, I’m constantly amazed by how the right color palette can transform a simple recipe into something extraordinary. These cookies aren’t just delicious—they’re a masterclass in visual storytelling, where every element serves both flavor and aesthetic purpose.
Why Perfect Chocolate Mint Cookies Matter
The magic of these cookies lies in their three-dimensional visual appeal and textural contrast. When you master the art of presenting easy chocolate crescents alongside these mint beauties, you create a dessert spread that’s both cohesive and visually striking. The combination of matte cookie base, glossy frosting, and mirror-like ganache creates depth that photographs beautifully and entices from every angle. For those interested in exploring more chocolate cookie variations, understanding the fundamentals of chocolate and mint pairing opens doors to endless creative possibilities. Professional bakers often reference comprehensive chocolate dessert collections like this one to understand how different textures and colors work together in dessert presentation. Don’t miss our collection of creative chocolate treats for more inspiration on chocolate-forward desserts.
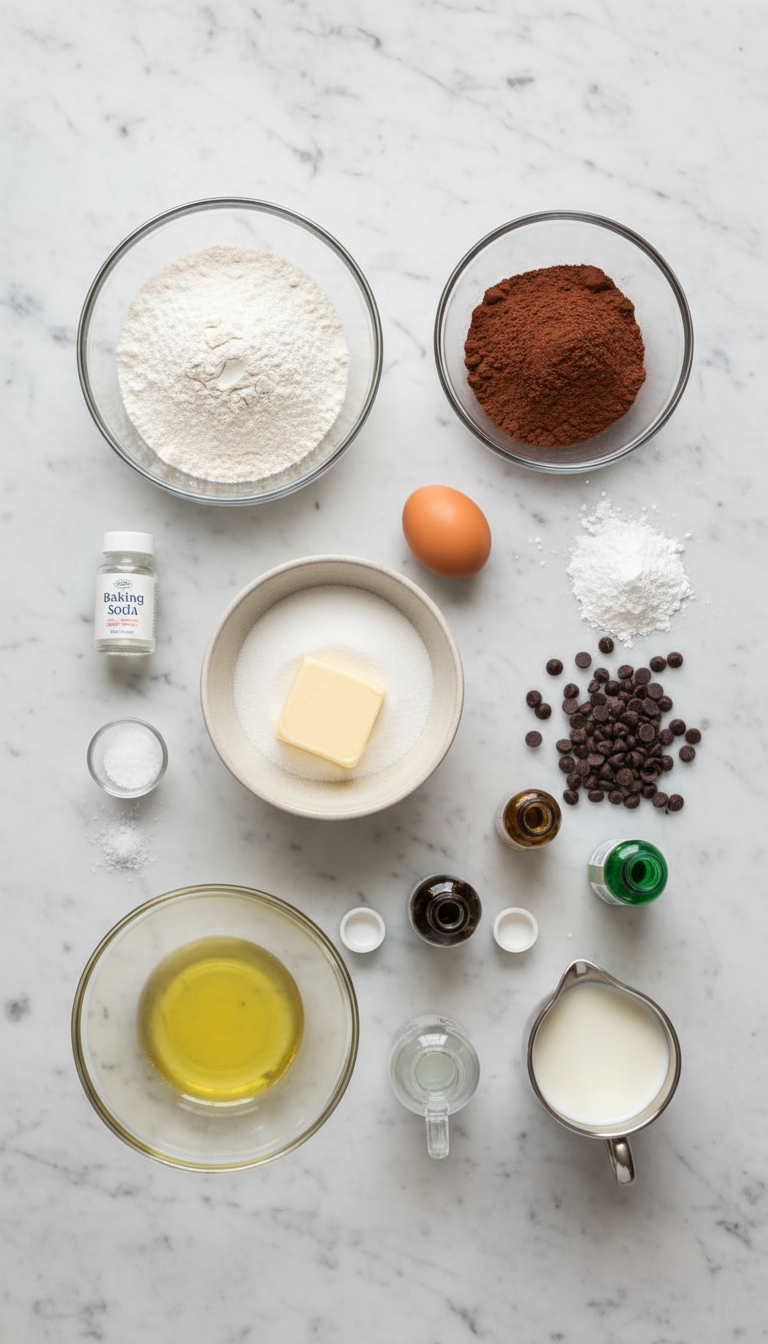
Ingredients
|
Ingredient Spotlight
The unsweetened cocoa powder is your color foundation—it creates that deep, rich brown that makes the mint frosting pop visually. The mint extract not only provides flavor but when combined with green food coloring, creates that signature mint-green hue that makes these cookies instantly recognizable. The semisweet chocolate chips for ganache provide the glossy finish that catches light beautifully, while the powdered sugar creates the smooth, matte frosting texture that serves as the perfect middle layer between cookie and ganache.
Timing
|
Instructions
|
Behind the Recipe
The inspiration for these Chocolate Mint Cookies came from observing how professional chocolatiers layer contrasting textures and colors. The deep chocolate base represents earth and richness, while the mint green frosting evokes freshness and vibrancy. The glossy ganache drizzle adds that final touch of sophistication—like jewelry on a beautiful dress. This three-layer approach creates visual depth that transforms simple cookies into stunning dessert art pieces worthy of any elegant gathering.
Tips & Tricks for Perfect Chocolate Mint Cookies
|
Recipe Variations & Substitutions
High Contrast Plating Option: Create white chocolate ganache instead of dark chocolate for a stunning color contrast against the mint frosting. Textural Twist: Add finely chopped mint chocolate pieces to the cookie dough for extra visual interest and texture. Seasonal Adaptation: Use different food coloring to match holidays—red for Valentine’s Day, orange for Halloween. Gluten-Free Version: Substitute almond flour for all-purpose flour, adjusting liquid as needed to maintain proper consistency.
Pairing Ideas
Serve these Chocolate Mint Cookies on crisp white plates to make the colors pop, or arrange them on a dark slate board for dramatic contrast. Pair with hot cocoa in clear glass mugs to echo the chocolate theme, or serve alongside vanilla bean ice cream for temperature and color contrast. For beverages, consider mint tea in delicate china cups or sparkling water with fresh mint sprigs to complement the cookie’s flavor profile while maintaining the elegant presentation.
Nutritional Information
Per cookie (approximate): 285 calories, 4g protein, 45g carbohydrates, 12g fat, 3g fiber, 180mg sodium. The three-layer construction provides a satisfying balance of textures and flavors in each bite.
Leftover & Reuse Ideas
Crumble unfrosted cookies over vanilla ice cream for a mint chocolate chip effect. Use broken cookie pieces in trifle layers for added texture and visual appeal. Transform leftover frosting into mint buttercream for cupcakes, or use extra ganache as a dip for fresh strawberries to create an elegant dessert spread.
Serving Suggestions
Present these cookies on a tiered serving stand to create height and visual interest. Arrange them in a color gradient if you’ve made multiple batches, or alternate with plain chocolate cookies for pattern variety. Garnish the serving area with fresh mint sprigs for aromatic appeal and color echo. Use small dessert plates and provide delicate forks for an elevated dining experience. For photography or special occasions, dust the serving surface lightly with cocoa powder to create depth and frame the cookies beautifully. Consider serving on vintage cake pedestals or modern geometric serving boards to match your event’s aesthetic. The key is creating layers of visual interest that complement rather than compete with the cookies’ natural beauty.
Storage & Reheating Tips
Store frosted cookies in airtight containers with parchment paper between layers to prevent frosting damage. Keep at room temperature for up to 5 days, or freeze unfrosted cookies for up to 3 months. For best visual appeal, add frosting and ganache just before serving if storing for extended periods. The cookies maintain their texture best when stored in cool, dry conditions.
Common Mistakes to Avoid
Avoid overbaking, which creates hard cookies that crack when frosted, ruining the smooth visual appeal. Don’t frost warm cookies—the heat will melt the frosting and create an uneven, unprofessional appearance. Prevent ganache from being too hot when drizzling, as this melts the frosting layer underneath and muddles the clean color separation. Never skip the cooling time between layers—patience creates the professional-looking results that make these cookies truly stunning.
- Are Chocolate Mint Cookies suitable for beginners?
- Absolutely! These cookies use basic techniques with stunning visual results, making them perfect for novice bakers wanting to create impressive-looking treats.
- Can I make Chocolate Mint Cookies without food coloring?
- Yes, the mint extract provides the flavor, and the cookies will still be delicious with white frosting, though the visual contrast won’t be as dramatic.
- How far ahead can I make Chocolate Mint Cookies?
- Bake the cookie base up to 3 days ahead, but add frosting and ganache within 24 hours of serving for the best visual appeal and texture.
- What’s the best way to drizzle ganache on Chocolate Mint Cookies?
- Use a fork or squeeze bottle for controlled drizzling, working quickly while the ganache is warm but not hot enough to melt the frosting.
- Can I freeze decorated Chocolate Mint Cookies?
- It’s best to freeze only the unfrosted cookies and add the decorative elements after thawing for optimal visual appeal and texture.
Conclusion
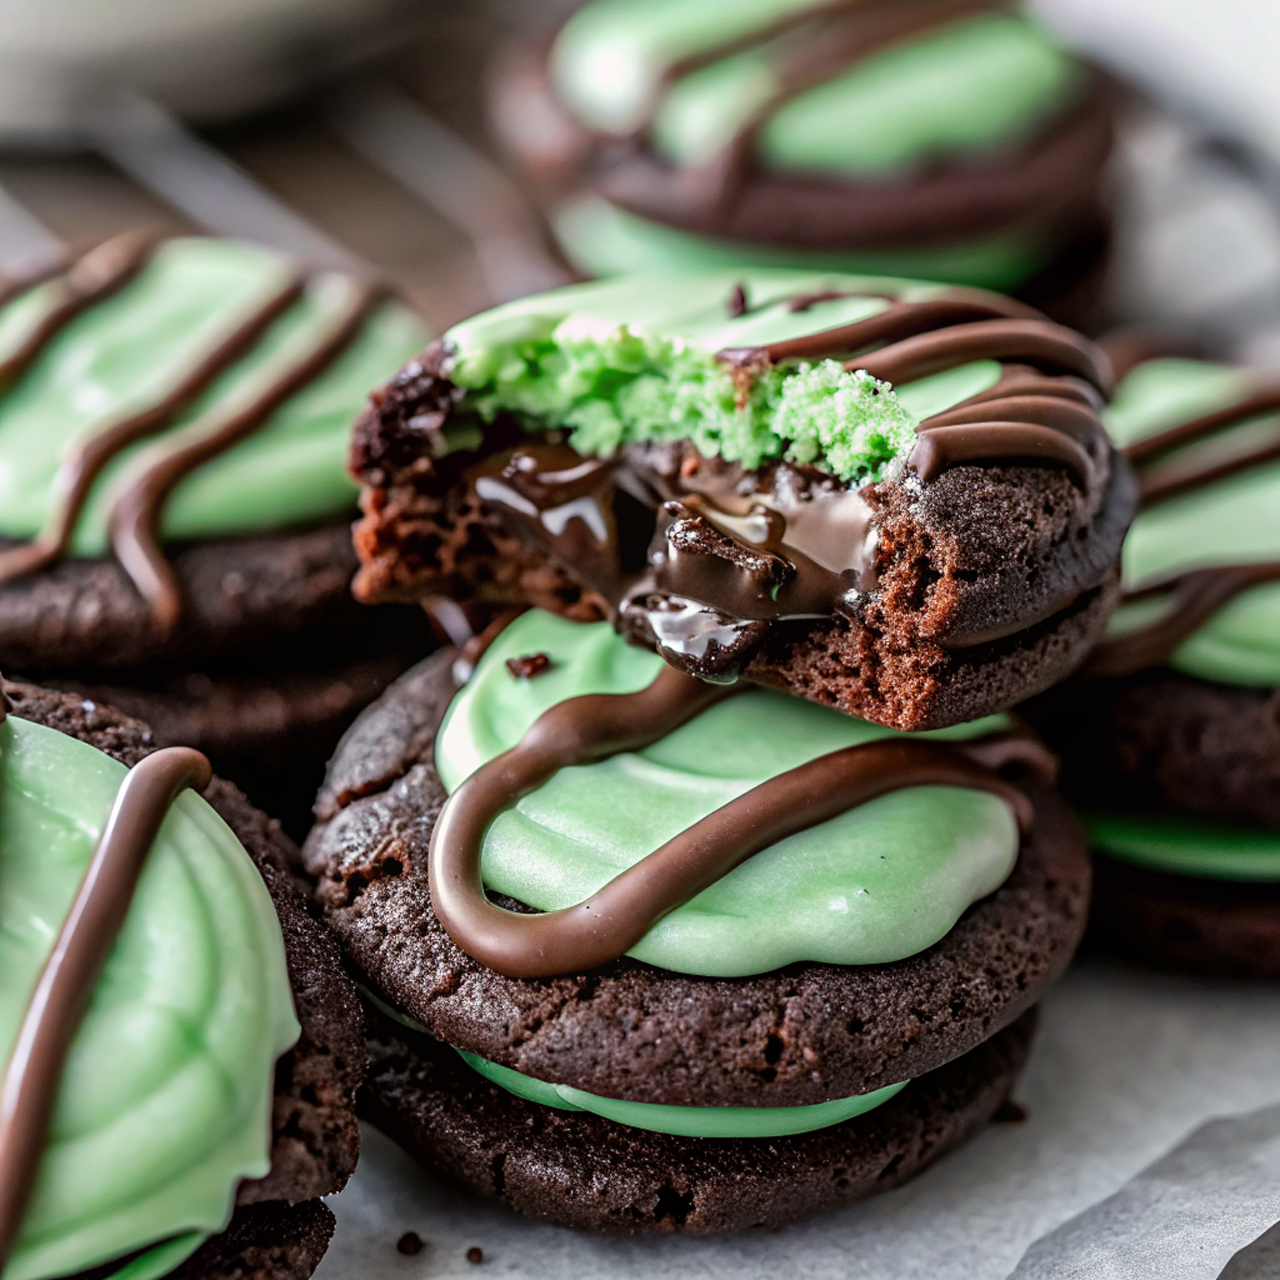
These Chocolate Mint Cookies prove that with the right techniques and attention to visual detail, simple ingredients can create extraordinary results. The three-layer approach—chocolate cookie base, mint frosting, and glossy ganache—demonstrates how professional presentation elevates both the eating experience and visual impact. Each element serves a purpose in creating depth, contrast, and sophistication that transforms ordinary cookies into memorable treats.
Made these Chocolate Mint Cookies? Drop your twist in the comments, rate the recipe, and tag us on facebook, instagram with #erinrecipes — we might feature your creation!

Chocolate Mint Cookies – Perfect Frosted Treats
Ingredients
Instructions
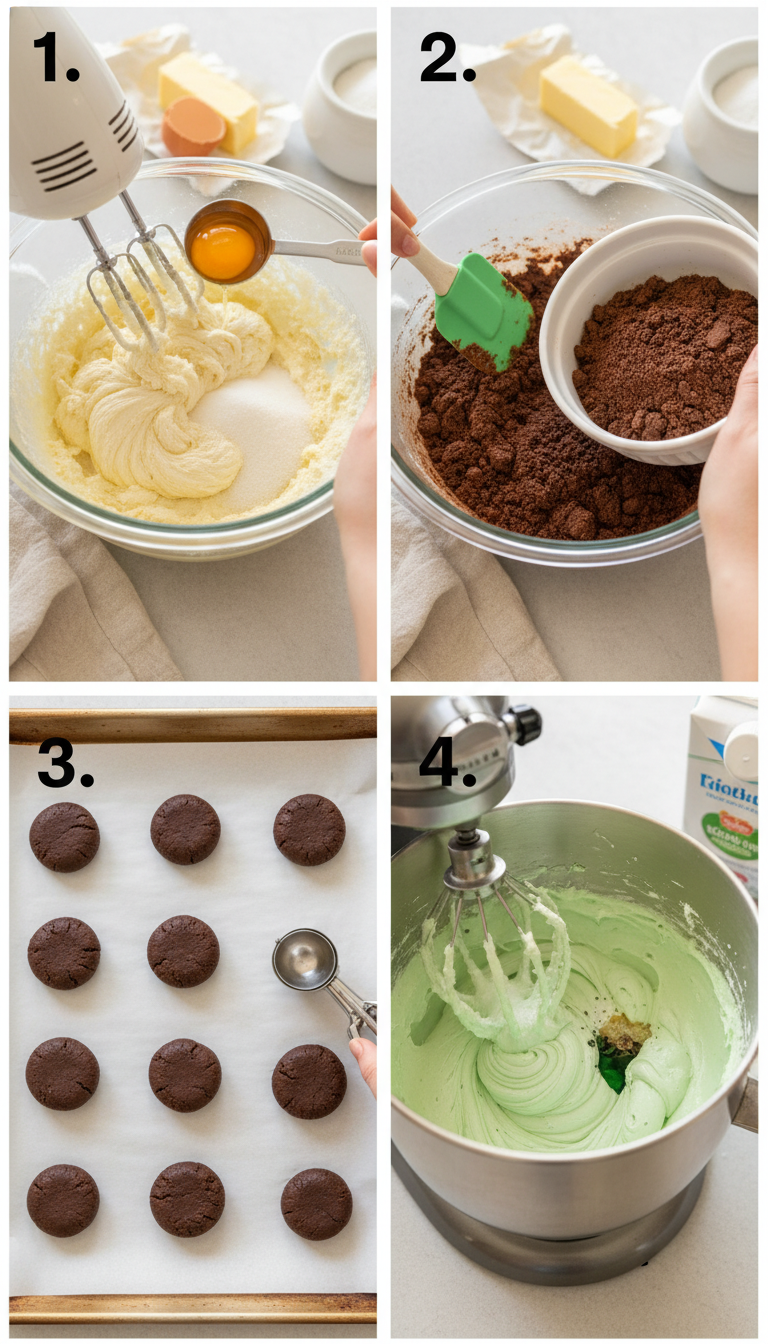
- Preheat Oven: Preheat the oven to 350°F (175°C).
- Cream Wet Ingredients: In a mixing bowl, cream together butter and sugar until fluffy. Add the egg and vanilla, mixing well.
- Combine Dry Ingredients: In another bowl, whisk flour, cocoa powder, baking soda, and salt. Gradually combine the dry ingredients with the wet mixture.
- Portion Dough: Drop rounded tablespoons of dough onto a baking sheet, leaving space between each cookie.
- Bake Cookies: Bake for about 10 minutes until edges are set and centers remain soft. Let cool on the baking sheet for a few minutes before transferring to wire racks.
- Prepare Mint Frosting: Prepare the mint frosting by beating together powdered sugar, butter, milk, mint extract, and food coloring until smooth.
- Frost Cookies: Once cooled, frost each cookie generously with the mint frosting.
- Make Ganache Topping: For the ganache topping, melt chocolate chips with oil in short intervals until smooth; drizzle over frosted cookies.