

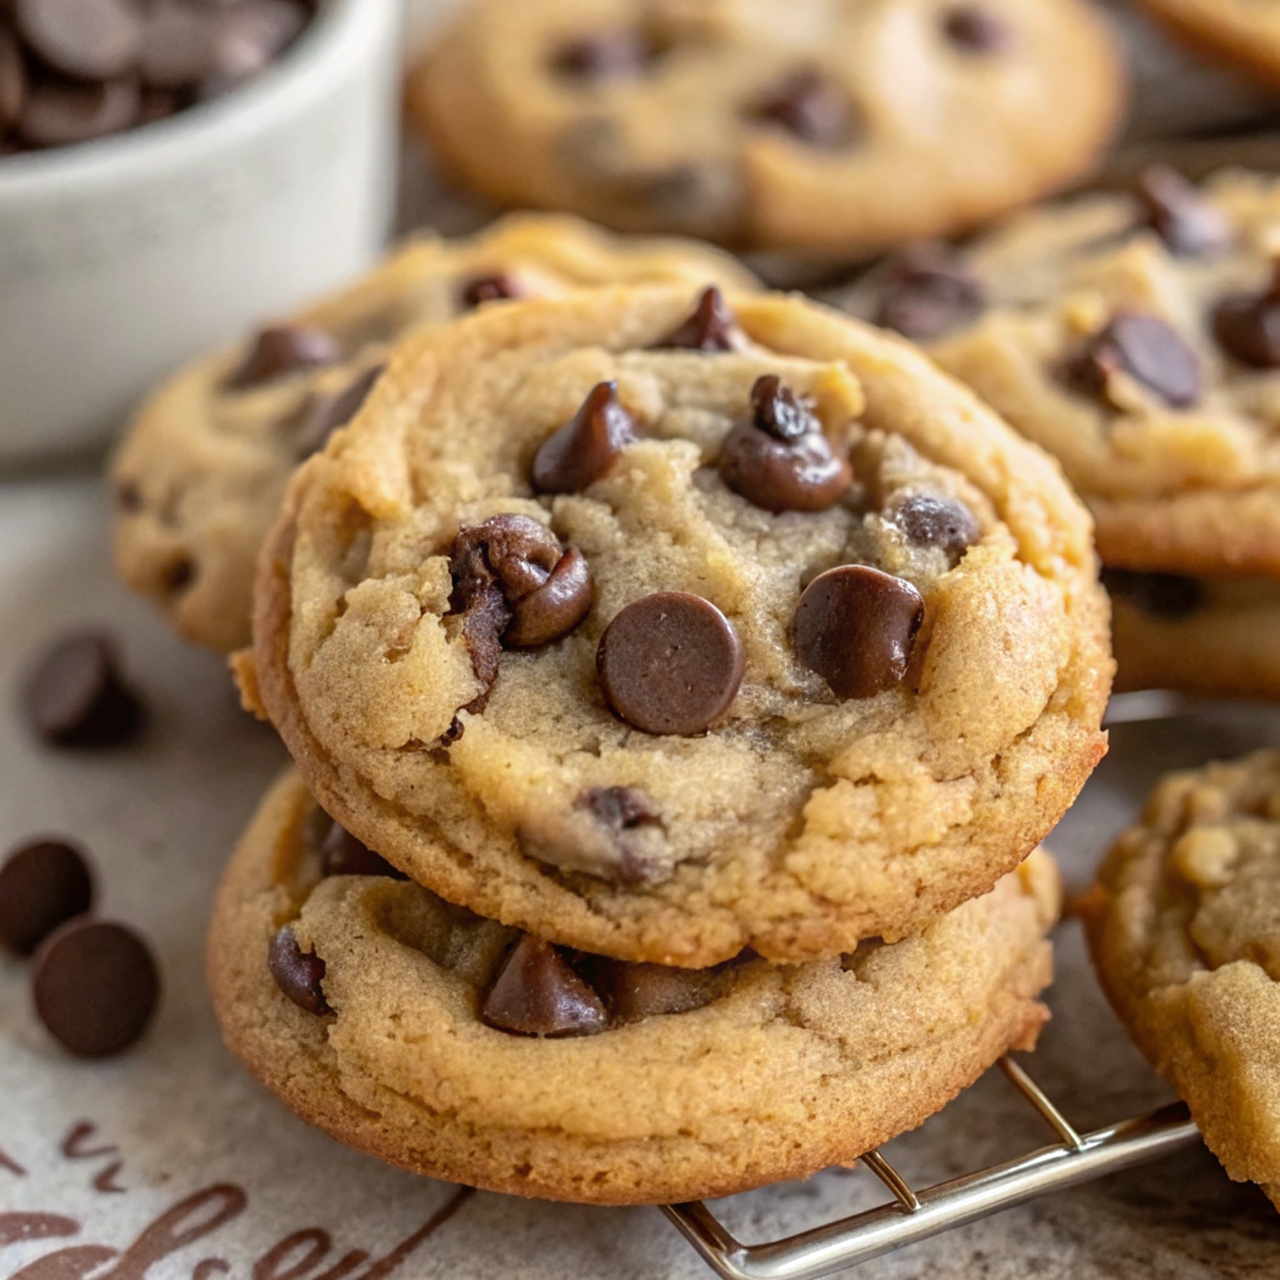
What if the secret to making your kitchen feel like a professional bakery lies in understanding the psychology of visual presentation? Research shows that 75% of our eating experience is determined by how food looks before we even take the first bite. These Easy Peanut Butter Chocolate Chip Cookies aren’t just about achieving that perfect chewy texture—they’re about creating a visual masterpiece that captivates before the first taste. With their golden-brown edges contrasting beautifully against rich, dark chocolate chips and that signature crisscross pattern catching light at every angle, these cookies transform your ordinary baking session into an artistic endeavor. You’ll discover not only how to achieve bakery-quality flavor but also the styling secrets that make each cookie photograph-worthy and irresistibly appealing.
Why Visual Presentation Matters for Easy Peanut Butter Chocolate Chip Cookies
The art of cookie presentation goes beyond mere aesthetics—it’s about creating an emotional connection before the first bite. When we see perfectly arranged Easy Peanut Butter Chocolate Chip Cookies with their distinctive fork marks creating geometric shadows and chocolate chips positioned like tiny jewels, our brains release anticipatory pleasure chemicals. This visual appeal is especially crucial for peanut butter cookie variations and chocolate-enhanced treats. According to professional baking experts, the visual contrast between the warm peanut butter base and dark chocolate creates an irresistible appeal that enhances the overall eating experience. Food stylists often reference community discussions about peanut butter desserts to understand what makes these cookies visually compelling to home bakers.
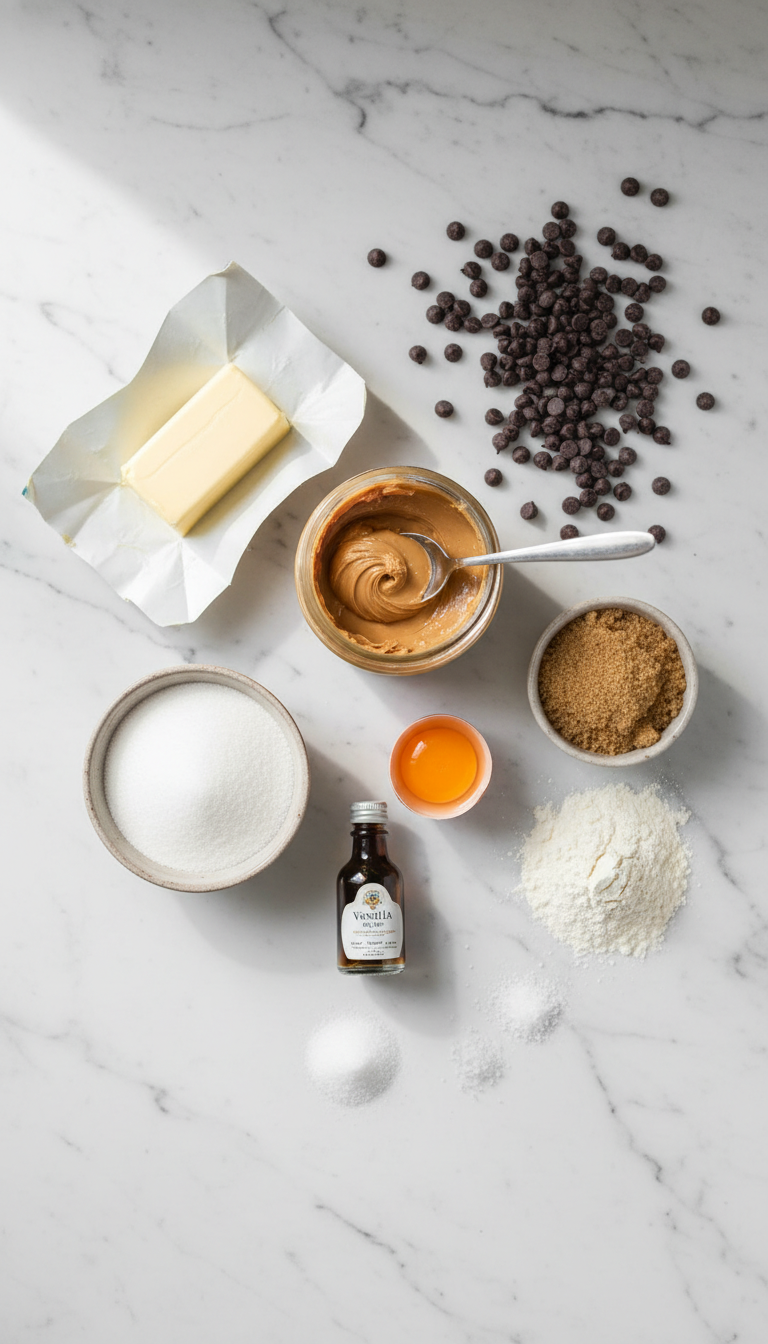
Ingredients for Easy Peanut Butter Chocolate Chip Cookies
|
Ingredient Spotlight for Visual Excellence
Each ingredient in these Easy Peanut Butter Chocolate Chip Cookies serves a specific visual purpose. The melted butter creates that coveted golden sheen that catches kitchen lighting beautifully, while the combination of granulated and brown sugars provides textural interest—the granulated sugar creates subtle sparkles on the surface, and brown sugar contributes to the rich, caramelized color that makes cookies look professionally baked. The peanut butter acts as both flavor base and visual foundation, creating that warm, inviting tan color that contrasts perfectly with dark chocolate chips. When selecting chocolate chips, choose ones that maintain their shape during baking to ensure those perfect little dark jewels remain intact and visually striking throughout the cookie surface.
Timing for Perfect Easy Peanut Butter Chocolate Chip Cookies
|
Instructions for Stunning Easy Peanut Butter Chocolate Chip Cookies
|
Behind the Recipe: Visual Design Inspiration
The inspiration for these Easy Peanut Butter Chocolate Chip Cookies came from observing the interplay of warm and cool tones in autumn landscapes—the golden wheat fields dotted with dark earth. This natural color palette translates beautifully to cookies, where the warm peanut butter base mimics sun-kissed grain, and the dark chocolate chips represent rich, fertile soil. The geometric crisscross pattern was inspired by traditional quilting designs, creating visual rhythm and texture that transforms each cookie into a small work of art. The contrast between the smooth peanut butter dough and the irregular chocolate chip placement creates visual interest that keeps the eye engaged, making these cookies as beautiful to look at as they are delicious to eat.
Tips & Tricks for Perfect Easy Peanut Butter Chocolate Chip Cookies
|
Recipe Variations & Substitutions for Easy Peanut Butter Chocolate Chip Cookies
High Contrast Plating Option: Replace regular chocolate chips with white chocolate chips for a striking monochromatic presentation, or use a combination of dark, milk, and white chocolate chips for maximum visual impact.
Textural Twist: Add ¼ cup of finely chopped roasted peanuts to create additional texture and visual interest, sprinkling extra chopped nuts on top before baking for enhanced presentation.
Gluten-Free Adaptation: Substitute almond flour for all-purpose flour (use 1 cup instead of 1¼ cups) for a slightly different texture and color that’s equally beautiful when plated.
Mini Cookie Presentation: Create bite-sized versions using a small cookie scoop for elegant party presentations, reducing baking time to 6-8 minutes and arranging on tiered serving stands for maximum visual impact.
Pairing Ideas for Easy Peanut Butter Chocolate Chip Cookies
These Easy Peanut Butter Chocolate Chip Cookies pair beautifully with cold milk served in clear glasses to showcase the color contrast, or with vanilla-scented coffee in white ceramic mugs that complement the cookies’ golden tones. For elegant presentation, arrange cookies on dark slate boards or rustic wooden platters where the warm cookie colors pop against cool backgrounds. Consider pairing with fresh fruit like sliced apples or pears, whose crisp texture and light colors create beautiful contrast against the rich, warm cookies. For special occasions, serve alongside vanilla ice cream in small glass bowls, creating a classic color palette of cream, gold, and chocolate brown that’s visually stunning and deliciously satisfying.
Nutritional Information
Each Easy Peanut Butter Chocolate Chip Cookie contains approximately 185 calories, with 9g fat, 24g carbohydrates, and 4g protein. The combination of peanut butter and chocolate chips provides essential minerals and antioxidants, while the moderate portion size makes these cookies a satisfying treat that fits well into balanced eating patterns.
Leftover & Reuse Ideas
Transform leftover Easy Peanut Butter Chocolate Chip Cookies into elegant dessert presentations by crumbling them over vanilla ice cream for a beautiful textural contrast, or layer broken pieces in clear glasses with pudding and whipped cream for an attractive trifle. Crushed cookies make excellent pie crust alternatives, creating a golden, nutty base for cheesecakes or cream pies. For gift-giving, package whole cookies in clear cellophane bags tied with ribbon, showcasing their beautiful golden color and chocolate chip distribution.
Serving Suggestions for Maximum Visual Impact
Present these Easy Peanut Butter Chocolate Chip Cookies on white porcelain plates to emphasize their golden color, or arrange them in wicker baskets lined with cream-colored linen for a rustic, homey appeal. For photography or special occasions, place cookies on marble surfaces where the natural veining complements the chocolate chip pattern. Create height variation by using tiered serving stands, positioning larger cookies on the bottom tier and smaller ones above. Garnish plates with a light dusting of powdered sugar or a few strategically placed chocolate chips to echo the cookies’ design. For individual servings, present each cookie on a small dessert plate with a cloth napkin in complementary earth tones, creating an intimate, café-style presentation that highlights the artisanal quality of your homemade treats.
Storage & Reheating Tips
Store Easy Peanut Butter Chocolate Chip Cookies in airtight containers at room temperature for up to one week, placing parchment paper between layers to prevent sticking and maintain their beautiful appearance. For longer storage, freeze cookies in freezer-safe containers for up to three months. To refresh day-old cookies, warm them in a 300°F oven for 2-3 minutes to restore their just-baked appearance and slightly crisp edges. When serving previously frozen cookies, allow them to thaw at room temperature to maintain their optimal texture and visual appeal.
Common Mistakes to Avoid
Overmixing the Dough: This creates tough cookies with a dense appearance instead of the tender, golden texture we want. Mix just until ingredients are combined to maintain that perfect, bakery-style crumb.
Skipping the Chill Time: Warm dough spreads too much during baking, creating flat cookies that lose their defined edges and attractive shape. The 30-minute chill time is crucial for maintaining visual appeal.
Inconsistent Cookie Sizes: Uneven portions create cookies that brown at different rates, resulting in some being perfectly golden while others are over or underbaked. Use a cookie scoop for uniform results.
Overbaking: Cookies continue cooking on the hot pan after removal from the oven. Remove them when edges are just golden to prevent the beautiful color from becoming too dark and losing visual appeal.
- Are Easy Peanut Butter Chocolate Chip Cookies suitable for beginners?
- Absolutely! This recipe is designed for bakers of all skill levels, with simple techniques that consistently produce professional-looking results. The visual cues provided make it easy to achieve perfect cookies every time.
- Can I make Easy Peanut Butter Chocolate Chip Cookies ahead of time?
- Yes! You can prepare the dough up to 24 hours in advance and refrigerate it, or freeze shaped cookie dough balls for up to three months. This actually improves the flavor and helps maintain the cookies’ beautiful shape during baking.
- Why do my Easy Peanut Butter Chocolate Chip Cookies spread too much?
- The most common cause is using warm dough or butter that’s too soft. Always chill the dough for 30 minutes before baking, and ensure your butter is melted but cooled to room temperature before mixing.
- How can I make my Easy Peanut Butter Chocolate Chip Cookies look more professional?
- Focus on uniform sizing using a cookie scoop, create clean crisscross patterns with a fork, and add extra chocolate chips to the tops before baking. Proper cooling on the baking sheet also helps maintain their perfect shape.
- What’s the secret to getting the perfect golden color in Easy Peanut Butter Chocolate Chip Cookies?
- The key is using the right ratio of brown to granulated sugar and baking at exactly 350°F. Watch for edges that just begin to turn golden while centers still look slightly underbaked—they’ll finish cooking on the hot pan for that perfect color gradation.
Frequently Asked Questions
Conclusion
These Easy Peanut Butter Chocolate Chip Cookies prove that exceptional visual presentation and incredible flavor can go hand in hand. By focusing on the artistic elements—from the golden color development to the geometric crisscross patterns and strategic chocolate chip placement—you’ve created more than just cookies; you’ve crafted edible art that captures attention and creates lasting memories. The techniques you’ve learned about color contrast, texture development, and professional presentation will serve you well in all your future baking endeavors, transforming your kitchen into a space where culinary artistry thrives.
Made these Easy Peanut Butter Chocolate Chip Cookies? Drop your twist in the comments, rate the recipe, and tag us on facebook, instagram with #erinrecipes — we might feature your creation!

Easy Peanut Butter Chocolate Chip Cookies Recipe
Ingredients
Instructions
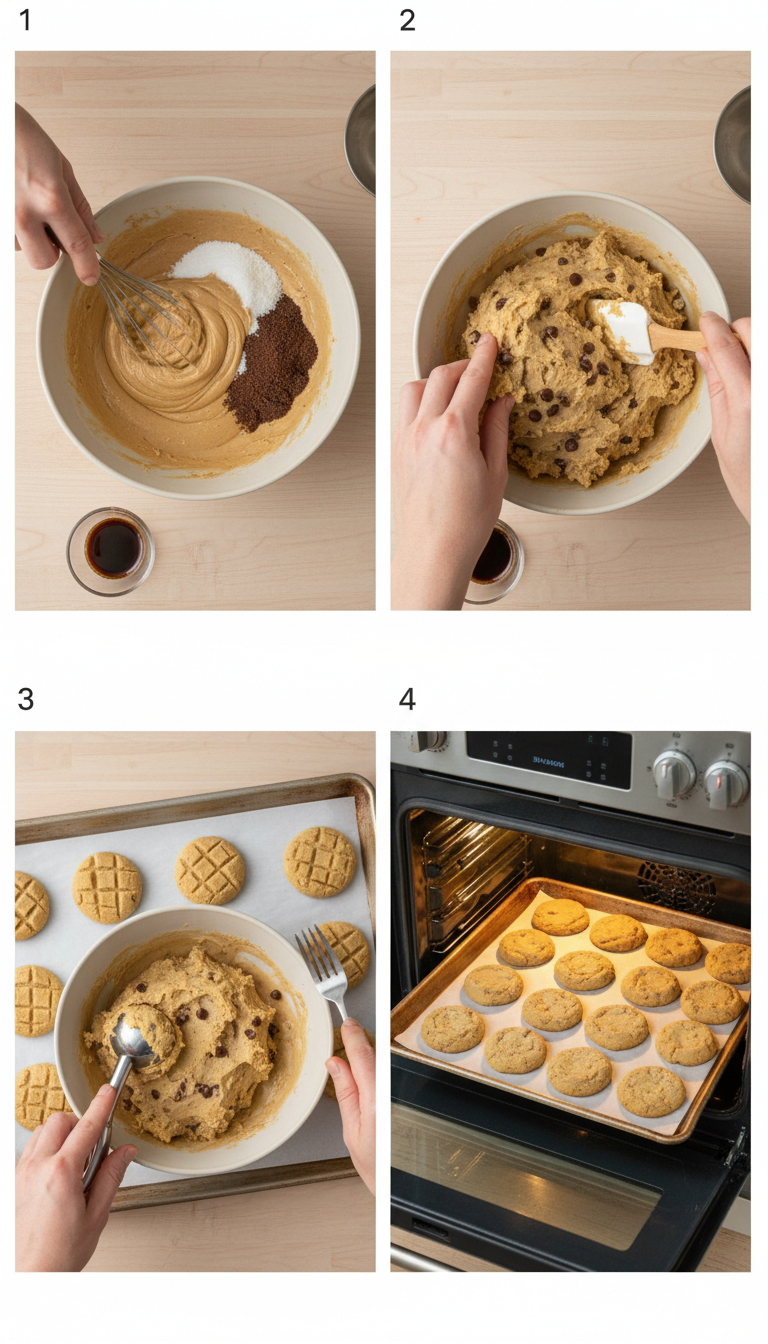
- Combine Wet Ingredients: Mix melted unsalted butter with creamy peanut butter until smooth. Add in both sugars—granulated and brown sugar—and mix until creamy.
- Add Flavor and Leavening: Beat in the vanilla extract, egg, baking soda, and salt until everything is well combined.
- Form the Dough: Slowly add all-purpose flour to the mixture until a dough forms. Gently stir in chocolate chips until evenly distributed.
- Scoop and Chill: Scoop out tablespoon-sized balls of cookie dough onto prepared baking sheets lined with parchment paper or silicone mats. Chill the dough balls in the refrigerator for about 30 minutes.
- Preheat Oven: While the dough chills, preheat your oven to 350°F (175°C).
- Shape Cookies: After chilling, press each cookie dough ball flat using the tines of a fork to create a classic crisscross pattern.
- Bake Cookies: Place your baking sheets in the oven and bake for about 8–12 minutes. Look for a slightly brown bottom and a top that just loses its wet appearance.
- Cool and Store: Once baked, let them cool before transferring them to an airtight container where they can be stored for up to three days or frozen for up to one month.