
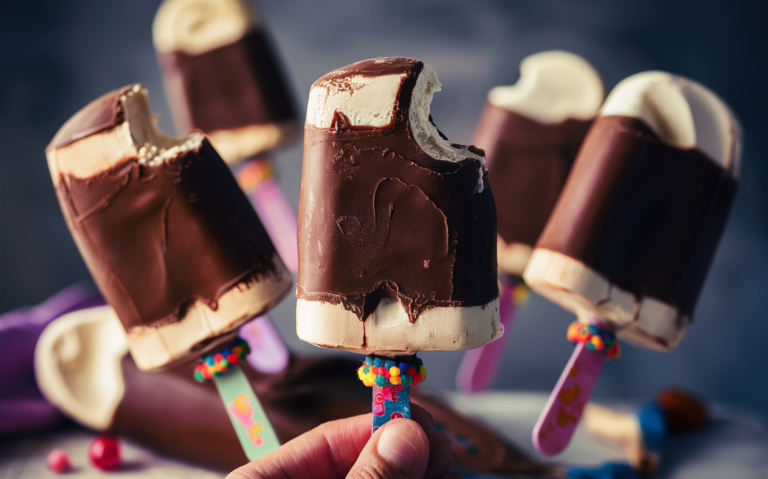
Homemade Eskimo Pie popsicles are a delightful frozen treat that combines the creamy goodness of vanilla ice cream with a rich chocolate coating. Perfect for summer, these nostalgic popsicles are surprisingly easy to make at home, allowing you to indulge in a delicious dessert that’s both fun to create and enjoy
Introduction
The Homemade Eskimo Pie popsicles is a classic frozen dessert that combines the creamy goodness of vanilla ice cream with a rich chocolate coating. This Eskimo Pie popsicle recipe is perfect for summer, nostalgic for childhood, and surprisingly easy to make at home. In this guide, we’ll dive deep into the process of crafting these delightful treats, ensuring you achieve that perfect balance of creamy and crunchy.
Before we begin, it’s worth noting the versatility of this recipe. Whether you want to stick to the classic flavors or experiment with your variations, the possibilities are endless. Plus, making these popsicles at home allows you to control the quality of ingredients, making them potentially healthier and definitely more delicious than store-bought versions. For more on the history and origin of Eskimo Pies, you can refer to this Smithsonian article.
For those interested in exploring more homemade desserts, check out this chocolate sourdough bread recipe for another unique treat you can make from scratch.
Ingredients Needed to homemade Eskimo Pie popsicles
Core Ingredients
To create the classic homemade Eskimo Pie popsicle, you will need the following ingredients:
- Vanilla Ice Cream: The base of your popsicle. Choose a high-quality ice cream for the best results. Alternatively, you can use homemade ice cream for an even more authentic experience.
- Dark or Milk Chocolate: The chocolate coating is what makes the Eskimo Pie so iconic. You can choose between dark or milk chocolate, depending on your preference.
- Coconut Oil: This ingredient is crucial for achieving that perfect, smooth chocolate coating. It helps the chocolate harden quickly when dipped and adds a slight sheen to the coating.
Optional Ingredients for Variations
If you’re feeling adventurous, consider adding some of these ingredients to create variations of the classic recipe:
- Different Ice Cream Flavors: Try using mint, coffee, or strawberry ice cream for a unique twist.
- Add-ins: Consider mixing in nuts, chocolate chips, or even cookie crumbles into the ice cream before freezing.
- Toppings: Crushed nuts, shredded coconut, and colorful sprinkles can be added to the chocolate coating before it hardens.
For more on creative desserts, you might also enjoy this zucchini banana bread recipe, which offers a healthy yet indulgent option.
Step-by-Step Homemade Eskimo Pie popsicles Instructions
Preparation
- Choosing the Right Ice Cream Consistency: Start with slightly softened ice cream, which makes it easier to mold and shape. Allow the ice cream to sit at room temperature for about 10-15 minutes.
- Preparing the Chocolate Coating: Melt your chocolate slowly over a double boiler or in the microwave. Add coconut oil to the melted chocolate, stirring until smooth. This will help the chocolate set properly on the popsicles.
- Setting Up Your Workspace: Before you begin, ensure that you have all your tools and ingredients ready. This includes your popsicle molds, sticks, melted chocolate, and any toppings you wish to use.
Making the Popsicles
- Molding the Ice Cream: Spoon the softened ice cream into popsicle molds. Press it down firmly to avoid air pockets and ensure a smooth, even texture.
- Freezing Process Tips: Insert the popsicle sticks and freeze the molds for at least 4 hours, or until the ice cream is completely solid. Freezing at a lower temperature (around -18°C or 0°F) will give the best results.
- Dipping in Chocolate: Once frozen, carefully remove the popsicles from their molds. Dip each popsicle into the melted chocolate, letting any excess drip off. You can dip each popsicle twice for a thicker chocolate layer.
Finishing Touches
- Adding Toppings: Immediately after dipping, sprinkle your chosen toppings over the chocolate before it hardens. This could be crushed nuts, shredded coconut, or colorful sprinkles.
- Tips for a Smooth Chocolate Coating: Work quickly and ensure that the chocolate is not too hot, as it may melt the ice cream. If you notice any imperfections, you can dip the popsicle again.
- Final Freeze: After dipping and adding toppings, place the popsicles back in the freezer for 10-15 minutes to set the chocolate completely.
Troubleshooting Common Issues
Even with a simple recipe like this, some common issues may arise. Here’s how to troubleshoot them:
Soft Ice Cream Before Dipping
If your ice cream starts to soften too much before you can dip it in chocolate:
- Solution: Melt the chocolate slowly, stirring frequently. If it becomes too thick, add a small amount of coconut oil to thin it out. For more tips on perfecting your popsicles, you can refer to this guide.
Overheated Chocolate
Overheating chocolate can cause it to become thick and difficult to work with:
- Solution: Melt the chocolate slowly, stirring frequently. If it becomes too thick, add a small amount of coconut oil to thin it out.
Difficulties in Dipping
If the chocolate doesn’t coat the popsicles evenly:
- Solution: Make sure the chocolate is warm but not hot. You can also try double-dipping the popsicles to achieve a thicker coating.
Healthier Alternatives and Customizations Homemade Eskimo Pie popsicles
Creating a healthier version of the homemade Eskimo Pie popsicle is easy and allows you to enjoy this treat guilt-free.
Healthier Ice Cream Alternatives
- Low-Fat or Dairy-Free Ice Cream: Substitute traditional ice cream with low-fat, sugar-free, or dairy-free options like almond or coconut milk ice cream.
- Homemade Ice Cream: Making your own ice cream allows you to control the ingredients, reducing sugar content or using organic products.
Healthier Chocolate Options
- Dark Chocolate: Opt for dark chocolate with at least 70% cocoa content. It’s richer in antioxidants and lower in sugar. If you’re looking for healthier options, this guide on ice cream alternatives can be helpful.
- Alternatives to Coconut Oil: While coconut oil is a common choice, you can also use avocado oil for a healthier option.
Additions for Extra Nutrition
- Fruits, Nuts, and Seeds: Mixing in fruits, nuts, or seeds into the ice cream before freezing adds nutritional value. Consider using berries, chia seeds, or almonds.
- Natural Sweeteners: Replace any added sugars with natural sweeteners like honey or maple syrup.
For those interested in making even more health-conscious choices, you might find the why is sourdough the healthiest bread article insightful.
Comparison: Homemade Eskimo Pie popsicles vs. Store-Bought Eskimo Pies
Advantages of Homemade
- Flavor Control: When you make your popsicles at home, you have complete control over the ingredients. This allows you to choose high-quality, organic, or specialty items that might not be available in store-bought versions.
- Freshness: Homemade Eskimo Pie popsicles are fresher, as they don’t sit in a store freezer for weeks or months before being eaten.
- Customization: You can experiment with different flavors, add-ins, and toppings, something that’s not possible with store-bought versions.
Nutritional Differences
- Calories and Additives: Store-bought Eskimo Pies often contain preservatives and higher levels of sugar. By making them at home, you can reduce sugar content and avoid unnecessary additives.
- Ingredient Quality: Homemade popsicles can be made with organic dairy, natural sweeteners, and quality chocolate, making them a healthier option overall.
Taste and Texture Comparison
- Homemade Freshness: The taste of fresh homemade popsicles often surpasses that of store-bought ones, which may have been stored for long periods.
- Chocolate ‘Snap’: The chocolate coating on homemade Eskimo Pies tends to be crisper and more satisfying than the mass-produced versions.
Homemade Eskimo Pie popsicles: (FAQ) Section
What is the Best Chocolate to Use for Eskimo Pie Popsicles?
The best chocolate to use is one with a high cocoa content, such as dark chocolate with 70% cocoa. It offers a richer flavor and healthier profile than milk chocolate.
Can I Use Homemade Ice Cream Instead of Store-Bought?
Absolutely! Using homemade ice cream allows you to control the ingredients and tailor the flavor to your liking. Plus, it often results in a creamier texture.
How Long Do Homemade Eskimo Pie Popsicles Last in the Freezer?
These popsicles can last up to 2 months in the freezer if stored properly in an airtight container. This ensures they remain fresh and free of freezer burn.
Can I Make This Recipe Dairy-Free or Vegan?
Yes, you can substitute dairy-based ice cream with a vegan alternative such as coconut milk or almond milk ice cream. Use dark chocolate that’s free of dairy for the coating.
How Do I Avoid Air Bubbles in the Chocolate Coating?
To avoid air bubbles, ensure that the chocolate is smooth and that you dip the popsicles in one continuous motion. Gently tap theback and gently shake off any excess chocolate after dipping. This will help ensure a smooth, even coating.
What Are Some Creative Variations for Eskimo Pie Popsicles?
There are numerous ways to get creative with your homemade Eskimo Pie popsicles:
- Flavor Infusions: Add extracts like peppermint or almond to the chocolate or ice cream for a unique flavor twist.
- Themed Popsicles: Tailor your popsicles to holidays or seasons. For example, add crushed candy canes for a Christmas-themed treat or pumpkin spice for a fall variation.
- Gourmet Additions: Experiment with adding a sprinkle of sea salt on the chocolate coating, or infuse the chocolate with espresso powder or chili flakes for an adult twist.
Creative Variations of Homemade Eskimo Pie popsicles
Homemade Eskimo Pie popsicles are already a delightful treat, but there’s always room for creativity. Here are a few ideas to take your popsicles to the next level.
Flavor Infusions
- Mint Chocolate Chip: Add a few drops of mint extract to the melted chocolate or the ice cream base.
- Caramel Swirl: Before freezing the ice cream, swirl in some homemade or store-bought caramel sauce for a rich, gooey surprise in each bite.
- Fruit Purees: Mix in fruit purees such as strawberry, raspberry, or mango into the ice cream for a fruity twist.
Themed Popsicles
- Holiday Variations: Add crushed candy canes to the chocolate coating for a festive Christmas treat. Use pumpkin spice in the ice cream for a fall-themed Eskimo Pie.
- Patriotic Popsicles: For a 4th of July theme, consider layering red, white, and blue ice cream flavors before dipping them in chocolate.
Gourmet Additions
- Sea Salt: Sprinkle a little sea salt on the chocolate coating right after dipping for a sweet and salty flavor profile.
- Espresso Powder: Mix a teaspoon of espresso powder into the melted chocolate to give your popsicles a coffee kick.
- Chili Flakes: For a spicy twist, sprinkle some chili flakes into the chocolate for an unexpected heat.
For more unique recipe ideas, check out this guide on creamy pasta Alfredo with red peppers.
Serving and Storing Tips
Properly serving and storing your homemade Eskimo Pie popsicles ensures they remain delicious and fresh for as long as possible.
Serving Suggestions
- For Parties: Serve the popsicles on a platter lined with crushed ice to keep them cold. You can also add labels indicating the different flavors or toppings.
- On-the-Go Treat: Wrap each popsicle in wax paper or parchment paper and tie it with a ribbon for a portable, mess-free treat.
Proper Storage Techniques
- Storage Containers: Store the popsicles in an airtight container or wrap them individually in plastic wrap to prevent freezer burn.
- Freezer Temperature: Keep the popsicles stored at a consistent, low temperature to maintain their texture and flavor.
Shelf Life Considerations
- Longevity: Homemade Eskimo Pie popsicles can be stored in the freezer for up to 2 months. Always check for signs of freezer burn before serving.
Conclusion
Creating homemade Eskimo Pie popsicles is not only a fun and rewarding experience but also allows for endless customization to suit any taste. Whether you stick to the classic vanilla and chocolate combo or venture into more adventurous flavors and toppings, these popsicles are sure to be a hit.
By following the detailed steps outlined in this guide, you’ll be able to craft the perfect Eskimo Pie popsicles at home. Don’t forget to share your creations with family and friends—they might just become your new go-to treat for special occasions or everyday indulgence.