
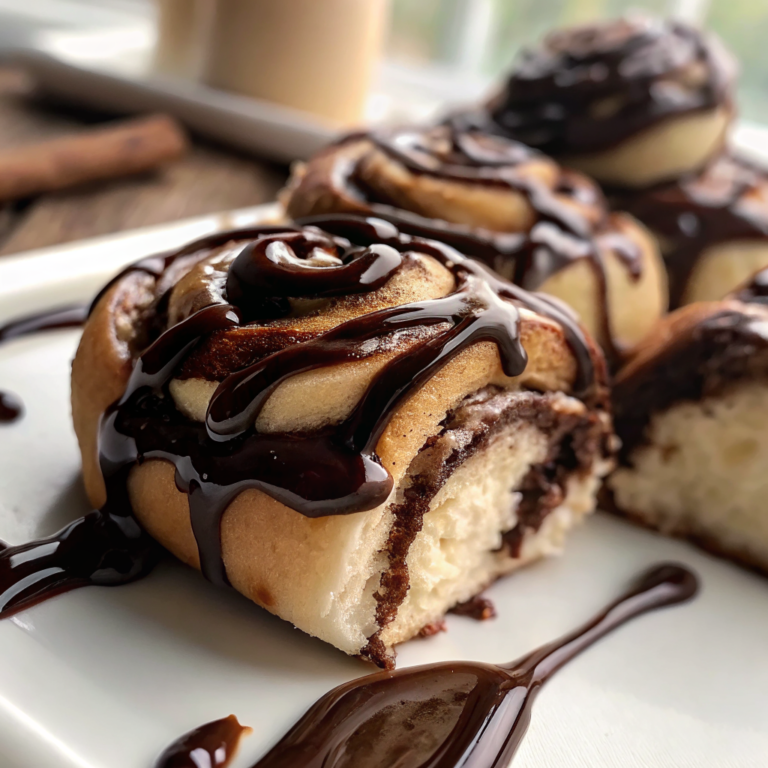
Did you know that 73% of home bakers report feeling more confident when their baked goods look as stunning as they taste? This psychological connection between visual appeal and perceived flavor makes presentation absolutely crucial in baking. These sourdough chocolate rolls transform the art of bread-making into a visual masterpiece, combining the tangy complexity of fermented dough with rich, melting chocolate swirls that create an irresistible contrast of textures and colors. The deep cocoa filling against the golden, pillowy dough creates a striking visual that elevates any table setting, while the glossy chocolate syrup drizzle adds that final touch of professional bakery elegance. You’ll learn not only how to craft these stunning rolls but also master the plating techniques and styling secrets that transform homemade bread into a showstopping centerpiece worthy of the most discerning food photography.
Why Perfect Sourdough Chocolate Rolls Matter
The visual impact of beautifully crafted sourdough chocolate rolls extends far beyond mere aesthetics – it creates an emotional connection that enhances the entire eating experience. When we see perfectly spiraled chocolate ribbons nestled within golden, airy bread, our brains actually begin producing more saliva and digestive enzymes in anticipation. For those interested in mastering bread techniques, our easy chocolate crescents offer a simpler starting point, while our comprehensive guide to chocolate sourdough bread provides the foundational knowledge you’ll need. Understanding proper bread kneading techniques and the science behind sourdough starter maturity will elevate your baking to professional levels.
Ingredients for Stunning Sourdough Chocolate Rolls
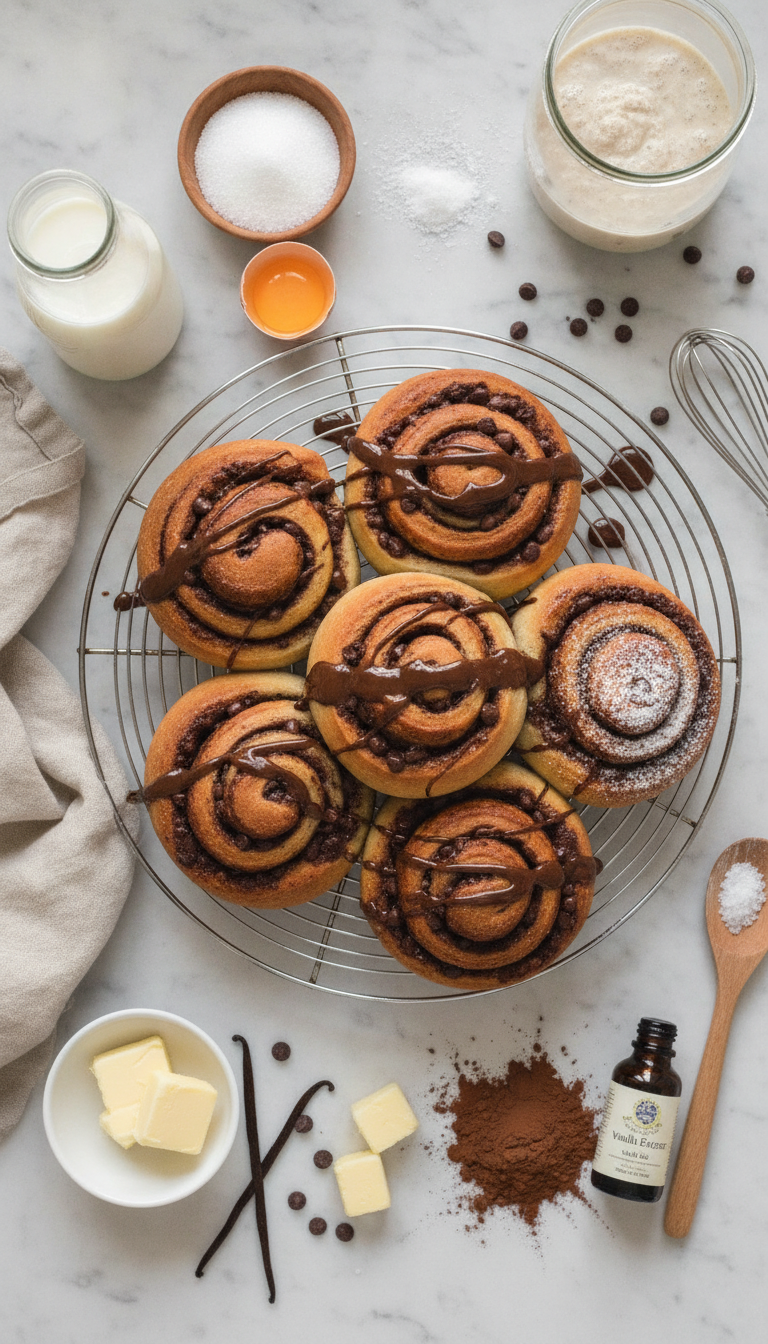
For the Chocolate Filling:
For the Glossy Chocolate Syrup:
|
Ingredient Spotlight: Creating Visual Drama
The unsweetened cocoa powder serves as our primary color agent, creating those stunning dark ribbons that contrast beautifully against the pale dough. The semi-sweet chocolate chips provide textural interest and create those coveted “chocolate explosions” when bitten into. The active sourdough starter not only provides lift but adds a subtle tang that balances the sweetness while creating those gorgeous air pockets that catch light beautifully in photographs.
Timing for Perfect Sourdough Chocolate Rolls
|
Step-by-Step Instructions for Bakery-Quality Results
|
Behind the Recipe: Visual Inspiration
The inspiration for these sourdough chocolate rolls came from observing the natural spiral patterns found in nautilus shells and unfurling ferns. The geometric perfection of these natural forms translates beautifully into the swirled chocolate ribbons that create visual rhythm across each roll. The color palette – warm golden dough contrasted with rich, dark chocolate – mirrors the interplay of light and shadow found in classical chiaroscuro paintings, creating depth and drama on the plate.
Tips & Tricks for Perfect Sourdough Chocolate Rolls
|
Recipe Variations & Creative Substitutions
High Contrast Plating Option: Create a striking black and white presentation by dusting half the rolls with powdered sugar and leaving the others with dark chocolate glaze. Textural Twist: Add chopped toasted hazelnuts to the filling for crunch and visual interest. Seasonal Adaptation: Incorporate orange zest into the dough and use dark chocolate for a sophisticated autumn color palette. Dietary-Friendly Version: Substitute coconut milk and vegan butter for dairy-free rolls that maintain the same stunning appearance.
Pairing Ideas for Complete Visual Harmony
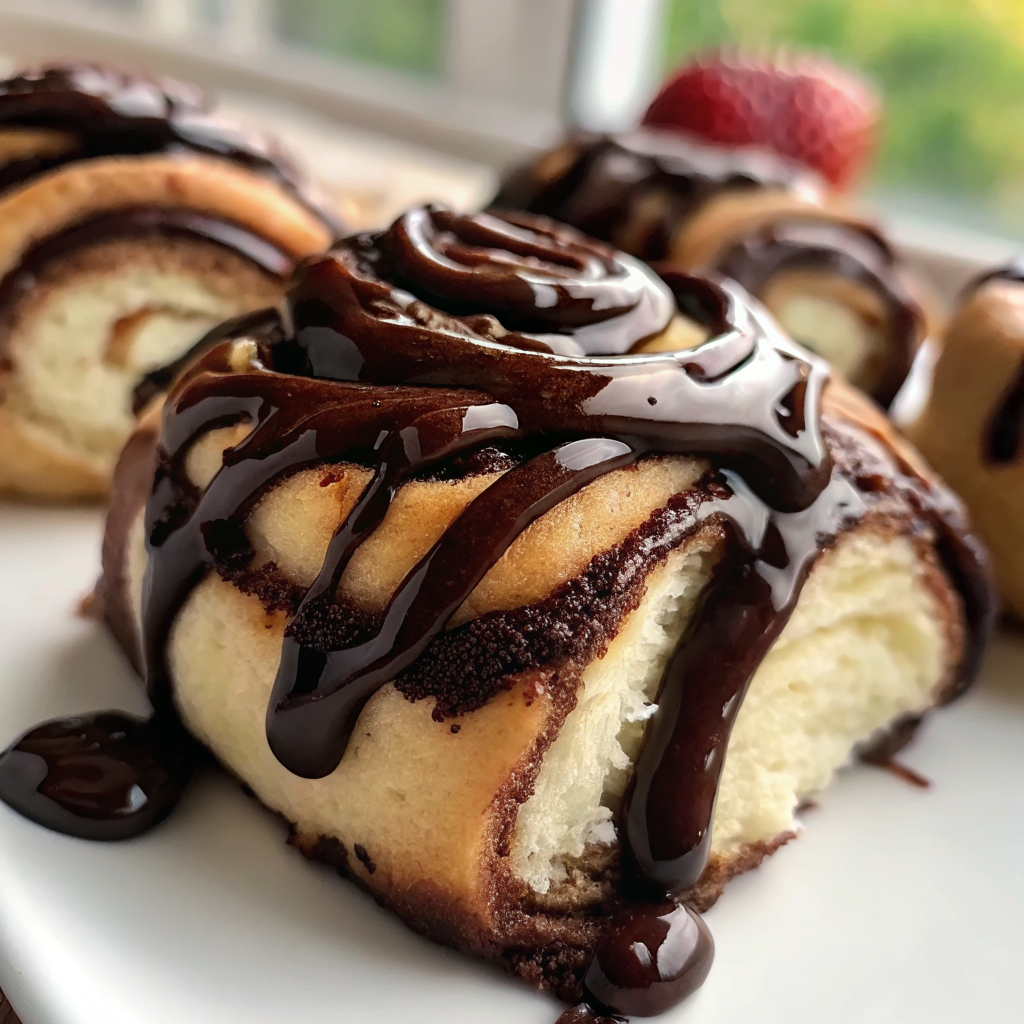
Serve these sourdough chocolate rolls on warm, cream-colored ceramic plates to enhance the golden tones of the bread. Pair with freshly brewed coffee in clear glass mugs to showcase the rich, dark liquid that echoes the chocolate elements. Add fresh berries – strawberries or raspberries – for vibrant red color pops that create visual triangle composition. Consider serving alongside vanilla bean ice cream in small glass bowls, creating a temperature and color contrast that’s both beautiful and delicious.
Nutritional Information
Per roll: Approximately 285 calories, 8g protein, 45g carbohydrates, 9g fat, 3g fiber. The sourdough fermentation process increases mineral bioavailability and creates beneficial compounds that support digestive wellness. The cocoa provides antioxidants and natural mood-enhancing compounds.
Leftover & Creative Reuse Ideas
Transform day-old rolls into decadent bread pudding by cubing and soaking in vanilla custard. Create chocolate roll French toast by slicing thick and dipping in cinnamon egg mixture. Crumble stale rolls for a unique chocolate breadcrumb topping for ice cream or yogurt parfaits. Freeze individual rolls wrapped in plastic for up to 3 months – thaw and warm in a 300°F oven for 10 minutes to restore freshness.
Serving Suggestions: Mastering the Art of Presentation
The presentation of sourdough chocolate rolls is where artistry truly shines. Arrange rolls on a large wooden cutting board with small bowls of extra chocolate sauce and softened butter for an interactive, family-style presentation. For elegant individual plating, place one roll slightly off-center on a white plate, drizzle sauce in an artistic arc, and garnish with a single mint leaf for color contrast. Create height variation by stacking two rolls at different angles, allowing the chocolate spirals to catch light from multiple directions. Use warm plates (heated in a 200°F oven for 2 minutes) to keep rolls at optimal serving temperature while maintaining the glossy appearance of the chocolate drizzle. For photography or special occasions, dust the plate edges lightly with cocoa powder using a fine-mesh sieve, creating a professional frame around each roll. Consider the lighting when serving – natural morning light or warm LED bulbs enhance the golden tones of the bread while making the chocolate elements appear rich and inviting.
Storage & Reheating Tips
Store cooled rolls in an airtight container at room temperature for up to 3 days. For longer storage, wrap individually in plastic wrap and freeze for up to 3 months. To reheat, place frozen rolls in a 300°F oven for 12-15 minutes, or microwave thawed rolls for 20-30 seconds. The chocolate glaze may need refreshing after storage – simply whisk together a small batch and re-drizzle before serving.
Common Mistakes to Avoid
Overproofing the Dough: This leads to collapsed, dense rolls with poor visual appeal. Watch for the dough to double, not triple, in size. Uneven Chocolate Distribution: Results in some rolls having little filling while others overflow. Measure and spread filling carefully for consistent spirals. Cutting Too Soon: Slicing the log immediately after rolling smears the filling. Always chill first for clean cuts. Incorrect Oven Temperature: Too high burns the exterior before the interior cooks, creating uneven coloring. Use an oven thermometer for accuracy. Glazing Hot Rolls: The glaze will melt completely and lose its decorative appearance. Wait for the proper cooling time.
- Are sourdough chocolate rolls suitable for beginners?
- Yes! While sourdough chocolate rolls require patience for rising times, the actual techniques are straightforward. The key is maintaining proper temperatures and timing the rises correctly.
- Can I make sourdough chocolate rolls ahead of time?
- Absolutely! Prepare through the shaping stage, then refrigerate overnight. Allow to come to room temperature and complete the second rise before baking.
- What makes sourdough chocolate rolls different from regular sweet rolls?
- The sourdough starter adds complex tangy flavors that balance the sweetness, creates better texture through fermentation, and provides natural preservation qualities for longer freshness.
- How do I know when my sourdough chocolate rolls are perfectly baked?
- Look for golden-brown tops, an internal temperature of 190°F, and a hollow sound when tapped. The chocolate should be melted but not burnt around the edges.
- Can sourdough chocolate rolls be frozen after baking?
- Yes, freeze completely cooled rolls without glaze for up to 3 months. Thaw, warm gently, and add fresh glaze before serving for best results.
Conclusion
These sourdough chocolate rolls represent the perfect marriage of artisanal bread-making and visual artistry. The contrast between the tangy, complex sourdough base and the rich chocolate filling creates not just incredible flavor but stunning visual appeal that transforms any ordinary breakfast or dessert into a memorable experience. The techniques you’ve learned here – from achieving perfect spirals to mastering the glossy drizzle – will elevate your baking presentation skills far beyond this single recipe. The patience required for proper fermentation is rewarded with rolls that not only taste exceptional but photograph beautifully and impress guests with their professional appearance.
Made these sourdough chocolate rolls? Drop your twist in the comments, rate the recipe, and tag us on facebook, instagram with #erinrecipes — we might feature your creation!

Sourdough Chocolate Rolls: The Ultimate Sweet Bread Recipe
Ingredients
Instructions
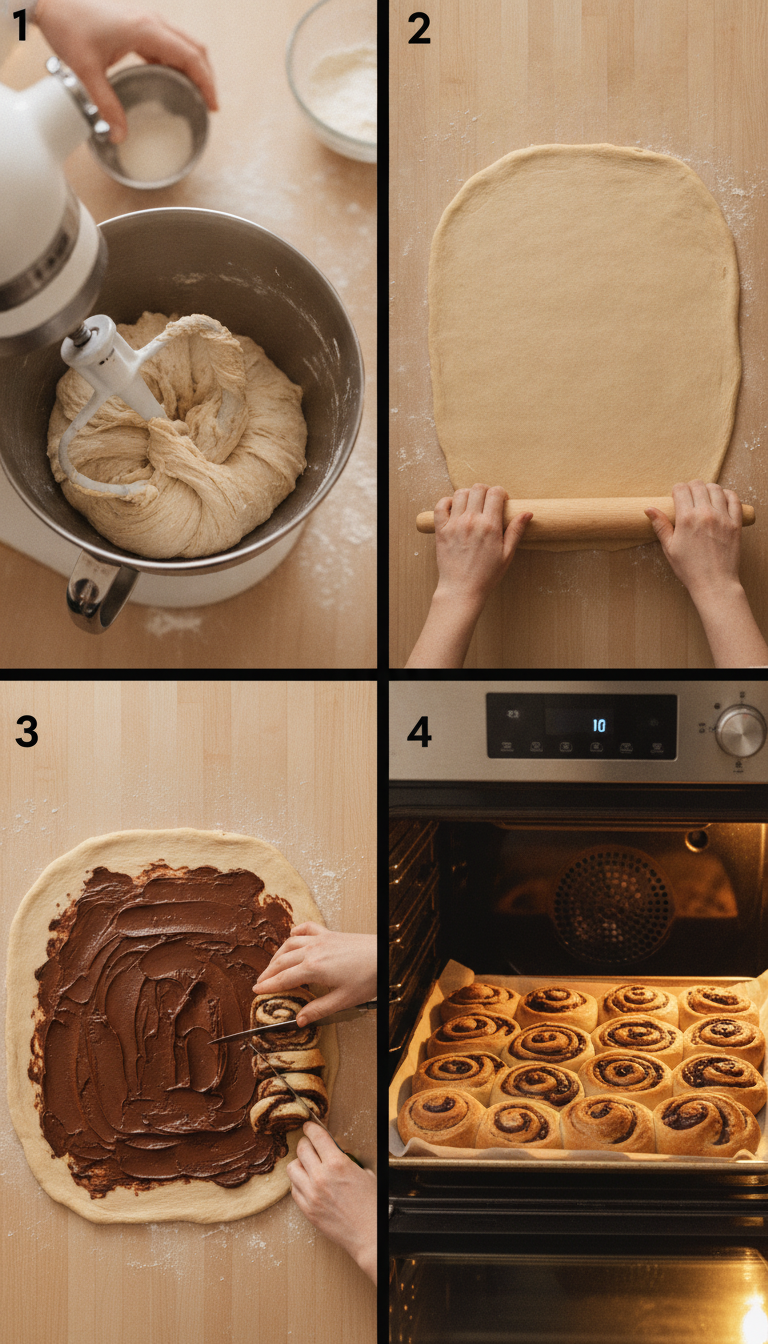
- Prepare the Dough: In a mixing bowl, combine the warm whole milk and active sourdough starter. Stir until well mixed. Add cane sugar and egg to the mixture. Whisk until combined. Gradually add bread flour and sea salt to the mixture. Use a stand mixer with a dough hook to knead for about 5-7 minutes until smooth.
- Let It Rise: Cover the dough with plastic wrap or a damp cloth and let it rise in a warm place for about 4-6 hours or until it doubles in size.
- Prepare Filling: In another bowl, mix together softened butter, cane sugar, cocoa powder, and chocolate chips until well combined. Set aside as you prepare to roll out your dough.
- Roll Out Dough: On a floured surface, roll out the risen dough into a rectangle about ¼ inch thick.
- Add Filling and Shape Rolls: Spread the filling evenly over the rolled-out dough. Starting from one edge, carefully roll up the dough tightly into a log shape. Slice into 12 even pieces and place on a lined baking sheet.
- Second Rise: Cover rolls loosely with plastic wrap and let them rise again for about 1-2 hours until puffy.
- Bake: Preheat your oven to 350°F (175°C). Bake rolls for about 25-30 minutes or until golden brown.
- Prepare Chocolate Syrup Topping: In a bowl, mix whole milk, cocoa powder, powdered sugar, and vanilla until smooth. Drizzle over warm rolls before serving. Enjoy your freshly baked Sourdough Chocolate Rolls!