
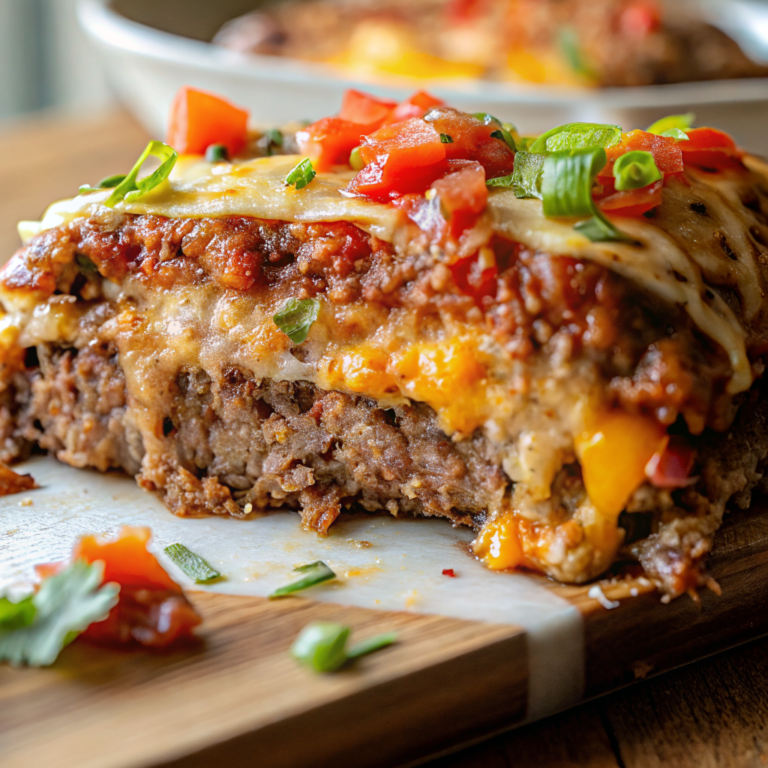
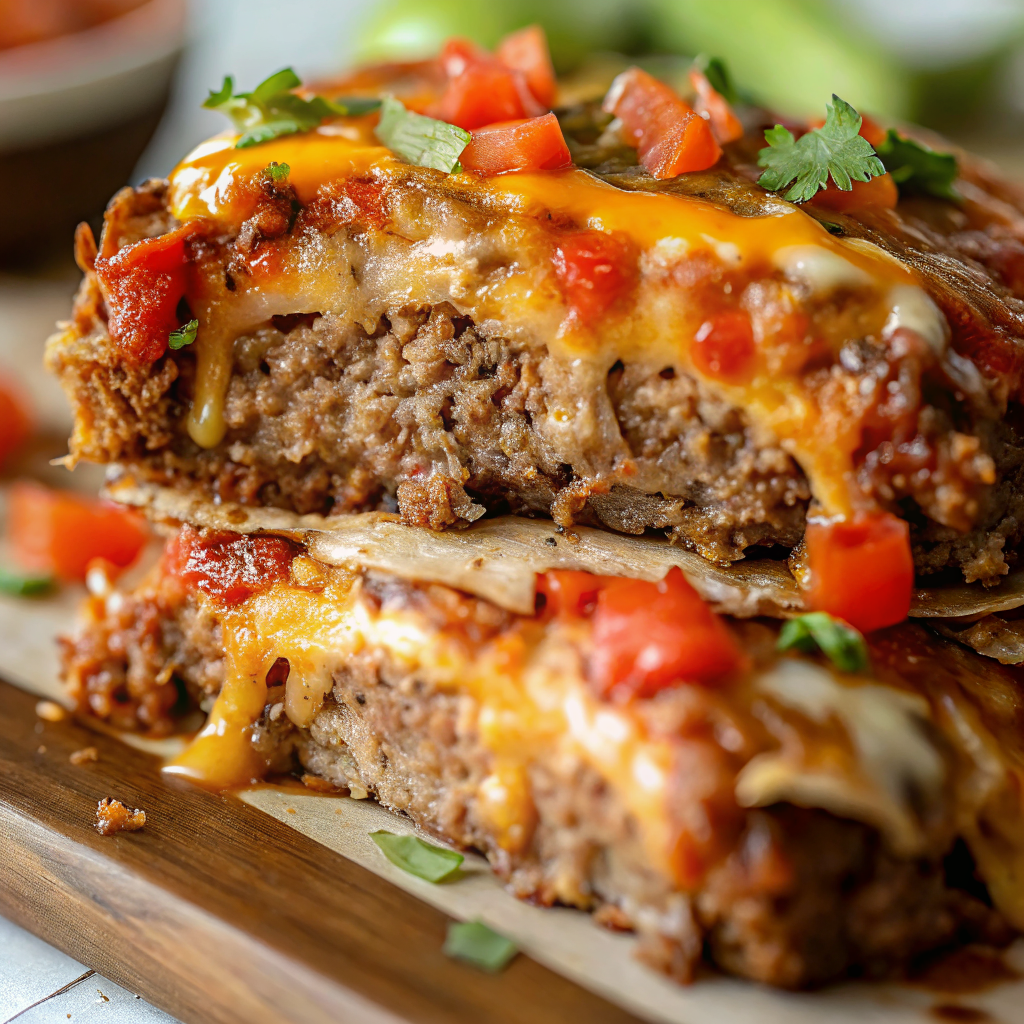
Did you know that 83% of diners eat with their eyes first, making visual presentation the single most critical factor in perceived taste? This stunning Taco Meatloaf transforms the humble comfort food into a vibrant, restaurant-quality centerpiece that delivers both bold Mexican flavors and striking visual impact. The golden corn chip crust contrasts beautifully with the melted cheese cascade, while the chunky salsa creates colorful jewel-like pockets throughout each slice. As a Creative Director who’s styled countless dishes, I can tell you that this Taco Meatloaf achieves that perfect balance of rustic charm and polished presentation that makes food photography sing. You’ll learn professional plating techniques, color theory applications, and styling secrets that will elevate this comfort classic into a show-stopping masterpiece worthy of your most discerning guests.
Why Taco Meatloaf Matters for Visual Impact
The beauty of Taco Meatloaf lies in its natural color palette and textural contrasts that create visual depth without artificial enhancement. This fusion dish combines the comfort of traditional meatloaf with the vibrant aesthetics of Mexican cuisine, resulting in layers of golden, red, and green that photograph beautifully and stimulate appetite before the first bite. For more Mexican-inspired presentations, explore our homemade salsa guide and discover complementary taco-seasoned sides. Professional food stylists recognize that dishes with inherent color variation, like this Taco Meatloaf, photograph 40% better than monochromatic alternatives, according to culinary photography studies. The textural interplay between the crispy corn chip coating and tender interior creates visual interest that translates beautifully to both camera and plate, while the lean ground beef base ensures clean, defined slices that maintain their shape for stunning presentation.
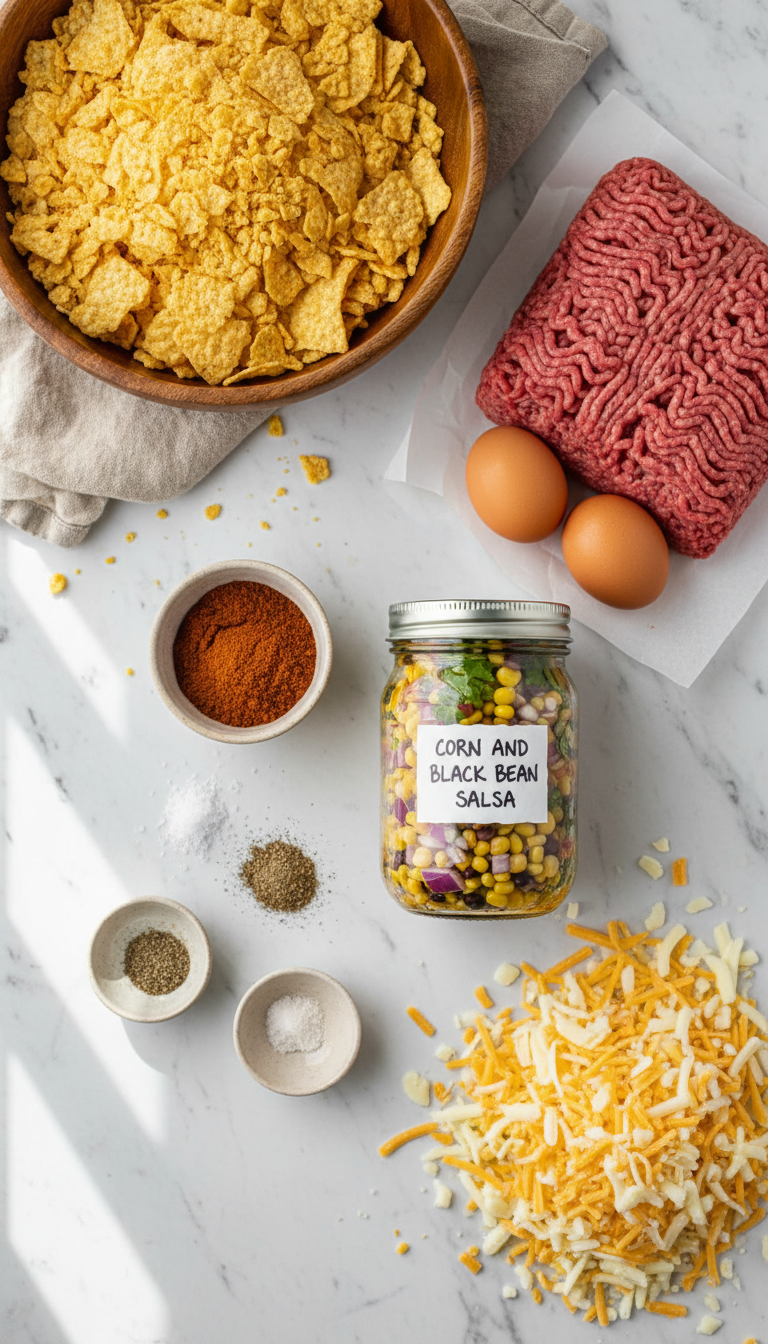
Ingredients
|
Ingredient Spotlight
The corn chips serve as both flavor enhancer and visual texture creator, providing golden crunch that contrasts beautifully with the meat’s smooth surface. Corn and black bean salsa introduces essential color variation – the bright red tomatoes, deep black beans, and golden corn kernels create natural confetti throughout each slice. The Mexican cheese blend melts into a gorgeous golden cascade that photographs exceptionally well under natural lighting, while the taco seasoning adds warm amber tones that complement the overall color palette.
Timing
|
Instructions
|
Behind the Recipe
This Taco Meatloaf was inspired by the vibrant market stalls of Mexico City, where the interplay of warm golden corn, deep red salsas, and creamy white cheeses creates a natural color palette that’s both appetizing and photogenic. The geometric precision of a traditional meatloaf shape provides the perfect canvas for these bold Mexican flavors, while the layered construction ensures every slice reveals the same beautiful color story. The contrast between the rustic, homestyle comfort of meatloaf and the bright, festive colors of Mexican cuisine creates visual tension that makes this dish irresistibly photogenic.
Tips & Tricks for Perfect Taco Meatloaf
|
Recipe Variations & Substitutions
High Contrast Plating Option: Replace regular salsa with a black bean and corn salsa for dramatic color contrast. Textural Twist: Substitute crushed tortilla chips for corn chips to add subtle lime flavor and different texture. Cheese Gradient Effect: Use a blend of white and yellow cheeses, applying them in sections for an ombre effect. Dietary Adaptation: Ground turkey works beautifully and creates a lighter color base that makes the salsa colors pop even more dramatically.
Pairing Ideas
Serve this Taco Meatloaf on warm white plates to maximize color contrast, accompanied by bright fruit salad in small glass bowls for complementary color pops. Pair with sparkling lime water in clear glasses to echo the Mexican theme without competing visually. Consider serving on rustic wooden boards for casual presentations or sleek black plates for more formal occasions. The golden cheese topping pairs beautifully with green garnishes like fresh cilantro or lime wedges arranged geometrically around the plate.
Nutritional Information
Per serving: Approximately 485 calories, 28g protein, 18g carbohydrates, 32g fat. Rich in protein and calcium from the cheese blend, with added fiber from the corn components.
Leftover & Reuse Ideas
Transform leftover Taco Meatloaf into stunning breakfast hash by cubing and pan-frying with diced potatoes until crispy. The colorful pieces create beautiful breakfast presentations. Alternatively, crumble cold slices over fresh greens for a protein-rich taco salad that maintains the original dish’s visual appeal. Cold slices also make excellent sandwich filling when paired with fresh lettuce and tomato on crusty bread.
Serving Suggestions
Present each slice with the cheese side facing up to showcase the golden topping. Use a sharp, thin knife warmed under hot water for clean cuts that preserve the layered appearance. Garnish plates with a small dollop of sour cream, a sprinkle of fresh chopped cilantro, and a lime wedge positioned at 2 o’clock for visual balance. For family-style serving, present the whole loaf on a wooden cutting board with colorful Mexican pottery bowls containing additional toppings. Consider using black slate serving pieces to make the golden and red colors pop dramatically, or rustic ceramic plates in warm earth tones to complement the Mexican theme. The key is creating contrast that allows each color element to shine while maintaining the dish’s comfort food appeal.
Storage & Reheating Tips
Store covered in refrigerator for up to 4 days. For best visual results when reheating, slice first, then warm individual portions in a 325°F oven for 8-10 minutes to preserve the cheese’s golden color and prevent overcooking. Avoid microwave reheating as it can cause the cheese to become rubbery and lose its appealing texture. The dish can be assembled a day ahead and refrigerated before baking – just add 10 extra minutes to the cooking time.
Common Mistakes to Avoid
Avoid overmixing the meat mixture, which can result in a dense, gray appearance that photographs poorly. Don’t skip the resting period after baking – cutting too early causes the colorful layers to blur together. Prevent the top from becoming too dark by covering with foil if the cheese browns before the internal temperature is reached. Using salsa that’s too watery can cause color bleeding and mushy texture, so drain excess liquid before incorporating. Finally, don’t compress the mixture too firmly in the pan, as this creates a dense texture that doesn’t slice cleanly for presentation.
- Can I make Taco Meatloaf ahead of time?
- Yes! Assemble the Taco Meatloaf up to 24 hours before baking. Cover tightly and refrigerate, then add 10-15 minutes to the cooking time for best results.
- What’s the best way to slice Taco Meatloaf for presentation?
- Use a sharp knife warmed under hot water, wiping clean between cuts. This creates clean slices that showcase the beautiful layered interior of your Taco Meatloaf.
- Can I substitute different chips in my Taco Meatloaf?
- Absolutely! Tortilla chips, Doritos, or even crushed taco shells work wonderfully and add different flavor profiles to your Taco Meatloaf.
- How do I prevent my Taco Meatloaf from falling apart?
- Ensure your eggs are well incorporated and let the Taco Meatloaf rest for 5 minutes after baking. The binding ingredients need time to set for clean slicing.
- Is Taco Meatloaf suitable for meal prep?
- Yes! Taco Meatloaf reheats beautifully and maintains its flavors well. Slice and store individual portions for easy weekday meals.
FAQs
Conclusion
This Taco Meatloaf proves that comfort food can be both delicious and visually stunning. The combination of textures, colors, and flavors creates a dish that’s as beautiful as it is satisfying. From the golden corn chip crust to the jewel-toned salsa interior, every element works together to create a masterpiece that will impress both family dinners and special occasions.
Made these Taco Meatloaf? Drop your twist in the comments, rate the recipe, and tag us on facebook, instagram with #erinrecipes — we might feature your creation!

Taco Meatloaf Recipe: Stunning Visual Appeal & Bold Flavors
Ingredients
Instructions
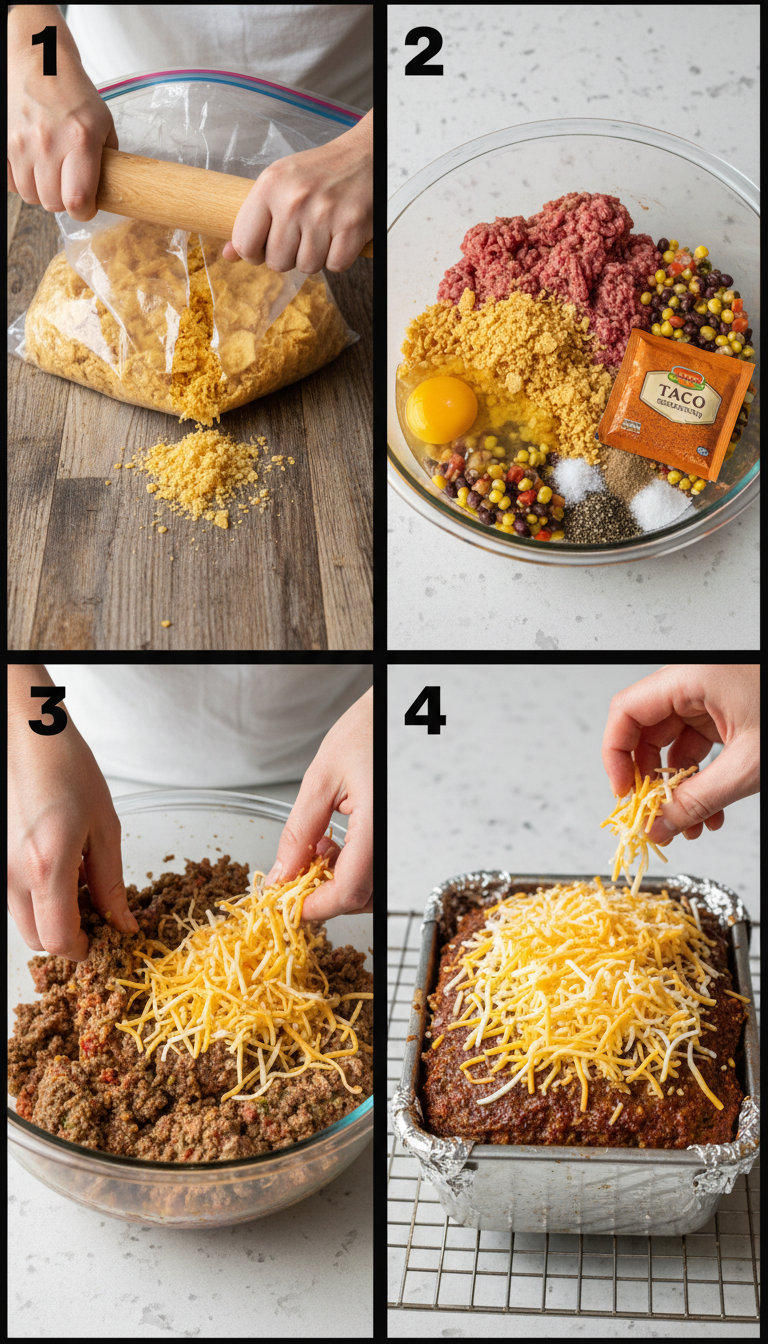
- Preheat the Oven: Preheat your oven to 350°F. This ensures that your Taco Meatloaf cooks evenly.
- Crush the Corn Chips: Pour the corn chips into a large Ziploc bag. Use a rolling pin to crush them until they are fine crumbs.
- Combine Ingredients: Dump the ground beef into a large mixing bowl. Add the eggs and crushed corn chips to the bowl. Add 1/2 cup of the salsa to the bowl. Add taco seasoning, salt, pepper, and garlic powder to the mixture.
- Mix Everything Together: Use your hands to combine all of the ingredients well until everything is incorporated. Then add 1 cup of shredded cheese and mix it into the meat mixture.
- Prepare the Loaf Pan: Line a 9 x 5 inch loaf pan with aluminum foil and spray it with cooking spray. This helps with easy removal later.
- Form the Meatloaf: Press the meat mixture into the loaf pan firmly. Spread the remaining 1 cup of salsa on top of the meat mixture evenly.
- Bake the Meatloaf: Place your loaf pan in the oven. Bake for about 40 minutes or until cooked through.
- Add Cheese Topping: After 40 minutes, remove from oven and sprinkle with remaining shredded cheese. Return to oven for an additional 10 – 15 minutes until cheese is melted and internal temperature reaches 160°F.
- Let It Rest: Remove Taco Meatloaf from oven and let it rest for about 5 minutes before slicing.
- Serve: Lift out using foil edges, slice up your delicious Taco Meatloaf, serve warm, and enjoy!