
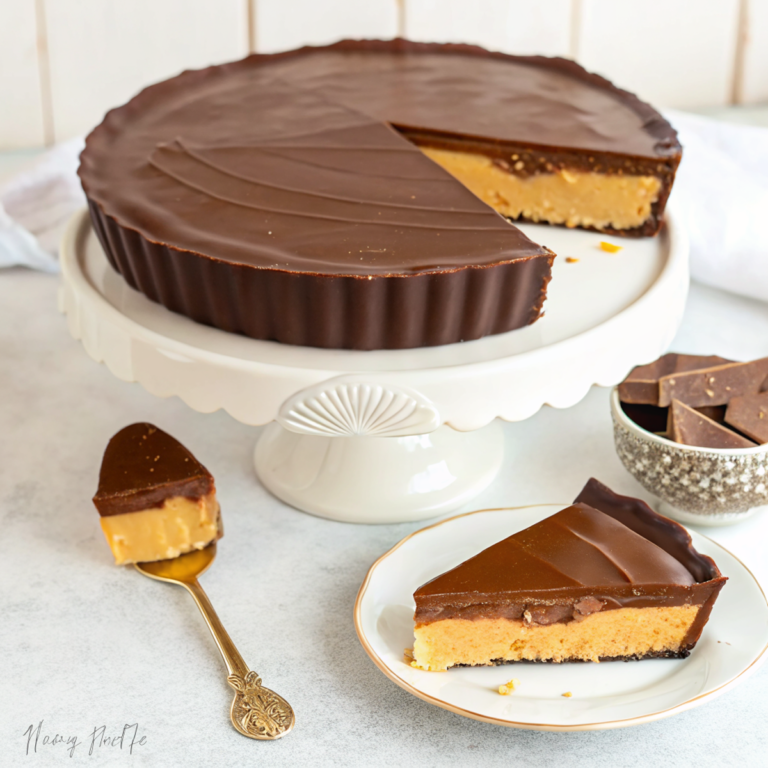
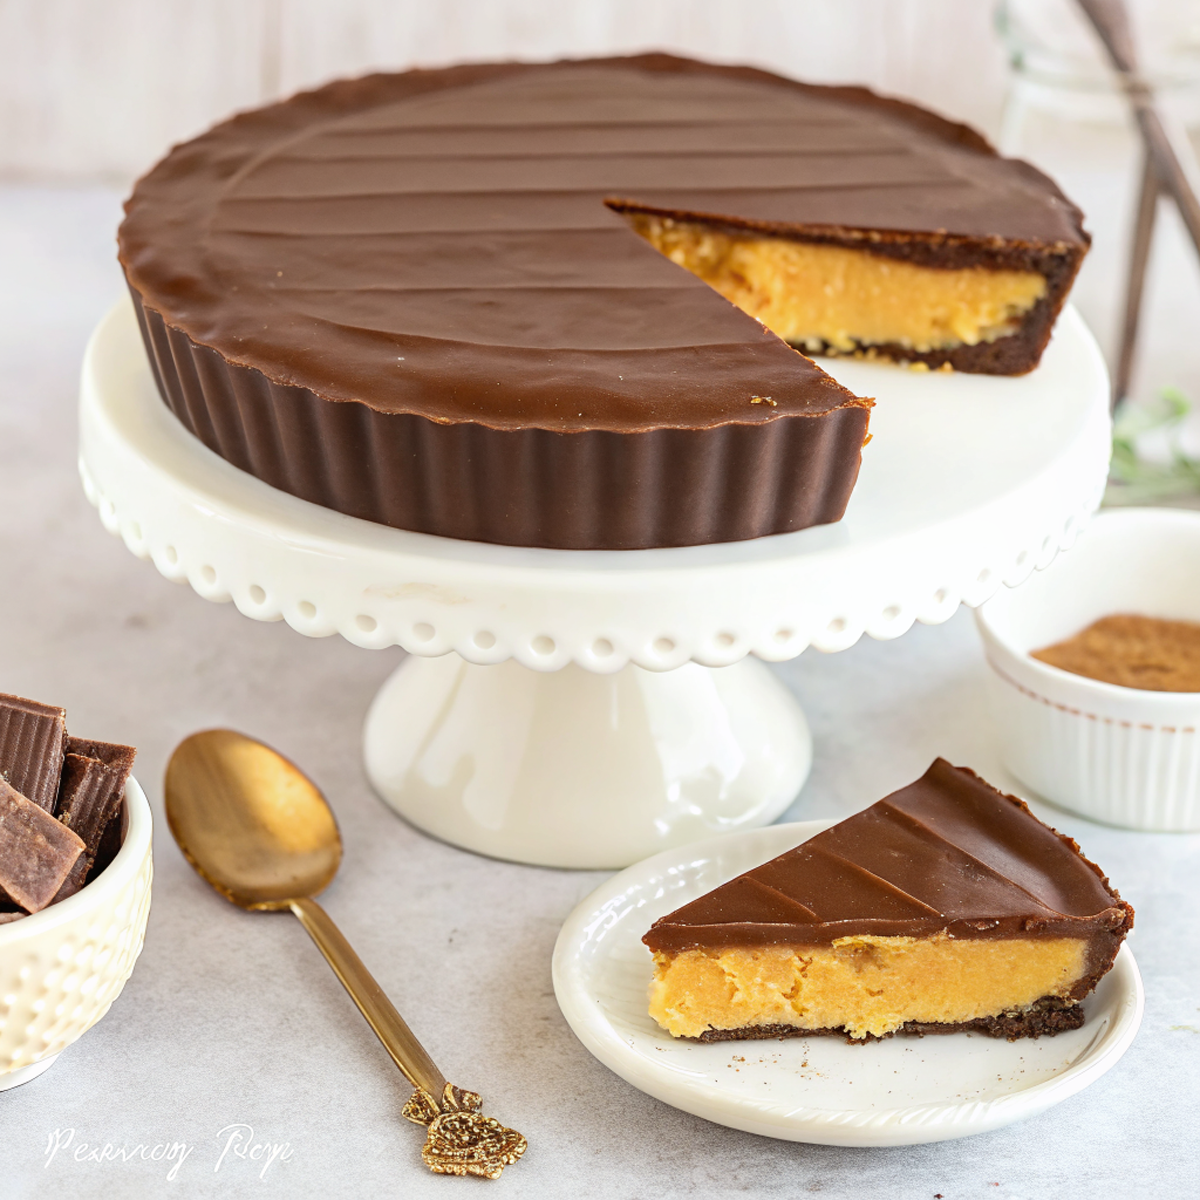
When my neighbor brought over a slice of what she called her “famous Giant Peanut Butter Cup,” I thought she was exaggerating. One bite later, I was completely convinced – and desperately asking for the recipe! This Giant Peanut Butter Cup transforms the beloved candy into an impressive dessert that serves twelve and delivers all the creamy, chocolatey satisfaction you crave. With just four simple ingredients and no baking required, this showstopper proves that the most memorable desserts often come from the simplest techniques. Whether you’re planning a special celebration or just want to surprise your family with something extraordinary, this Giant Peanut Butter Cup will become your go-to recipe for pure chocolate-peanut butter bliss.
Why This Giant Peanut Butter Cup Matters
In a world of complicated dessert recipes, this Giant Peanut Butter Cup stands out for its beautiful simplicity and guaranteed success. It’s the perfect solution when you want to create something that looks professionally made but requires no special skills or equipment beyond a tart pan. The combination of rich chocolate shell and creamy peanut butter filling delivers that nostalgic candy shop experience while serving a crowd. Plus, with no oven time required, it’s an ideal make-ahead dessert that actually improves as it chills.
Behind the Recipe
This recipe was born from my childhood love affair with peanut butter cups and my adult realization that sometimes bigger really is better. I discovered that the key to achieving that perfect candy-like texture lies in the balance between the melted butter and powdered sugar in the filling – it creates that signature fudgy consistency that makes each slice feel like biting into a giant version of your favorite candy.
The technique of tempering chocolate might sound intimidating, but I’ve found that using compound chocolate (candy melts) makes this recipe foolproof for home cooks. If you’re interested in mastering traditional chocolate tempering, this Reddit discussion offers great advice, and for more peanut butter dessert inspiration, Allrecipes has a simple peanut butter fudge recipe that shares similar techniques. For more creative dessert ideas, check out our classic chess pie or explore our collection of Christmas fudge recipes for year-round sweet treats.
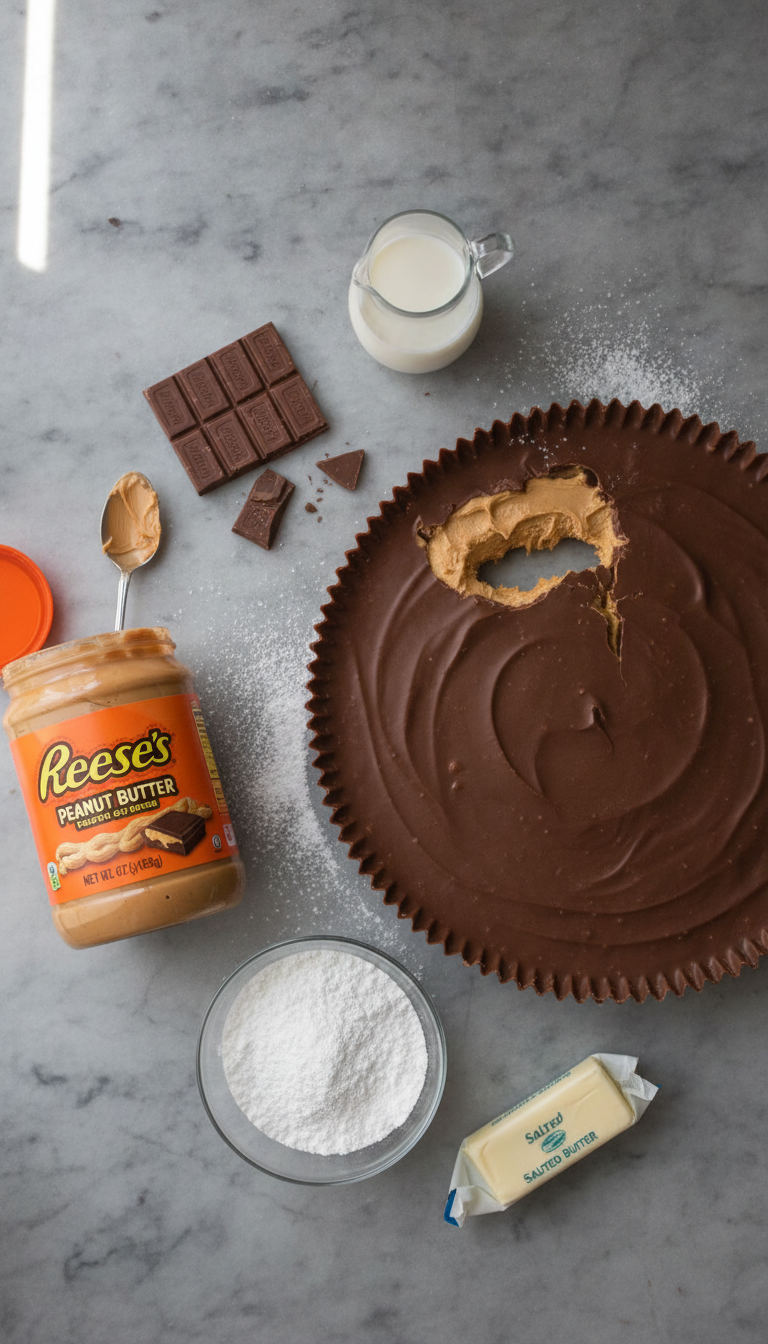
Ingredients
|
Ingredient Spotlight
Reese’s Peanut Butter: Using the actual Reese’s brand isn’t just about brand loyalty – their specific blend of peanut butter has the perfect consistency and flavor profile that mimics the original candy. The slightly sweet, creamy texture works better than natural peanut butter for this recipe.
Powdered Sugar: This is what transforms regular peanut butter into that signature fudgy filling. The fine texture dissolves completely, creating smoothness without grittiness. Always sift it to prevent lumps!
Compound vs. Pure Chocolate: Compound chocolate (candy melts) contains stabilizers that make it easier to work with and less temperamental than pure chocolate. If you choose pure chocolate, tempering is essential for that perfect snap and shine.
Timing
|
Instructions
|
Tips & Tricks for Perfect Giant Peanut Butter Cup
|
Recipe Variations & Substitutions
Crunchy Peanut Butter Version: Substitute crunchy peanut butter for added texture and that satisfying bite. Kids especially love this variation!
White Chocolate Twist: Use white chocolate for the shell to create a beautiful contrast with the peanut butter filling. Add a few drops of vanilla extract to enhance the flavor.
Mini Individual Cups: For busy weeknight entertaining, use a muffin tin to create individual servings. Perfect for portion control and easier serving.
Dairy-Free Option: Use dairy-free chocolate chips and substitute the butter with coconut oil (solid at room temperature) for those with dietary restrictions.
Leftover & Reuse Ideas
Leftover slices (if there are any!) can be chopped and folded into vanilla ice cream for an incredible homemade treat. You can also crumble pieces over brownies before baking, or melt them down to create a decadent sauce for pancakes or waffles. Store wrapped slices in the refrigerator for up to a week, or freeze individual portions for up to three months – perfect for surprise dessert emergencies!
Pairing Ideas
This rich Giant Peanut Butter Cup pairs beautifully with a tall glass of cold milk or a steaming cup of coffee. For special occasions, serve alongside fresh strawberries or a dollop of whipped cream to cut through the richness. A sparkling fruit punch or lemonade provides a refreshing contrast that cleanses the palate between bites.
Serving Suggestions
Present your Giant Peanut Butter Cup on a beautiful cake stand or serving platter for maximum visual impact. Dust the serving plate with a light sprinkle of cocoa powder for an elegant restaurant-style presentation. Cut into 12 wedges and serve each slice with a small dessert fork. For parties, consider cutting smaller pieces – this dessert is incredibly rich, and a little goes a long way!
Nutritional Information
Per serving (1/12 of recipe): Approximately 420 calories, 28g fat, 42g carbohydrates, 8g protein. This dessert provides energy from natural peanut butter proteins and healthy fats, though it should be enjoyed as an occasional treat due to its sugar content.
Common Mistakes to Avoid
Overheating the Chocolate: This causes it to seize and become grainy. Always use gentle heat and stir frequently. If it does seize, don’t panic – sometimes adding a tiny bit of coconut oil can save it!
Rushing the Chilling Process: I know it’s tempting to speed things up, but proper chilling time ensures structural integrity. A rushed shell will crack or collapse under the filling weight.
Uneven Filling Distribution: Take time to press the peanut butter mixture evenly into the shell. Uneven distribution leads to some slices being mostly chocolate while others are all filling.
Dirty Knife Cuts: Not cleaning your knife between cuts creates messy, uneven slices. Remember: hot knife, clean cuts, beautiful presentation!
Storage & Reheating Tips
Store your Giant Peanut Butter Cup covered in the refrigerator for up to one week. The cool temperature maintains the chocolate’s snap and keeps the peanut butter filling at the perfect consistency. For longer storage, wrap individual slices in plastic wrap and freeze for up to three months. To serve frozen slices, let them thaw at room temperature for 10-15 minutes for the best texture. Never microwave to thaw – it will melt the chocolate and ruin the texture.
- Can I make this Giant Peanut Butter Cup with natural peanut butter?
- While possible, natural peanut butter’s oil separation and grittier texture won’t give you that smooth, candy-like consistency. Stick with conventional creamy peanut butter for best results.
- Is this Giant Peanut Butter Cup recipe gluten-free?
- Yes! All the ingredients in this recipe are naturally gluten-free, making it perfect for those with gluten sensitivities or celiac disease.
- How far ahead can I make this Giant Peanut Butter Cup?
- You can make this up to 3 days ahead. In fact, it tastes even better after the flavors have had time to meld together overnight in the refrigerator.
- What’s the best way to cut a Giant Peanut Butter Cup cleanly?
- Always use a hot, dry knife. Dip it in boiling water, dry completely, then make your cut. Clean and reheat the knife between each slice for professional-looking results.
- Can I use dark chocolate instead of milk chocolate for this Giant Peanut Butter Cup?
- Absolutely! Dark chocolate creates a more sophisticated flavor profile and balances the sweetness of the peanut butter filling beautifully. Use the same amount and technique.
FAQs
Conclusion
This Giant Peanut Butter Cup proves that sometimes the most impressive desserts come from the simplest ingredients and techniques. With its perfect balance of rich chocolate and creamy peanut butter filling, it delivers all the nostalgic satisfaction of your favorite candy in a dessert that serves a crowd. The no-bake convenience makes it perfect for busy schedules, while the stunning presentation ensures it’s always the star of any gathering. Whether you’re celebrating a special occasion or just treating your family to something extraordinary, this recipe guarantees smiles and requests for seconds.
Made these Giant Peanut Butter Cup? Drop your twist in the comments, rate the recipe, and tag us on facebook, instagram with #erinrecipes — we might feature your creation!

Giant Peanut Butter Cup – The Ultimate Showstopper Dessert
Ingredients
Instructions
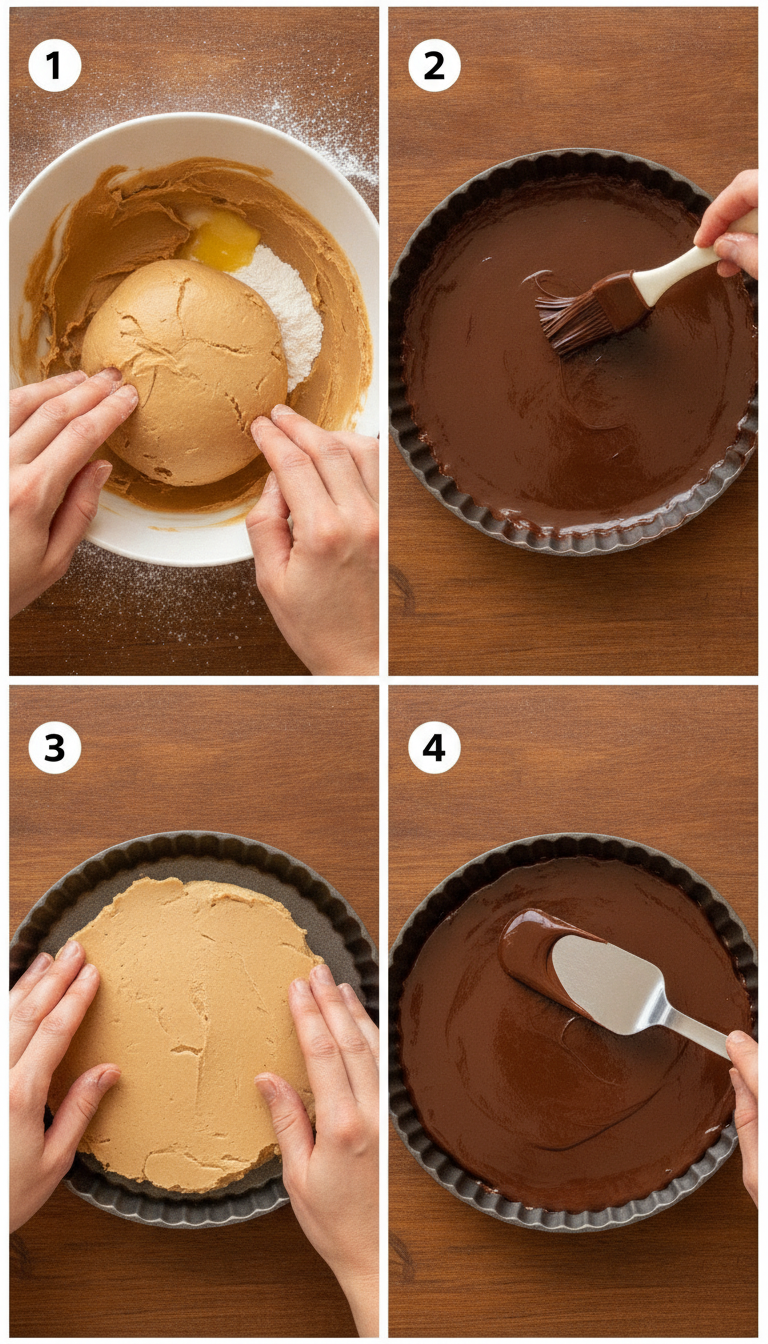
- Prepare Peanut Butter Filling: Spoon the Reese's Peanut Butter into a large mixing bowl. Sift the powdered sugar over the peanut butter. Pour in the melted butter. Stir until the ingredients come together. Use your hands to continue mixing the ingredients together until they form a smooth ball. Set aside.
- Form Chocolate Shell Base: Spoon 8 ounces of melted and tempered pure milk chocolate or 8 ounces of melted compound chocolate (candy melts, melting wafers, almond bark) into the bottom of a 9-inch tart pan. Hold onto the removable bottom, using your thumb, and brush the chocolate over the bottom and up the sides of the pan. As the chocolate thickens, continue to push it up around the edge of the tart pan until you get a nice thick layer around the sides.
- Chill Chocolate Shell: Chill pure chocolate in the refrigerator and compound chocolate (candy melts, melting wafers, almond bark) in the freezer for about 10-15 minutes until hardened.
- Reinforce Chocolate Shell (Optional): If needed, brush another layer of chocolate around the sides and chill until hard.
- Remove and Prepare Shell for Filling: Remove the chocolate shell from the tart pan and carefully peel the removable metal plate from the chocolate. Remove any excess chocolate from the plate, then place it back in the pan. Place the chocolate back in the pan, then add more chocolate to any areas that look too thin. Chill again before filling.
- Add Peanut Butter Filling: Pat the peanut butter fudge filling into a disc and place it into the chocolate shell. Gently press the fudge up against the sides of the chocolate shell.
- Seal with Chocolate Top: Spread the remaining milk chocolate over the top of the fudge making sure it seals around the edge. Chill for 10-15 minutes until hardened.
- Serve the Giant Peanut Butter Cup: Remove the giant chocolate peanut butter cup from the tart pan. Set it on a serving platter. To serve, warm a sharp knife over a flame, a gas stove, or dip it into boiling water then, dry it off. Make a cut using the hot knife. Repeat, to cut the pie into 12 wedges.